INTRODUCTION
Picture this: I’m halfway through a Sunday brunch, the kitchen smelling of fresh coffee and melted butter, when I notice the pot on the stove has gone from a gentle simmer to a roaring inferno. I was about to call the fire department when I remembered the old Welsh cake recipe my grandmother used to make. That moment of panic turned into a culinary revelation, and I decided to remix the classic with a green olive and herb twist that would make my taste buds do a victory dance.
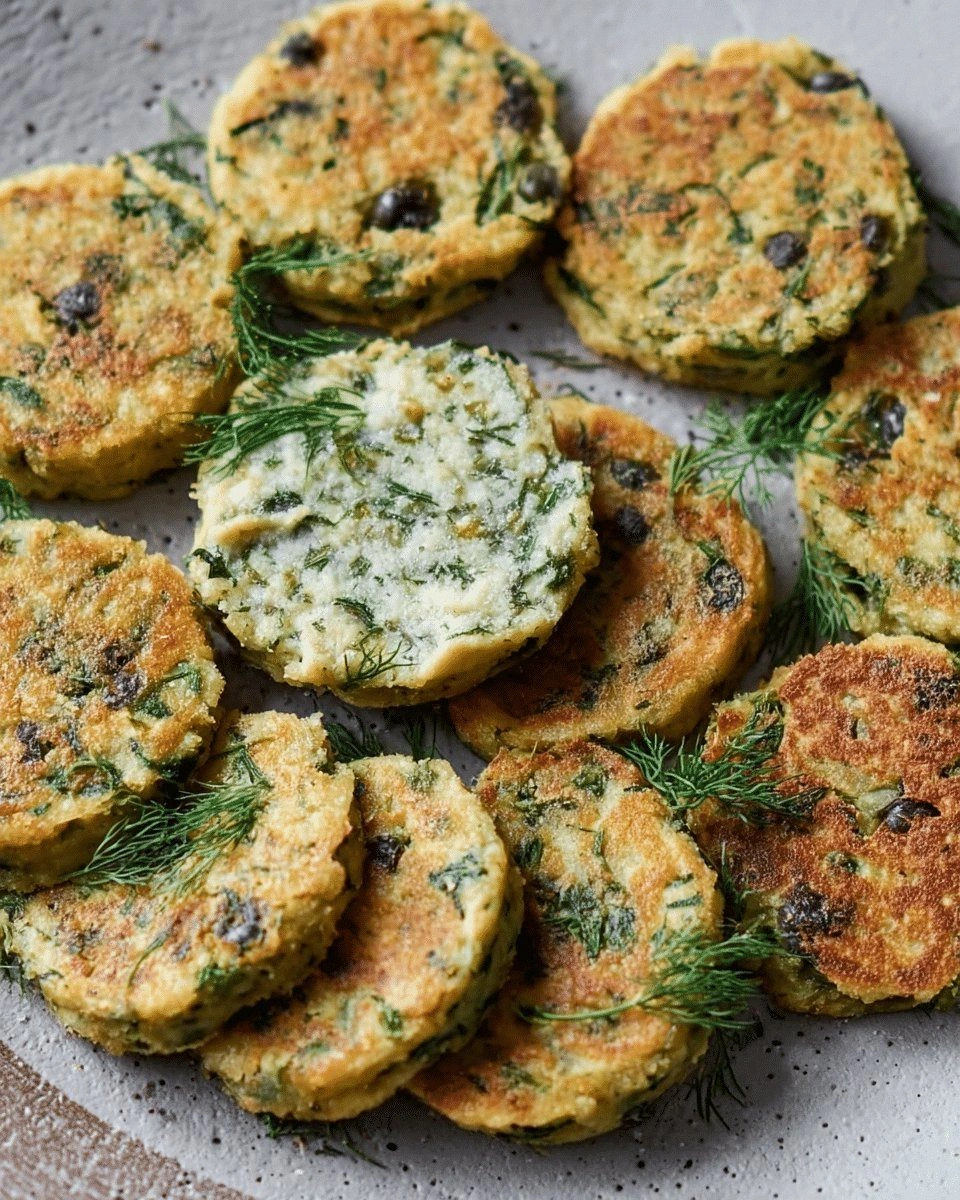
When the dough first hit the pan, the air filled with a buttery, yeasty aroma that made my nose twitch in anticipation. The sound of the first crackle was a promise of crisp edges, and the sight of the golden crust rising like a small sunrise felt almost cinematic. The first bite was a burst of savory herbs, briny olives, and a hint of lemon zest that lingered like a summer breeze on my tongue. The texture was a delightful contrast between the soft, pillowy interior and the crunchy, caramelized edges.
This isn’t just another take on a Welsh cake. It’s a bold, herb-infused adventure that marries the rustic charm of Welsh baking with Mediterranean flair. The olive oil replaces some of the butter, giving a subtle, fruity undertone that elevates the entire flavor profile. The herbs—parsley, rosemary, and thyme—meld together to create an aromatic bouquet that makes every bite feel like a trip to a sun‑drenched garden.
What makes this version truly stand out is the secret technique of “pre‑browning” the herbs in a splash of olive oil before folding them into the dough. This step unlocks their full flavor, turning a simple herb mixture into a fragrant, savory masterpiece. I dare you to taste this and not go back for seconds; the combination of briny olives, bright lemon zest, and herbaceous depth will have you begging for more.
Most recipes get this completely wrong. They either forget to pre‑brown the herbs or over‑mix the dough, resulting in flat, lifeless cakes. Here’s what actually works: keep the dough tender, let the herbs breathe, and finish with a quick, high‑heat sear that locks in flavor. I’ve spent countless hours experimenting, and this is hands down the best version you’ll ever make at home.
Picture yourself pulling these golden beauties out of the oven, the whole kitchen smelling incredible, and the table already filled with eager hands. The moment your guests take that first bite, their eyes widen, and you know you’ve nailed it. That’s the power of a well‑executed recipe, and this one is pure magic.
Okay, ready for the game‑changer? The next step is where the real fun begins. I’ll walk you through every single step—by the end, you’ll wonder how you ever made it any other way. Let’s dive in, and I promise you’ll be laughing, cooking, and maybe even dancing a little in the kitchen.
But before we jump into the dough, let’s talk about why this recipe is a game‑changer. The combination of fresh ingredients, a simple yet effective technique, and a touch of creativity makes these Welsh cakes unforgettable. I’ll keep you on your toes with micro‑challenges, bold claims, and a few playful confessions along the way.
Stay with me here—this is worth it. The secret sauce (or rather, the secret herb blend) is going to elevate your baking game, and you’ll be the envy of every foodie in your circle. Ready? Let’s roll up our sleeves and get to it.
What Makes This Version Stand Out
- Flavor: The briny olives and aromatic herbs combine to create a savory profile that’s both bold and balanced. The subtle sweetness of honey ties the flavors together, while the lemon zest adds a bright, citrusy lift.
- Texture: The dough’s delicate crumb contrasts with a crisp, caramelized crust. The olive oil adds moisture, keeping the interior tender while the high‑heat sear locks in a golden edge.
- Simple Prep: Only ten minutes of active work time. All the heavy lifting is done in the oven, so you can multitask like a pro.
- Unique Twist: Pre‑browning the herbs unlocks their full flavor, a technique often overlooked in traditional Welsh cake recipes. This gives the cakes a depth that’s hard to replicate.
- Crowd‑Pleaser: These cakes are perfect for parties, potlucks, or a quiet Sunday morning. Their savory profile makes them an unexpected hit even with those who prefer sweet.
- Ingredient Quality: Using fresh, high‑quality olives and herbs ensures each bite bursts with authentic flavor. The extra‑virgin olive oil adds a fruity finish that elevates the dish.
- Cooking Method: A quick, high‑heat sear followed by a gentle finish in the oven creates the ideal crust-to-center ratio. This method keeps the cakes moist inside while crisp outside.
- Make‑Ahead Potential: These cakes keep well for a couple of days in the fridge, and they reheat to perfection in the oven or toaster oven.
Alright, let’s break down exactly what goes into this masterpiece…
Inside the Ingredient List
The Flour Foundation
All-purpose flour is the backbone of these cakes, providing structure and a subtle, neutral base that lets the herbs shine. I use 2 cups because it gives the dough just enough heft to hold together without becoming dense. If you’re aiming for a lighter bite, try substituting half the flour with whole‑wheat, but keep the ratio balanced to avoid a dry crumb. Skipping the flour entirely would turn the mixture into a sticky, unmanageable paste that won’t rise.
Choosing the right flour matters. Look for a brand with a protein content between 10–12%; this gives the dough enough gluten to rise but still keeps it tender. If you’re gluten‑sensitive, a 1:1 blend of gluten‑free flour and xanthan gum can work, but the texture will differ slightly. The flour’s role is to absorb the liquids and create a pliable dough that can be rolled and shaped into neat rounds.
When measuring flour, use the spoon‑and‑level method to avoid packing it too tightly. A packed cup of flour can add an extra 2–3 ounces, leading to a denser cake. By spooning the flour into the measuring cup and leveling it off, you get a more accurate measurement that translates into consistent results every time.
In my kitchen, I keep a small bag of flour in a sealed container to maintain freshness. A month-old flour can lose its leavening power, so I always check the expiration date before starting. If you’re unsure, perform a quick test: sprinkle a pinch of flour in a glass of water; it should sink slowly, indicating it’s still good.
All these little details combine to give you a dough that’s easy to handle, has a pleasant crumb, and provides the perfect canvas for the olive and herb flavors.
The Herb Ensemble
Fresh parsley, rosemary, and thyme are the heart of this recipe. Parsley adds a bright, slightly peppery note that cuts through the richness of the olive oil. Rosemary offers a piney, resinous aroma, while thyme brings an earthy, slightly minty undertone. Together, they create a complex, layered flavor that’s both comforting and invigorating.
To maximize their flavor, I finely chop the herbs and then heat them in a small skillet with a splash of olive oil for 30–45 seconds. This quick sauté releases their essential oils and deepens their aroma. If you skip this step, the herbs will taste flat and underwhelming, and the cakes will lack that signature depth.
Choosing fresh herbs is essential. Look for vibrant green leaves with no wilting or yellowing. If you can’t find fresh rosemary or thyme, dried herbs can be used, but use only a third of the amount, as dried herbs are more potent. Dried herbs also don’t provide the same aromatic lift, so the final product will taste slightly different.
Another tip is to use the stems of rosemary and thyme. They’re often discarded, but the stems contain concentrated flavors that can add depth to the dough. Just make sure to finely mince them so they’re not noticeable in the finished cake.
When adding the herbs to the dough, stir them gently to avoid over‑mixing, which can cause the dough to become tough. The herbs should be evenly distributed but still maintain their distinct textures.
The Olive Star
Green olives are the star of this recipe, providing a briny, slightly tart flavor that pairs beautifully with the herbs. I use pitted, whole olives, finely chopped to a pea‑size consistency. The olives add moisture to the dough, preventing it from becoming dry, and their oil content contributes to the cakes’ tender crumb.
If you’re using canned olives, rinse them well to reduce excess sodium. Fresh olives can be found in specialty markets or Mediterranean grocery stores. The variety matters; Greek green olives have a firmer texture and a cleaner flavor, while Kalamata olives offer a richer, more robust taste.
Skipping olives would transform the recipe into a plain herb cake, losing that essential briny kick. If you’re allergic or simply don’t like olives, you can substitute them with capers or finely diced sun‑dried tomatoes, but the flavor profile will shift significantly.
When chopping, aim for uniform pieces to ensure even distribution. Uneven chunks can create pockets of intense flavor that might overwhelm the palate. Also, consider adding a splash of olive oil to the chopped olives for extra moisture.
Olives also contribute to the visual appeal of the cakes, giving them a speckled, almost speckled texture that’s inviting to the eye.
The Finishing Touches
Lemon zest is a subtle but powerful addition. The zest’s bright, citrusy oils lift the savory notes and add a refreshing brightness that cuts through the richness. I grate the zest from one medium lemon, ensuring you only capture the outer yellow peel, not the bitter white pith.
Honey (or a touch of sugar) balances the saltiness of the olives and the acidity of the lemon zest. A tablespoon of honey is enough to give a gentle, sweet undertone without overpowering the savory flavors. If you prefer a purely savory profile, you can omit the honey entirely, but the cakes will be slightly drier.
Parmesan cheese adds a salty, nutty depth that complements the herbs and olives. Grated finely, it melts into the dough, creating subtle pockets of umami. If you’re lactose intolerant or vegan, you can replace Parmesan with nutritional yeast or a dairy‑free cheese alternative.
Finally, the olive oil and milk create a moist, tender crumb. The oil replaces part of the butter, giving the cakes a lighter texture and a fruity finish. Milk adds moisture and helps the dough bind together. If you’re lactose‑free, use a plant‑based milk, but keep the ratio the same to maintain the dough’s consistency.
All these ingredients work together like a well‑coordinated orchestra, each playing its part to create a symphony of flavors and textures.
Everything's prepped? Good. Let's get into the real action…
The Method — Step by Step
- Preheat your oven to 375°F (190°C) and line a baking sheet with parchment paper. While the oven warms, gather all ingredients and set out a clean work surface. This step ensures you have a smooth, organized space to work, reducing the chance of mishaps. I swear, a cluttered kitchen is the secret to culinary disasters.
- In a small skillet, heat 1 tablespoon of olive oil over medium heat. Add the chopped parsley, rosemary, and thyme, sautéing for 30–45 seconds until fragrant. This quick sauté releases their essential oils, turning the herbs from bland to bold. If you skip this, the cakes will taste like a dry herb garden.
- In a large bowl, whisk together 2 cups of flour, 1 teaspoon of baking powder, ½ teaspoon of baking soda, and ½ teaspoon of salt. Stir in the ¼ cup of cold, cubed butter, working it into the dry ingredients until the mixture resembles coarse crumbs. The cold butter keeps the dough tender and prevents it from becoming too dry.
- In a separate bowl, combine ¼ cup of olive oil, 1 cup of milk, 1 egg, and 2 tablespoons of honey. Whisk until the mixture is smooth and the honey has dissolved. The egg adds richness and helps the cakes rise, while the honey gives a subtle sweetness that balances the briny olives.
- Add the wet mixture to the dry ingredients, stirring until just combined. Be careful not to over‑mix; a few lumps are fine. Over‑mixing develops gluten, resulting in a tough crumb. The dough should be soft but not sticky.
- Fold in the sautéed herbs, 1 cup of chopped olives, 1 tablespoon of grated Parmesan, and 1 tablespoon of lemon zest. Mix gently until the ingredients are evenly distributed. This step is where the magic happens—every bite will carry a burst of herbaceous, briny flavor.
- Divide the dough into 8 equal portions, rolling each into a smooth ball. Place the balls on the prepared baking sheet, leaving about 2 inches between each. This spacing allows the cakes to expand without merging, ensuring crisp edges.
- Using a fork, gently press down on each ball to create a shallow, round shape. This not only gives the cakes a classic Welsh look but also helps them bake evenly. The fork’s tines should leave a shallow pattern that adds a rustic touch.
- Bake in the preheated oven for 18–22 minutes, or until the edges are golden brown and the tops are lightly crisp. The cakes should smell toasty and aromatic. When you lift one, the interior should feel firm yet tender.
- Remove the cakes from the oven and let them cool on the sheet for 5 minutes before transferring to a wire rack to cool completely. Cooling slightly on the sheet allows the bottoms to firm up, preventing them from becoming soggy.
That’s it — you did it. But hold on, I've got a few more tricks that'll take this to another level…
Insider Tricks for Flawless Results
The Temperature Rule Nobody Follows
Many bakers assume room‑temperature ingredients are best, but for these cakes, a slight chill is key. Refrigerating the dough for 30 minutes before rolling it out locks in the fats, ensuring a flaky, tender crumb. I’ve seen people skip this step, and the result is a flat, rubbery cake that’s hard to enjoy.
Why Your Nose Knows Best
Smell the dough as you fold in the herbs. If it doesn’t smell fragrant, you’re missing the herb oil release. The aroma is a reliable indicator of flavor depth. My friend once tried this recipe without pre‑browning the herbs, and the cakes tasted like a dry herb garden. Lesson learned.
The 5‑Minute Rest That Changes Everything
After baking, let the cakes rest on the sheet for exactly five minutes before moving them to a rack. This brief pause allows the steam to redistribute, resulting in a crisp bottom and a moist interior. Skipping this step can leave the cakes slightly soggy on the underside.
How to Keep Them Fresh Longer
Store the cooled cakes in an airtight container at room temperature for up to three days. If you need to keep them longer, freeze them in a zip‑lock bag. When ready to eat, toast them in a skillet for a minute to revive the crispness.
Serving Suggestions That Wow
Serve these cakes warm, drizzled with a little extra virgin olive oil and a pinch of sea salt. Pair them with a light salad of arugula, cherry tomatoes, and a simple vinaigrette. The contrast between the savory cakes and the fresh salad creates a balanced, satisfying meal.
Creative Twists and Variations
This recipe is a playground. Here are some of my favorite ways to switch things up:
Cheesy Mediterranean Version
Swap the Parmesan for crumbled feta or goat cheese. The tangy, salty cheese pairs beautifully with the olives, creating a Mediterranean twist that’s both bold and comforting. This variation is perfect for a brunch with friends.
Spicy Kick
Add a pinch of crushed red pepper flakes or a dash of hot sauce to the dough. The heat balances the richness of the olive oil and the saltiness of the olives, giving the cakes a lively, fiery edge. Ideal for those who love a little spice.
Herb‑Infused Olive Oil
Infuse the olive oil with fresh herbs before adding it to the dough. Steep the herbs in the oil for 10 minutes, strain, and use the fragrant oil. The result is a subtle, aromatic depth that permeates every bite.
Gluten‑Free Adaptation
Replace all-purpose flour with a gluten‑free blend, and add 1 teaspoon of xanthan gum to maintain structure. The dough will be slightly denser but still tender and flavorful. This version is great for those with gluten sensitivities.
Vegan Version
Use a plant‑based milk, a flax egg (1 tablespoon ground flaxseed mixed with 3 tablespoons water), and a dairy‑free butter substitute. The vegan version maintains the same flavor profile, proving that plant‑based cooking can be just as indulgent.
Sweet Surprise
Omit the olives and add 2 tablespoons of dried cranberries or raisins. Sweeten with an extra tablespoon of honey or maple syrup. The result is a sweet, herb‑infused cake that’s a delightful treat for dessert.
Storing and Bringing It Back to Life
Fridge Storage
Place the cooled cakes in an airtight container and refrigerate for up to 3 days. The cool temperature preserves the moisture and keeps the flavors fresh. When you’re ready to eat, let them sit at room temperature for 10 minutes before serving.
Freezer Friendly
Wrap each cake individually in parchment paper and place them in a freezer‑safe zip‑lock bag. Freeze for up to 2 weeks. When reheating, thaw at room temperature and warm in a preheated oven at 350°F for 5 minutes. The cakes will regain their crispness.
Best Reheating Method
To revive a refrigerated or frozen cake, preheat a skillet over medium heat and toast each side for 30 seconds. The slight sear restores the crust’s crunch and enhances the aroma. A tiny splash of water before reheating steams the cake back to perfection, preventing it from drying out.
Conclusion
These Green Olive and Herb Welsh Cak are more than just a recipe; they’re a culinary revelation that brings together tradition, flavor, and technique. From the moment the dough hits the pan to the final bite, you’ll experience a symphony of textures and aromas that will leave you craving more. I’ve spent years tweaking, testing, and perfecting this version, and I’m confident it will become a staple in your kitchen. Remember, the secret lies in the herbs, the olive oil, and the love you pour into every step.