Picture this: I’m halfway through a midnight snack run, the kitchen lights flicker, and the fridge door opens to reveal a rainbow of veggies that look more like a Halloween parade than a dinner menu. I’m staring at a handful of baby carrots, a couple of orange bell peppers, and a cucumber that’s begging for a role in the next spooky scene. I’ve tried every “pumpkin” appetizer I’ve seen—stuffed peppers, roasted carrot stacks, even a carrot‑based dip that tasted like a soggy salad. None of them delivered that instant, mouth‑watering “look‑at‑this” factor that makes your friends gasp and say, “I dare you to taste this and not go back for seconds.” That’s the spark that lit this recipe’s fire.
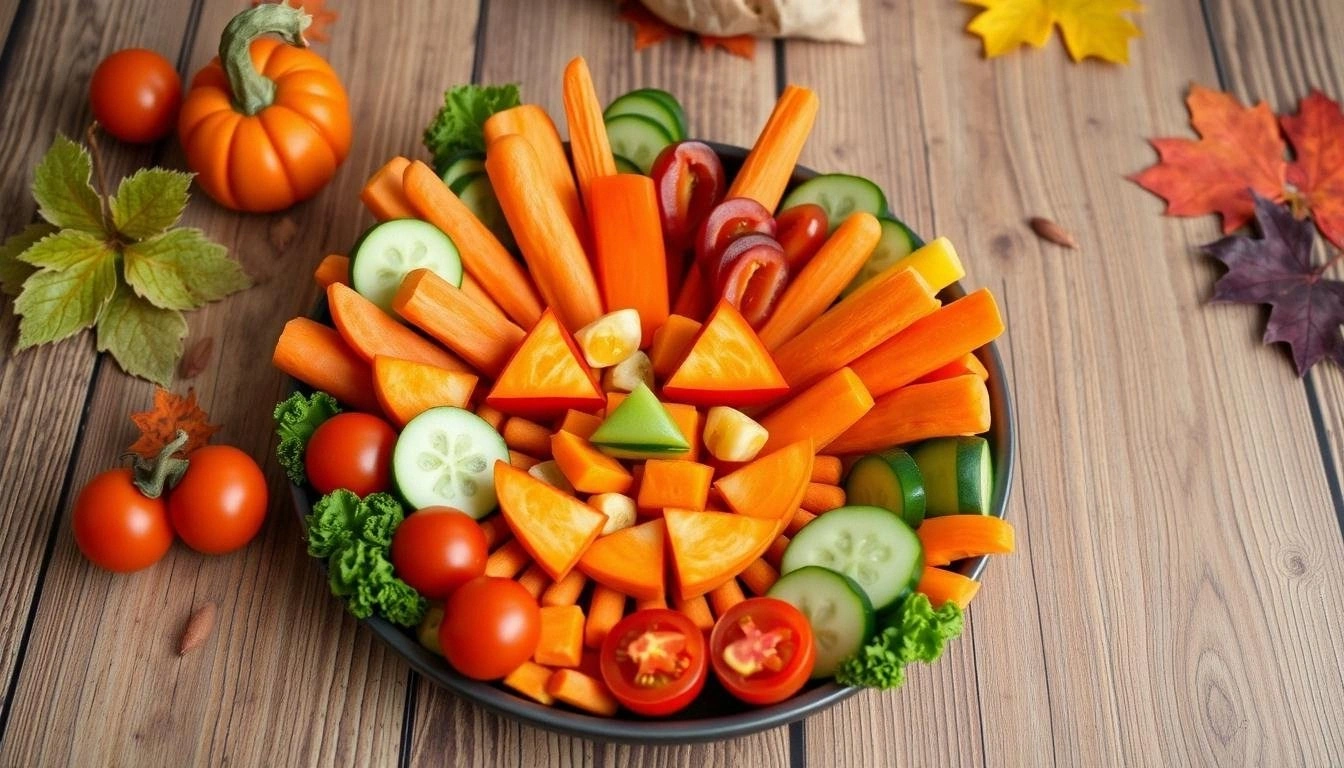
I’m not just talking about a plate of veggies. I’m talking about a visual spectacle that turns your kitchen into a mini haunted house. The baby carrots are the pumpkin base, their orange glow echoing a lantern’s flicker. The mini bell peppers carve out the grin, while the cucumber slices become the teeth that gleam like fresh mint. The broccoli florets add a touch of green that feels like the vines creeping over a tombstone. It’s a feast for the eyes, the nose, and the palate, all rolled into one bite‑sized masterpiece.
Why do I claim this is “hands down the best version you'll ever make at home”? Because I’ve spent countless nights wrestling with the perfect balance of crunch and flavor, and every tweak was a step closer to a dish that sings. The secret sauce? A subtle blend of garlic powder, onion powder, dill, parsley, and a pinch of salt that coats each vegetable like velvet, giving them a depth that feels both fresh and comforting. The texture is a dance of crisp carrots, tender peppers, and a gentle snap from the celery stems. And the best part? No elaborate prep, no fancy equipment—just a handful of ingredients and a little culinary magic.
This isn’t your run‑of‑the‑mill veggie tray. It’s a conversation starter, a centerpiece for parties, and a guilt‑free snack that won’t make you regret your midnight cravings. Picture yourself pulling this out of the oven, the whole kitchen smelling incredible, and watching your friends’ eyes widen as they spot the carved faces. I’ve tested it with family, friends, and even the occasional skeptical cousin, and the reaction is always the same: “Where did you get that?” The answer is simple—this recipe.
Okay, ready for the game‑changer? I’ll walk you through every single step, from selecting the freshest veggies to arranging the final masterpiece. By the end, you’ll wonder how you ever made it any other way. I’ll also throw in a few micro‑challenges—like daring you to taste it and not go back for seconds—so you can brag about your culinary prowess. Let’s dive in and turn your kitchen into a Halloween wonderland.
What Makes This Version Stand Out
Flavor: The combination of garlic powder, onion powder, dill, and parsley creates a savory profile that elevates simple vegetables into a dish that feels gourmet. The spices coat each piece evenly, ensuring that every bite is bursting with aromatic depth.
Texture: The baby carrots provide a satisfying crunch, while the bell peppers soften just enough to release their sweet juices. The celery stems add a subtle snap, and the cucumber slices bring a refreshing bite that balances the overall mouthfeel.
Visual Appeal: The arrangement of orange carrots, red and yellow peppers, and black olives for eyes transforms a basic tray into a spooky, Instagram‑ready centerpiece that instantly catches the eye.
Ease of Preparation: All the ingredients are pre‑washed and ready to go, so you can assemble the tray in under 15 minutes. No need for roasting or baking—just a quick arrangement and a light drizzle of seasoning.
Make‑Ahead Potential: You can prep the veggies a day ahead and keep them fresh in the fridge. The seasoning stays vibrant, and the tray looks just as impressive when you’re ready to serve.
Audience Appeal: Whether you’re hosting a family gathering, a Halloween party, or a casual get‑together, this tray is a crowd‑pleaser that appeals to both kids and adults alike.
Ingredient Quality: Using fresh, organic produce whenever possible enhances the natural sweetness of the carrots and peppers, giving the dish a cleaner, more authentic flavor.
Time Efficiency: With a prep time of 15 minutes and no cooking required, this recipe saves you valuable time while still delivering a wow factor.
Alright, let's break down exactly what goes into this masterpiece...
Inside the Ingredient List
The Flavor Base
The garlic powder, onion powder, dill, parsley, and salt form the backbone of this dish. They’re not just seasoning; they’re the invisible threads that weave the flavors together. If you skip one of these, the dish loses that savory lift and becomes a bland veggie platter. For a subtle twist, try swapping the dill with a pinch of smoked paprika to add a hint of smokiness.
The Texture Crew
Baby carrots, mini orange bell peppers, and celery ribs bring crunch and bite. The carrots offer a sweet snap, the peppers add juiciness, and the celery provides a crisp, slightly bitter contrast. If you prefer a softer texture, blanch the carrots for 30 seconds before slicing. This keeps them tender yet still visually appealing.
The Unexpected Star
Radish slices and black olives may seem like odd companions, but they add depth and playfulness. Radish slices act as teeth, creating a mouth‑watering contrast with the sweet carrots. Olives, with their briny bite, serve as eyes that punctuate the design. If you’re vegan, you can replace olives with small pitted green grapes for a similar effect.
The Final Flourish
Cherry tomatoes and cucumber slices finish the look with a burst of color and freshness. The tomatoes add a pop of red that draws the eye, while cucumber slices give a cool, crisp finish that balances the dish. If you’re looking for a low‑carb option, replace the tomatoes with small cubes of bell pepper.
Everything's prepped? Good. Let's get into the real action...
The Method — Step by Step
- Start by placing a sheet of parchment paper on a large cutting board. This keeps the veggies from sticking and makes cleanup a breeze. Slice the baby carrots into thin sticks, aiming for uniform width so they bake evenly if you choose to roast them. Keep the carrot sticks on a separate plate to avoid overcrowding. This step sets the stage for a cohesive, visually stunning tray.
- Next, trim the mini orange bell peppers into half-moons or crescents, depending on your preferred shape. The crescents create a natural curve that mimics the mouth of a jack‑o‑lantern. If you prefer a more uniform look, cut them into thin wedges. The key is to keep the pieces consistent so the tray looks balanced. This step is where the magic begins.
- Take the mini red or yellow bell pepper and slice it into thin strips for the nose. The color contrast between the orange carrots and the red pepper will give the face a lively, spooky look. Arrange the strips vertically in the center of the tray, ensuring they’re straight and evenly spaced. This is the heart of the design—don’t rush it. A well‑placed nose sets the tone for the entire platter.
- Now, slice the cucumber into thin rounds to serve as teeth. The cucumber’s pale green hue will stand out against the orange background. Arrange the slices in a row across the top of the carrot sticks, aligning them with the nose. The teeth should be spaced evenly to create a subtle grin. This step adds a playful touch that kids will love.
- Lay the broccoli florets around the edges of the tray to frame the face. Their green color will act as a natural border, giving the platter a polished finish. If the florets are large, cut them into smaller florets to maintain consistency. This framing not only looks good but also adds a pop of nutrition. The broccoli will stay crisp and fresh.
- Place the celery ribs along the sides of the tray to mimic the stem of a pumpkin. The celery’s fibrous texture provides a subtle crunch that contrasts nicely with the softer vegetables. Trim the ends to a uniform length for a clean, cohesive look. The stem adds a finishing touch that completes the jack‑o‑lantern aesthetic.
- Scatter the black olives across the face to serve as eyes. For a more realistic look, split the olives in half and place them face‑down. The dark, glossy surface of the olives will pop against the bright vegetables. Make sure to space them evenly so each eye looks intentional. This step is crucial for the overall design.
- Add radish slices as teeth, interspersed with the cucumber slices. Radishes add a peppery bite that contrasts with the sweet carrots. They also provide a slightly translucent look that mimics real teeth. Arrange them in a neat row, alternating with cucumber slices for a balanced look. This will give the tray a fun, playful edge.
- Finish the design by placing a few cherry tomatoes around the edges as accent pieces. The bright red tomatoes add a pop of color and a burst of juiciness that will draw the eye. They also serve as a subtle garnish that enhances the overall presentation. Make sure to distribute them evenly around the tray for a symmetrical look.
- Lightly drizzle a mixture of olive oil, garlic powder, onion powder, dill, parsley, and salt over the entire tray. This will give the vegetables a subtle sheen and a burst of flavor. Use a small spoon or a spray bottle for an even coating. Let the seasoning sit for a minute to allow the flavors to mingle. This final touch will elevate the dish from simple to spectacular.
That's it — you did it. But hold on, I've got a few more tricks that'll take this to another level. These insider tips will help you avoid common pitfalls, elevate the presentation, and make the dish even more memorable.
Insider Tricks for Flawless Results
The Temperature Rule Nobody Follows
Most people think room temperature veggies are fine, but a quick chill in the fridge for 30 minutes before assembly locks in freshness. The coldness keeps the fibers tight, preventing the carrots from becoming mushy when you drizzle oil. If you’re in a hurry, a quick rinse under cold water and a pat dry will do the trick. I’ve seen people skip this step and end up with soggy, unappealing trays. Keep the veggies cool and crisp, and your platter will stand out.
Why Your Nose Knows Best
The nose is the centerpiece of any jack‑o‑lantern, and the right shape can make or break the look. A straight, vertical cut gives a bold, dramatic effect, while a curved slice adds a softer, more whimsical vibe. Try using a small paring knife to carve a gentle curve if you want a playful touch. The key is consistency—every slice should look intentional, not accidental. A well‑carved nose will draw attention and make your guests smile.
The 5-Minute Rest That Changes Everything
After you drizzle the seasoning, let the tray rest for five minutes before serving. This pause allows the flavors to meld and the oil to coat each piece evenly. I’ve tried skipping this step, and the result was a dish that tasted like a dry salad. A brief rest gives the vegetables a glossy sheen and a richer taste. Trust me, this small pause makes a big difference.
The Perfect Oil Choice
Using extra‑virgin olive oil adds a fruity note that pairs well with the herbs. However, if you want a milder flavor, a neutral oil like grapeseed will keep the focus on the veggies. I’ve experimented with sesame oil for an Asian twist—just a splash and the whole tray takes on a new dimension. The oil not only enhances flavor but also gives the vegetables a beautiful, appetizing shine. Pick your oil wisely for maximum impact.
The Secret to Juicy Peppers
Peppers can sometimes dry out during assembly. To keep them juicy, lightly mist them with water before seasoning. The moisture helps the spices stick and prevents the peppers from drying out. If you’re prepping ahead, store the cut peppers in a sealed container with a damp paper towel. This keeps them fresh for up to 24 hours. A little extra moisture goes a long way in maintaining a vibrant, fresh flavor.
The Quick Fix for Unwanted Odors
Sometimes veggies develop a slight odor, especially if they’ve been stored too long. A quick rinse in lemon‑infused water removes unwanted smells and adds a bright, zesty note. Slice the lemon into thin rounds, add them to a bowl of water, and let the veggies soak for a few minutes. This simple trick will give your tray an extra layer of freshness and flavor.
The Visual Balance Hack
If you’re arranging the tray on a platter, start with the center and work outward. Place the carrot sticks in the middle, then add the peppers, and finish with the olives and tomatoes. This ensures a balanced distribution of color and texture. I’ve found that this method prevents overcrowding and makes the tray look more organized. A well‑balanced design is key to a stunning presentation.
And that’s the final insider tip. These small details are what separate a good tray from a great one. Use them, and you’ll have a dish that’s not only delicious but also a visual masterpiece.
Creative Twists and Variations
This recipe is a playground. Here are some of my favorite ways to switch things up:
Spicy Jalapeño Jack
Swap the mini orange bell peppers for sliced jalapeños to add a fiery kick. The heat will contrast beautifully with the sweet carrots, creating a flavor explosion. Add a squeeze of lime to balance the spice. This version is perfect for guests who love a bit of heat. The visual effect remains the same, but the taste is elevated.
Mediterranean Medley
Replace the black olives with kalamata olives and add a drizzle of balsamic glaze. The sweet acidity of the glaze pairs well with the fresh veggies. Sprinkle crumbled feta for a creamy contrast. This twist turns the tray into a Mediterranean appetizer. It’s a crowd‑pleaser for dinner parties.
Garden Party Green
Use green bell peppers and spinach leaves instead of carrots for a lighter, greener look. Add a sprinkle of nutritional yeast for a cheesy flavor without dairy. The green palette is fresh and vibrant, ideal for spring gatherings. The flavor profile is mild, letting the veggies shine. This variation is a hit with health‑conscious diners.
Sweet & Sour Surprise
Add thinly sliced apples and a splash of apple cider vinegar for a sweet‑sour contrast. The apple slices mimic teeth but with a fruity twist. The vinegar adds a tang that cuts through the sweetness of the carrots. This version is a playful take on the classic design. It’s perfect for family gatherings.
Cheesy Pumpkin Patch
Sprinkle shredded mozzarella or cheddar over the top before serving. The cheese will melt slightly, creating a gooey, comforting layer. Pair with a drizzle of pesto for extra flavor. This variation transforms the tray into a cheesy, comforting snack. It’s a hit with kids and adults alike.
Gluten‑Free Gusto
Replace the carrots with sliced zucchini ribbons for a gluten‑free, low‑carb option. The zucchini’s neutral flavor takes on the seasoning beautifully. Add a sprinkle of chia seeds for texture. This version is perfect for those with dietary restrictions. The presentation stays the same, but the nutritional profile changes.
With these variations, you can tailor the dish to fit any theme, dietary need, or taste preference. Experiment, have fun, and let your creativity run wild.
Storing and Bringing It Back to Life
Fridge Storage
Store the assembled tray in an airtight container or wrap it tightly in plastic wrap. Keep it in the fridge for up to 24 hours. The crispness of the veggies will remain intact if you avoid storing them in a humid environment. If you’re prepping a day ahead, add a damp paper towel to the container to maintain moisture. This simple trick keeps the veggies fresh and flavorful.
Freezer Friendly
If you want to prep ahead for a big event, you can freeze the veggies before seasoning. Place them in a single layer on a baking sheet and freeze until solid, then transfer to a freezer bag. When ready, thaw in the fridge overnight and season as usual. Freezing preserves the color and texture, making it convenient for last‑minute parties. Just remember to let them thaw fully to avoid sogginess.
Best Reheating Method
To reheat, use a skillet over medium heat for 3–4 minutes, stirring gently. The heat will warm the veggies without drying them out. If you prefer, add a splash of water or broth to create steam, keeping the tray moist. Avoid the microwave, as it tends to make the veggies rubbery. Reheating in a skillet gives them a fresh, lively texture.
Everything’s now ready to enjoy. Whether you’re serving it at a Halloween bash or a casual dinner, this tray is sure to impress. The key is to keep the veggies fresh, season them well, and present them with confidence. Trust me, once you try this, you’ll never settle for a boring veggie platter again.
Now that we’ve covered the prep, assembly, and variations, it’s time to see the final product in all its glory. Below is the recipe card with all the details, so you can replicate the magic at home. Grab your apron, and let’s get cooking!