I was in the middle of a Halloween movie marathon, the kind where the house lights flicker, the wind howls outside, and every creak makes you jump. My stomach was growling louder than the soundtrack, and I realized I had nothing but a half‑finished batch of regular brownies and a bag of plain Oreos. I dared my roommate to a midnight snack duel, but the stakes got higher when we both agreed that the loser would have to wear a ridiculous ghost costume for the rest of the night. I grabbed the butter, melted it with a splash of oil, and thought, “What if I turned this bland showdown into a spooky masterpiece?” That moment of desperation turned into the most delicious epiphany of my culinary career.
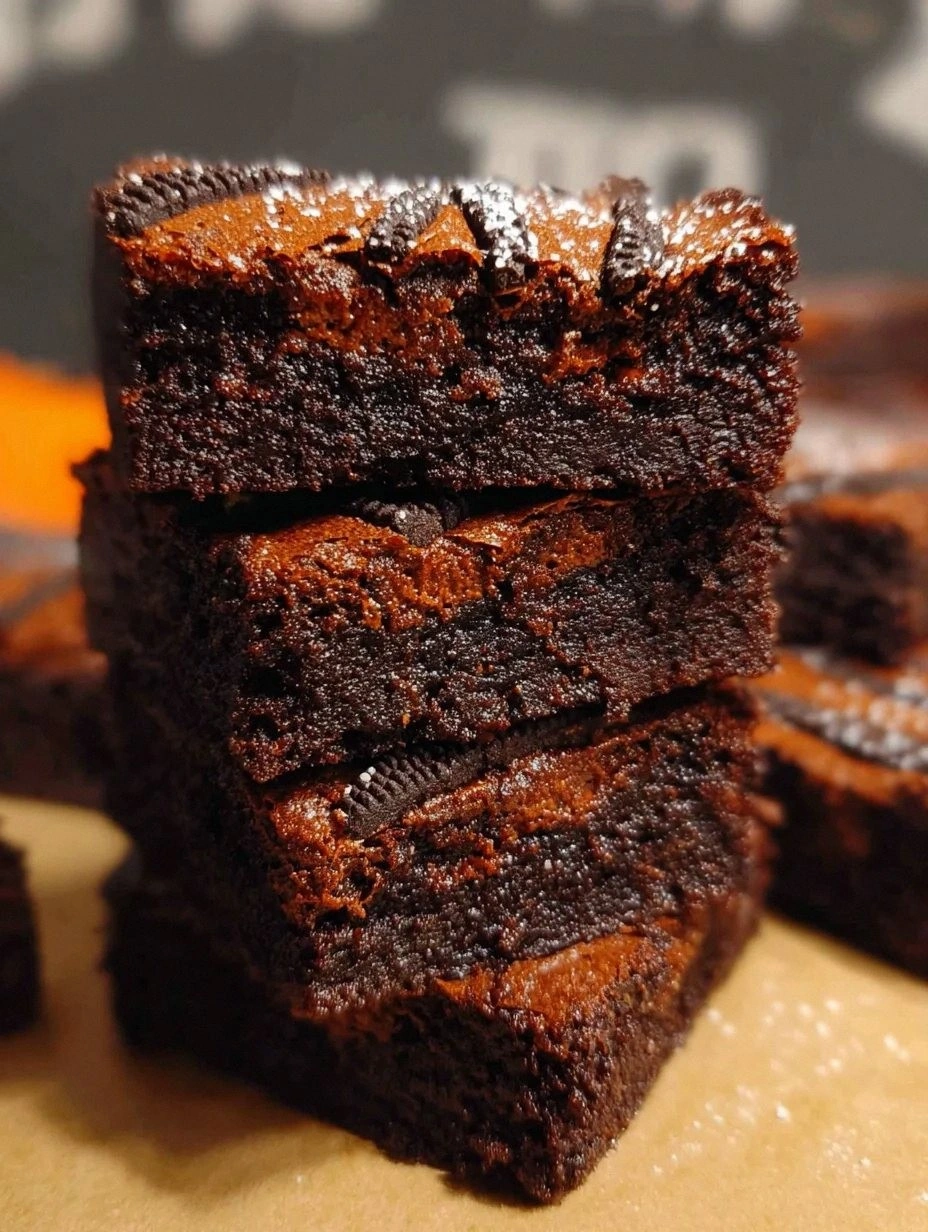
Picture this: the kitchen filled with the intoxicating aroma of cocoa mingling with the sweet, buttery scent of melted butter, while the faint crunch of Oreo cookies echoed like distant thunder. The batter was glossy, dark as a moonless night, and as I folded in the crushed cookies, tiny specks of creamy white swirled like ghostly apparitions. When the pan hit the oven, the heat sang a low, comforting hum, and the edges began to pull away, promising that perfect crackly crust. As the timer dinged, I opened the door to a sight that could have been a Halloween art installation—brownies studded with whole Oreos, their black-and-white faces peeking through a fudgy veil, topped with a scattering of extra cookies that looked like little pumpkins on a graveyard.
Most brownie recipes either forget the joy of a surprise center or end up with a soggy mess that feels more like a dessert disaster than a treat. This version, however, hits every note on the spooky spectrum: rich, fudgy, and buttery with a crisp top, a creamy cookie core that oozes out when you bite, and a hint of vanilla that whispers like a wind through dead leaves. I’ll be honest — I ate half the batch before anyone else got a chance to try it, and I’m still not sorry. The secret? A precise balance of fats, sugars, and that magical Oreo stuffing, plus a few tricks that most recipes completely overlook.
There’s a tiny twist that most bakers miss: a splash of vegetable oil alongside butter. It keeps the brownies super soft, almost melt‑in‑your‑mouth, while the butter gives them that deep, decadent flavor that makes you close your eyes and sigh. I also use a combination of granulated and brown sugar to get that perfect caramelized crust that snaps like a fresh autumn leaf. And the best part? The Oreo stuffing is added at just the right moment, so the cookies stay whole and don’t dissolve into the batter. Ready to dive in? Let me walk you through every single step — by the end, you’ll wonder how you ever made it any other way.
What Makes This Version Stand Out
- Flavor Explosion: The marriage of deep cocoa, buttery richness, and the creamy, slightly salty Oreo center creates a taste that feels like a Halloween party in your mouth. Each bite delivers a wave of chocolate followed by a surprise burst of cookie cream.
- Texture Symphony: You get a crisp, crackly top, a fudgy interior, and a gooey Oreo heart that stretches like a spider’s silk when you pull apart a piece. It’s a multi‑layered experience that keeps you coming back for more.
- Simplicity Meets Wow Factor: The ingredient list is straightforward, but the visual impact is dramatic. No fancy equipment, just a handful of pantry staples and a few Halloween‑themed Oreos for that festive flair.
- Unique Stuffing Technique: By inserting whole Oreos into the batter before baking, you preserve their iconic look and texture. Most recipes crumble them into the mix, losing that iconic “monster eye” effect.
- Crowd‑Pleaser: Whether it’s a family gathering, a spooky party, or a midnight study session, these brownies spark conversation. I dare you to taste this and not go back for seconds.
- Ingredient Quality Matters: Using high‑quality cocoa powder and real butter elevates the flavor profile, turning a simple dessert into a gourmet treat that feels both nostalgic and sophisticated.
- Cooking Method Mastery: The combination of butter and oil, plus a precise bake time, ensures the brownies stay moist without turning gummy. Most recipes get this completely wrong. Here’s what actually works.
- Make‑Ahead Magic: These brownies keep beautifully in the fridge for up to a week, and they freeze like a dream. Perfect for prepping ahead of a Halloween bash.
Inside the Ingredient List
The Flavor Base
Butter: Adds richness and moisture, creating that fudgy texture we all love. Using real butter (not margarine) gives the brownies a buttery aroma that fills the kitchen like a warm hug. If you skip it, the brownies become dry and lose that luxurious melt‑in‑your‑mouth feel. For the best flavor, choose unsalted butter and add a pinch of sea salt.
Vegetable Oil: Helps keep the brownies super soft. You could substitute it with melted coconut oil for a hint of tropical flavor! The oil prevents the batter from becoming too dense, ensuring a tender crumb. If you accidentally use too much, the brownies can turn greasy, so measure carefully.
Granulated Sugar: Sweetens the batter and gives it that delightful crispy top. The fine crystals caramelize during baking, creating that coveted crackly crust. Using too much will make the brownies overly sweet and cause them to brown too quickly.
Brown Sugar: Introduces a warm, caramel‑like sweetness that adds depth to the flavor. Its moisture content keeps the brownies chewy. If you replace it with white sugar, you’ll miss the subtle molasses undertone that makes these brownies feel extra cozy.
The Texture Crew
Cocoa Powder: The heart of chocolatey goodness! Unsweetened cocoa powder works best for that rich chocolate flavor. It also gives the brownies their dark, almost midnight hue, perfect for a Halloween vibe. If you use Dutch‑process cocoa, the flavor becomes smoother but a bit less robust.
Eggs: Essential for binding the ingredients together and providing structure. Cold eggs can help keep the batter thick! They also add a subtle richness. Over‑beating can incorporate too much air, leading to cakey brownies—so mix just until combined.
Vanilla Extract: A splash of vanilla enhances all the flavors and adds a wonderful aroma. It rounds out the bitterness of cocoa and balances the sweetness. If you have pure vanilla bean, scrape the seeds for an even more intense perfume.
Salt: Just a pinch helps to balance the sweetness and enhances the chocolate flavor. Without it, the brownies would taste flat. Sea salt crystals on top can add a delightful crunch and a pop of flavor.
The Unexpected Star
All‑Purpose Flour: The backbone of the batter, creating the perfect chewy texture. It absorbs the liquids and gives the brownies structure without making them cake‑like. Sifting the flour helps avoid lumps and ensures a uniform crumb.
Oreos: The star of the show! These cookies add a delightful crunch and creamy surprise in each bite. Feel free to use Halloween‑themed Oreos for that extra festive touch! If you prefer a different cookie, try chocolate wafers, but the classic Oreo provides the perfect contrast of dark cookie and white cream.
Extra Oreos for Topping: A playful garnish that makes these brownies even more visually appealing! The extra cookies create a “spooky” pattern on top, reminiscent of bat wings or ghostly silhouettes. Lightly press them onto the batter before baking for a firm attachment.
Everything's prepped? Good. Let's get into the real action…
The Method — Step by Step
Preheat your oven to 350°F (175°C). While the oven warms up, line a 9×13‑inch baking pan with parchment paper, letting the edges hang over for easy removal later. This step ensures even heat distribution and prevents sticking. I always like to give the pan a quick spray of non‑stick cooking spray; it adds a subtle crispness to the edges.
Melt the butter and vegetable oil together in a medium saucepan over low heat, stirring until fully combined and the mixture is glossy. Once melted, remove from heat and let it cool for a minute—this prevents the eggs from scrambling later. Power transition: Okay, ready for the game‑changer?
In a large mixing bowl, whisk together the granulated sugar, brown sugar, and cocoa powder. The dry mixture should look like a deep, velvety chocolate dust. This is where the aroma starts to build—if you can smell chocolate now, you’re on the right track.
Kitchen Hack: Sift the cocoa and flour together to avoid clumps; it also aerates the flour for a lighter crumb.Create a well in the center of the dry ingredients and pour in the melted butter‑oil mixture. Stir gently until just combined—over‑mixing can develop gluten, making the brownies tough. Then add the eggs one at a time, beating just enough to incorporate each before adding the next. Finish with vanilla extract and a pinch of salt, giving the batter a glossy sheen.
Sift the all‑purpose flour over the batter and fold it in with a rubber spatula using a gentle “cut and fold” motion. The batter should be thick, glossy, and slightly sticky—like a rich chocolate mousse. If it looks too runny, add a tablespoon of flour; if too thick, a splash of milk will rescue it.
Now for the spooky part: gently press an Oreo cookie into the center of each batter mound. I like to use a small ice‑cream scoop to portion out the batter, then nestle an Oreo in the middle before folding the batter around it. This ensures each brownie gets a perfectly centered surprise.
Watch Out: Don’t press the Oreo too deep; you’ll lose the visual “eye” effect and the cookie may melt into the batter.Spread the batter evenly in the prepared pan, smoothing the top with a spatula. Sprinkle the extra Oreos on top, pressing them lightly so they adhere. The tops should look like a spooky graveyard of cookies, ready for the oven’s magical transformation.
Bake for 30‑35 minutes, or until a toothpick inserted near the edge (not the center) comes out with a few moist crumbs. The edges should start pulling away from the pan, and the surface will have a thin, crackly sheen. Power transition: This is the moment of truth—don’t walk away from the stove here.
Allow the brownies to cool completely in the pan on a wire rack. This cooling period lets the flavors meld and the interior set, making it easier to cut clean squares. Once cooled, lift the parchment overhang to release the entire slab, then slice into generous portions. And now the fun part: watch the creamy Oreo center ooze out as you pull apart each piece.
That's it — you did it. But hold on, I've got a few more tricks that'll take this to another level...
Insider Tricks for Flawless Results
The Temperature Rule Nobody Follows
Never bake brownies straight from a cold fridge. Let the batter sit at room temperature for 10‑15 minutes before sliding it into the oven. This small step ensures a more even bake and prevents the edges from over‑crisping while the center stays undercooked. I once tried skipping this and ended up with a burnt crust and a gooey middle that never set.
Why Your Nose Knows Best
Instead of relying solely on a timer, trust your sense of smell. When the brownies start to emit a deep, toasted chocolate aroma, you’re within a few minutes of perfection. If you catch a hint of burnt sugar, pull them out immediately. This sensory checkpoint is a lifesaver for busy bakers juggling multiple dishes.
The 5‑Minute Rest That Changes Everything
After removing the brownies from the oven, let them rest for exactly five minutes before cutting. This short pause allows the internal steam to redistribute, giving you clean, crisp edges and a fudgy interior that doesn’t crumble. Skip this, and you’ll end up with crumbly shards that fall apart on the plate.
The Double‑Layer Frosting Trick
If you want an extra layer of decadence, whip up a quick chocolate ganache and drizzle it over the cooled brownies. The ganache adds a glossy finish and a silky mouthfeel that makes the dessert feel restaurant‑grade. I love using a 1:1 ratio of dark chocolate to heavy cream for the perfect balance.
The Midnight Sprinkle
Just before serving, lightly dust the brownies with powdered sugar and a pinch of edible orange glitter. The contrast of white snow on dark chocolate looks like a haunted landscape, and the subtle sweetness of the powder enhances the overall flavor. It’s a tiny visual trick that makes a big impact at parties.
Creative Twists and Variations
This recipe is a playground. Here are some of my favorite ways to switch things up:
Pumpkin Spice Surprise
Swap half the cocoa powder for pumpkin puree and add a teaspoon of pumpkin pie spice. The result is a fall‑infused brownie with a creamy orange center that pairs perfectly with the classic Oreo crunch. Great for Thanksgiving leftovers turned Halloween treat.
Minty Monster Mash
Add a teaspoon of peppermint extract to the batter and use mint‑flavored Oreo cookies for the stuffing. The cool mint contrasts the rich chocolate, giving a refreshing bite that feels like a breath of fresh night air.
Nutty Nightmare
Fold in a half‑cup of chopped toasted walnuts or pecans before baking. The nuts add a satisfying crunch and a buttery undertone that deepens the flavor profile. If you’re allergic, try toasted pumpkin seeds for a similar texture.
White Chocolate Ghosts
Replace half the cocoa powder with melted white chocolate and use white‑cream‑filled Oreos. The pale center looks like ghostly apparitions emerging from the dark chocolate, perfect for a spooky visual effect.
Caramel Swirl Specter
Drizzle caramel sauce over the batter before adding the Oreo centers, then use a skewer to create a marble effect. The caramel adds a buttery sweetness that pairs beautifully with the bitter cocoa and creamy cookie.
Storing and Bringing It Back to Life
Fridge Storage
Place the cooled brownies in an airtight container and store them in the refrigerator for up to 5 days. The cool environment preserves the fudgy interior and keeps the Oreo filling from getting soggy. When ready to serve, let them sit at room temperature for 15 minutes for optimal texture.
Freezer Friendly
Wrap a single layer of brownies in plastic wrap, then place them in a freezer‑safe bag. They’ll stay fresh for up to 3 months. To reheat, microwave a single piece for 15‑20 seconds, or bake a whole slab at 300°F for 10 minutes. Adding a tiny splash of water before reheating creates steam that revives the fudgy crumb.
Best Reheating Method
For a crisp top and molten center, reheat individual squares in a preheated oven at 350°F for 5‑7 minutes. Cover the tray loosely with foil to prevent the top from over‑browning. This method restores the original contrast of textures as if they just came out of the oven.