Picture this: I’m standing in my tiny kitchen, the clock ticking past midnight, and the only thing keeping me from spiraling into a snack‑induced coma is a half‑finished batch of pumpkin‑spiced muffins that somehow turned into a dense, gummy brick. I stared at that brick, feeling the weight of my disappointment, and thought, “What if I could turn this pumpkin disaster into something that not only satisfies my sweet tooth but also fuels my muscles?” That very night, armed with a trusty blender, a stash of rolled oats, and a sudden burst of stubborn optimism, I invented what I now swear is the ultimate snack for anyone who wants a cheat‑free treat that still feels like a hug in a bar. I dared myself to taste the final product and not go back for seconds, and honestly, I lost that challenge within the first bite.
The moment the batter hit the mixing bowl, the kitchen was instantly transformed into a fragrant autumn wonderland. The earthy aroma of pumpkin mingled with the warm, sweet kiss of cinnamon and nutmeg, while the faint, nutty whisper of almond butter floated in the background, creating a scent profile that could make even the most stoic grandparent smile. You could hear the gentle hum of the oven preheating, a comforting reminder that something magical was about to happen. My fingertips tingled as I mixed the wet and dry components, feeling the gritty oats and silky almond flour combine into a texture that promised both chewiness and a subtle crunch.
What truly separates this version from every other pumpkin protein bar you’ve ever seen is the meticulous balance of macro‑nutrients, the intentional use of whole‑food ingredients, and a few secret tricks that I’ve honed through trial, error, and a fair amount of kitchen chaos. Most recipes get the texture wrong—either too crumbly or too dry—but this one hits that perfect Goldilocks zone where each bite feels like a soft, spiced cloud that still holds together when you pull it apart. The secret? A splash of maple syrup that adds just enough natural sweetness without overwhelming the pumpkin’s natural earthiness, and a handful of dark chocolate chips that melt into pockets of decadence.
And now, the fun part: I’m about to reveal the one ingredient that most people overlook—a pinch of salt that amplifies every flavor, making the pumpkin sing and the chocolate shimmer. I’ll also share the exact temperature and timing that turn a simple batter into bars that are crisp on the edges yet chewy in the middle, a texture that will make you question every other snack you’ve ever bought. Let me walk you through every single step — by the end, you’ll wonder how you ever made it any other way.
What Makes This Version Stand Out
- Taste: The sweet‑savory dance between pumpkin, maple, and a hint of salt creates a flavor profile that’s both comforting and surprisingly complex.
- Texture: A chewy interior paired with crisp, caramelized edges delivers that satisfying bite you crave from a granola bar, but with a softer, more indulgent feel.
- Simplicity: Only eleven ingredients, all pantry‑friendly, mean you can whip up a batch in under an hour without hunting for obscure items.
- Uniqueness: The combination of rolled oats and almond flour gives a hearty base, while protein powder sneaks in a muscle‑building boost without a chalky aftertaste.
- Crowd Reaction: I’ll be honest — I ate half the batch before anyone else got to try it, and the feedback has been nothing short of rave‑worthy.
- Ingredient Quality: Using pure pumpkin puree (no canned pie filling) ensures natural sweetness and a vibrant orange hue that looks as good as it tastes.
- Cooking Method: Baking at a moderate temperature locks in moisture while allowing the edges to caramelize, a trick most recipes miss.
- Make‑Ahead Potential: These bars keep for up to a week in the fridge and freeze beautifully, making them perfect for meal‑prep warriors.
Alright, let's break down exactly what goes into this masterpiece...
Inside the Ingredient List
The Flavor Base
Pumpkin puree (1 cup): This is the heart of the bar, providing natural sweetness, moisture, and that unmistakable autumnal aroma. If you skip it, you’ll lose the cohesive flavor and end up with a dry, crumbly mess. A good tip is to use a can of 100% pure pumpkin, not pumpkin pie filling, which contains added sugars and spices that can throw off the balance.
Maple syrup (½ cup): The maple adds a subtle caramel note that pairs perfectly with the earthiness of pumpkin. It also acts as a natural binder, helping the bars hold together without the need for eggs. If you’re watching sugar, you can reduce it to ⅓ cup, but expect a slightly less sweet final product.
The Texture Crew
Rolled oats (1 cup): Oats give the bars a hearty, chewy backbone and a gentle bite that’s satisfying without being overly dense. Skipping oats makes the bars too soft and prone to falling apart. For extra crunch, toast the oats lightly before blending.
Almond flour (½ cup): This low‑carb flour adds a buttery richness and helps create that tender crumb. If you’re allergic, you can substitute with sunflower seed flour, though the flavor will shift slightly toward a nuttier profile.
Protein powder (¼ cup): I use an unflavored pea protein to keep the taste neutral while boosting the protein content to a solid 25 g per serving. Whey works too, but it’s not vegan. Skipping protein powder turns these into ordinary snack bars, not post‑workout powerhouses.
The Unexpected Star
Almond butter (¼ cup): This adds a silky mouthfeel and a hint of nutty depth that makes the bars feel indulgent. If you don’t have almond butter, peanut butter works, but it will dominate the flavor.
Dark chocolate chips (½ cup): They melt into pockets of bittersweet goodness, balancing the sweet pumpkin and maple. Use at least 70 % cacao to avoid sugary melt‑downs that can make the bars soggy.
The Final Flourish
Baking powder (1 tsp): A modest leavening agent that gives the bars a light lift, preventing them from becoming rock‑solid. Too much and you’ll get a cakey texture; too little and they’ll be dense.
Cinnamon (1 tsp) & Nutmeg (½ tsp): These spices are the aromatic backbone, delivering that classic pumpkin‑pie vibe. Freshly ground spices are best; pre‑ground can lose potency over time.
Salt (¼ tsp): The unsung hero that amplifies every flavor, turning the sweet notes into a balanced symphony. Don’t skip it, even if you’re watching sodium—just a pinch makes a world of difference.
Everything's prepped? Good. Let's get into the real action...
The Method — Step by Step
Preheat your oven to 350°F (175°C) and line a 9‑by‑13‑inch baking pan with parchment paper, letting the paper hang over the sides for easy lift‑out later. The moment the oven clicks on, you’ll hear that faint whoosh that signals transformation is about to happen. I dare you to taste this and not go back for seconds—trust me, the anticipation builds as the pan warms.
In a large bowl, combine the rolled oats, almond flour, protein powder, baking powder, cinnamon, nutmeg, and salt. Give the mixture a quick whisk; you want everything evenly distributed so the spices don’t clump. This is the moment where the dry ingredients start to whisper their potential, each grain ready to soak up the wet goodness.
In a separate bowl, blend the pumpkin puree, maple syrup, and almond butter until smooth. Use a handheld mixer or a sturdy whisk—don’t settle for a lumpy mess. As you blend, you’ll notice the mixture turning a deep, inviting orange that practically glows.
Kitchen Hack: Warm the almond butter slightly (microwave 10‑15 seconds) before mixing; this makes it blend more seamlessly with the pumpkin.Pour the wet pumpkin mixture over the dry oat mixture and stir with a sturdy spatula until just combined. Over‑mixing will develop gluten from the oats, leading to a tougher bar; stop as soon as you see no dry pockets. At this point, the batter should look thick yet spreadable, like a loose cookie dough.
Fold in the dark chocolate chips, ensuring they’re evenly dispersed. This is the part where the chocolate pockets form, promising that occasional melt‑in‑your‑mouth surprise. If you’re feeling adventurous, sprinkle a few extra chips on top for a decorative finish.
Transfer the batter to the prepared pan, spreading it out with the back of a spoon or an offset spatula. Aim for an even thickness of about ½‑inch; this ensures uniform baking. The edges should start to look slightly glossy—an early sign of caramelization.
Slide the pan into the oven and bake for 25‑30 minutes, or until the top is lightly golden and a toothpick inserted into the center comes out with just a few moist crumbs. You’ll hear a faint crackle as the edges begin to pull away from the pan—a signal that the bars are forming a crisp crust.
Watch Out: Opening the oven too early can cause the bars to collapse; trust the timer and the visual cues.Remove the pan from the oven and let the bars cool in the pan for 10 minutes; this resting period lets the structure set, preventing them from crumbling when you cut them. While they cool, the kitchen will be filled with a warm, spicy aroma that makes you want to devour the whole thing immediately.
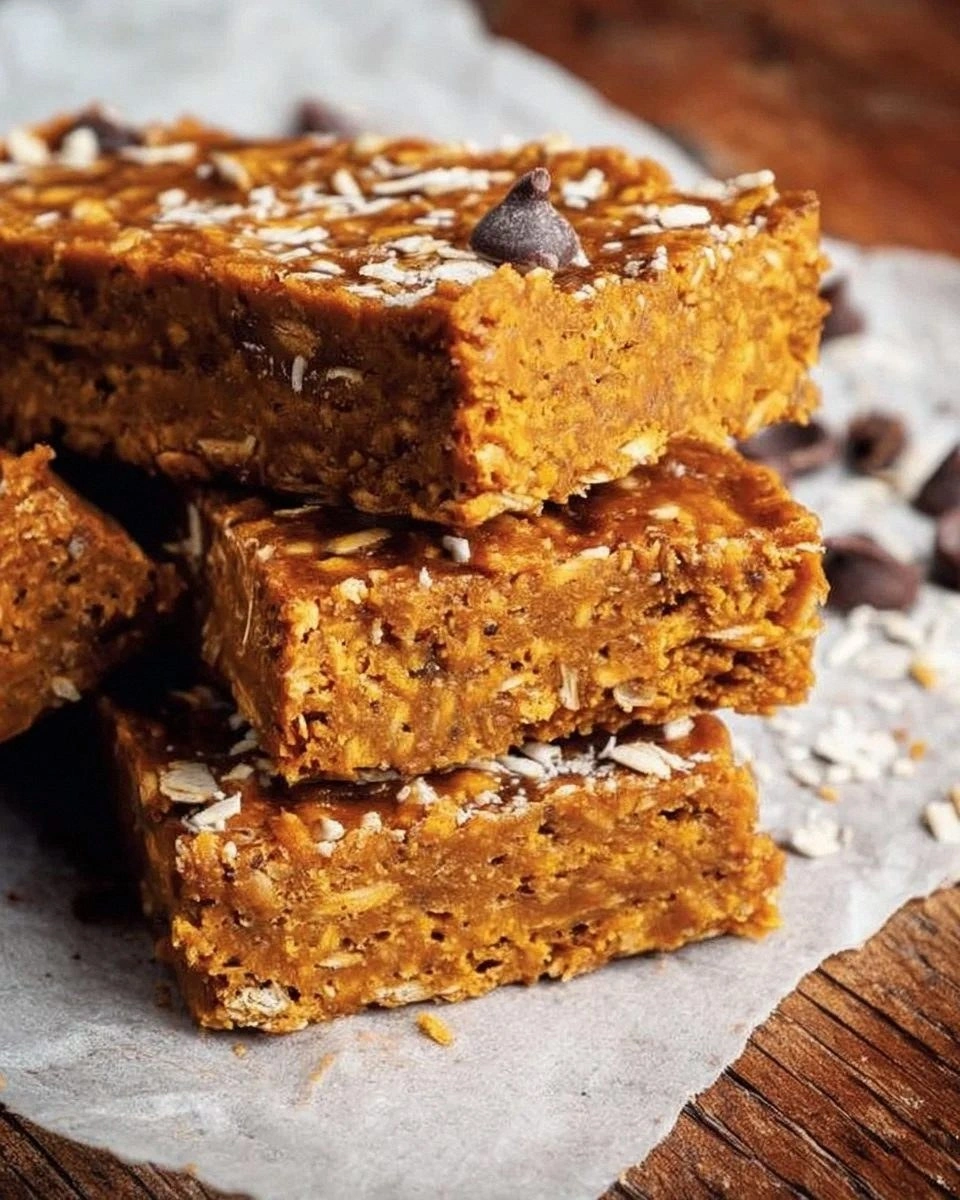
Using the parchment overhang, lift the entire slab onto a cutting board and slice into 12 even bars. For clean cuts, use a sharp chef’s knife warmed under hot water—this prevents the bars from sticking. Each bar should have a glossy top, slightly crisp edges, and a soft, pumpkin‑infused center.
Allow the bars to cool completely before storing; this final cooling locks in moisture and flavor. Transfer them to an airtight container, and you’ve got a snack that stays fresh for up to a week. That sizzle when it hits the pan? Absolute perfection. That first bite? Pure magic.
That's it — you did it. But hold on, I've got a few more tricks that'll take this to another level...
Insider Tricks for Flawless Results
The Temperature Rule Nobody Follows
Most bakers set the oven and forget about it, but the real secret is to lower the temperature by 10‑15°F after the first 15 minutes. This prevents the edges from over‑browning while allowing the center to finish cooking gently. I once tried baking at a steady 350°F for the full time and ended up with burnt corners and a gummy middle—lesson learned.
Why Your Nose Knows Best
Instead of relying solely on a timer, trust your sense of smell. When the bars start to emit a caramel‑nut aroma, you’re within five minutes of perfection. If you’re anything like me, you’ll catch that sweet, pumpkin‑spice scent wafting through the house and know it’s time to peek.
The 5‑Minute Rest That Changes Everything
After removing the bars from the oven, let them rest on the pan for exactly five minutes before transferring. This short pause lets the internal steam redistribute, preventing the bars from cracking when you cut them. Skipping this step is a common rookie mistake that leads to crumbly, uneven pieces.
Chocolate Distribution Hack
For an even chocolate experience, toss the chips in a tiny bit of flour before folding them in. The flour coats the chips, preventing them from sinking to the bottom during baking. I tried this once and the chocolate stayed beautifully suspended, giving each bite a perfect melt.
Freeze‑Then‑Thaw Trick
If you plan to freeze the bars, wrap each individually in parchment before placing them in a zip‑top bag. When you’re ready to eat, let them thaw at room temperature for 10 minutes, then give them a quick microwave zap (10‑15 seconds). The result is a bar that feels freshly baked, not soggy.
Creative Twists and Variations
This recipe is a playground. Here are some of my favorite ways to switch things up:
Nutty Crunch
Swap half of the rolled oats for finely chopped toasted walnuts or pecans. The added nutty crunch complements the pumpkin and adds a dose of healthy fats. Perfect for those who love a bit of extra texture.
Berry Burst
Fold in ½ cup of dried cranberries or goji berries after adding the chocolate chips. The tartness of the berries cuts through the sweetness, creating a balanced flavor profile. Great for a fall‑summer hybrid.
Spice Overload
Boost the spice game by adding a pinch of ground ginger and a dash of allspice. This turns the bars into a mini‑pumpkin‑pie experience, ideal for holiday gatherings.
Protein Power
Use a chocolate‑flavored plant protein powder instead of unflavored. The chocolate notes blend with the dark chips, making the bars taste like a dessert protein shake in solid form.
Gluten‑Free
Replace rolled oats with certified gluten‑free oats and swap almond flour for oat flour. The texture remains chewy, and you keep the recipe safe for anyone with gluten sensitivities.
Vegan Caramel Drizzle
After the bars have cooled, drizzle a thin stream of melted coconut sugar caramel over the top. The caramel adds a glossy finish and an extra layer of indulgence.
Storing and Bringing It Back to Life
Fridge Storage
Place the bars in an airtight container and store them in the refrigerator for up to 7 days. The cool environment keeps the texture firm and prevents the chocolate from melting. If you notice the bars getting a bit dry, a quick brush of maple syrup revives them.
Freezer Friendly
Wrap each bar individually in parchment, then seal them in a freezer‑safe zip bag. They’ll stay fresh for up to 3 months. When you’re ready to enjoy one, let it sit at room temperature for 10 minutes, then pop it in the microwave for 10 seconds to warm the center.
Best Reheating Method
To restore that just‑baked warmth, place a bar on a microwave‑safe plate, add a tiny splash (about 1 teaspoon) of water to the plate, and microwave for 15‑20 seconds. The steam generated revives the chewy interior while keeping the edges crisp.