Remember the night I tried to impress my roommates with a fancy dinner and ended up with a charred, flavorless mess? That disaster still haunts me, but it also sparked a relentless quest for the perfect chicken thigh recipe. I scoured cookbooks, forums, and YouTube channels until I stumbled upon a version that seemed to promise everything: crisp skin, succulent meat, and a burst of Italian herbs that would make any kitchen smell like a trattoria. The moment I tasted the first bite, I knew I had found the holy grail—flavor so deep that it practically sang. I dare you to taste this and not go back for seconds. Let me walk you through every single step — by the end, you'll wonder how you ever made it any other way.
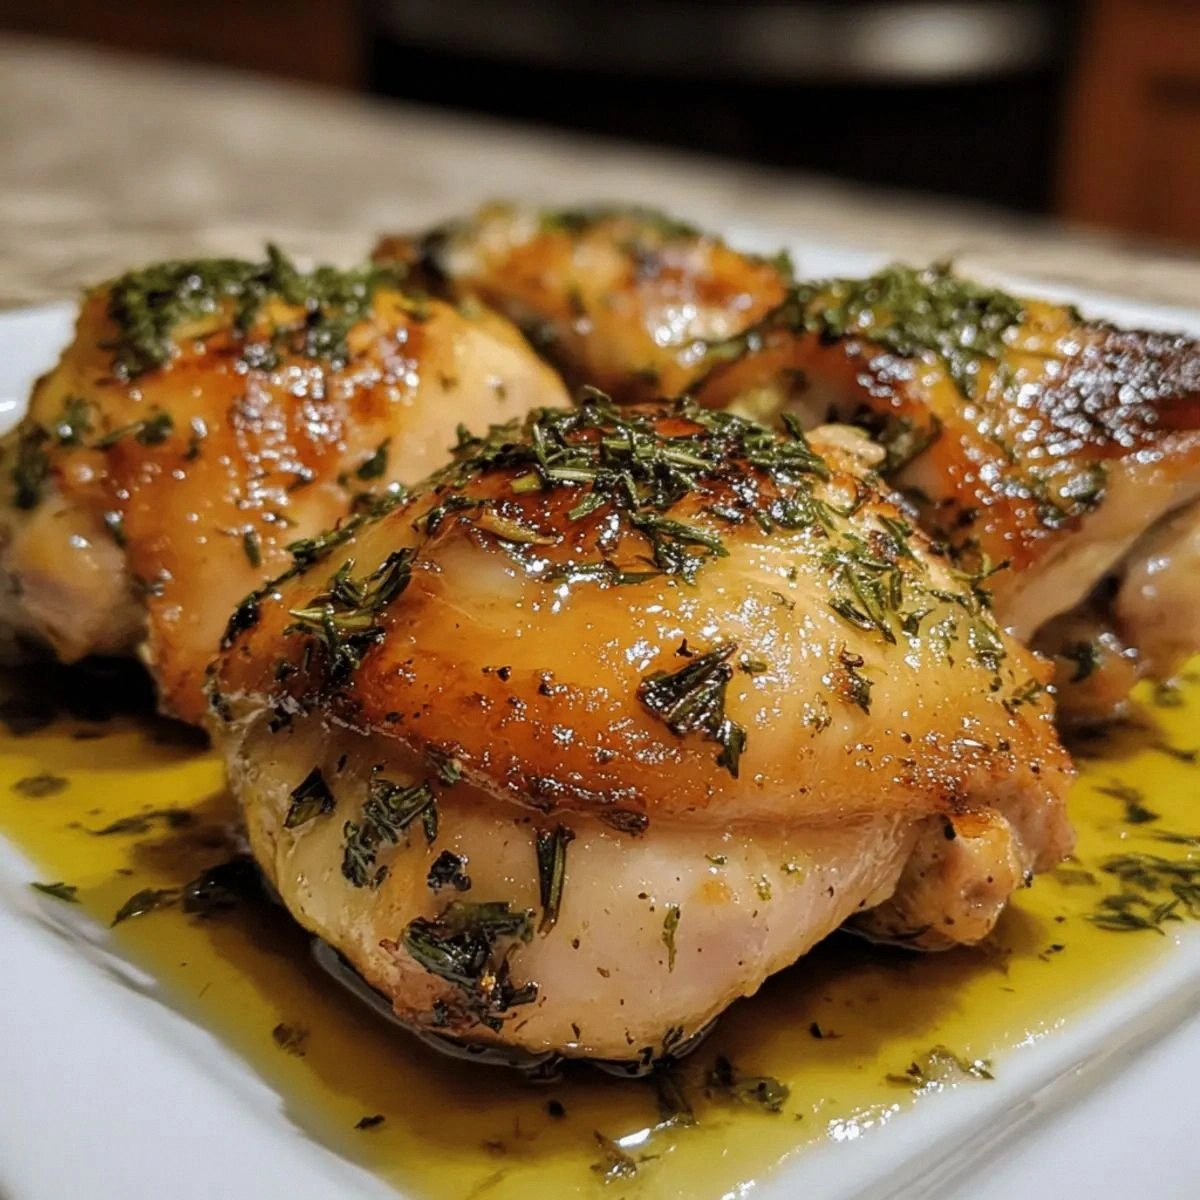
Picture the golden crust forming on the thighs as the oil sizzles, releasing a fragrant aroma that immediately lifts your mood. The garlic and rosemary mingle, their earthy notes rising like a fragrant steam that wraps the room in warmth. As you lift a thigh, the skin crackles with a satisfying snap, revealing a glossy, almost translucent glaze that glistens under the kitchen lights. The first bite delivers a juicy explosion of tender meat, kissed by a subtle lemon zest that brightens the savory base. The Parmesan adds a nutty undertone, while the crushed red pepper offers a gentle heat that lingers on the palate. The overall experience feels like a comforting hug, yet with the confidence of a well‑executed dish.
Unlike most recipes that rely on generic seasoning or overcooking, this version balances bold flavors with gentle cooking techniques that lock in moisture. The use of bone‑in, skin‑on thighs not only adds richness but also creates a natural bast that keeps the meat from drying out. The fresh herbs are layered strategically—rosemary and thyme are browned first, releasing their oils, while oregano and lemon zest are added later to preserve their bright flavors. The result is a dish that showcases each herb’s personality without overwhelming the others. It's the kind of meal that can be plated in minutes yet feels like a slow‑cooked Sunday feast. I’m confident that once you try it, you'll never settle for bland chicken again.
I’ve tweaked this recipe to include a surprising twist: a quick splash of white wine during the sear that deglazes the pan, pulling up all the browned bits for a deeper flavor base. This small addition elevates the dish from good to unforgettable. The technique is simple, yet it transforms the sauce into a silky, aromatic glaze that coats every thigh. Picture yourself pulling this out of the oven, the whole kitchen smelling incredible, and the table already humming with anticipation. The final plating is a burst of color: bright parsley, a sprinkle of Parmesan, and a drizzle of olive oil that glimmers like fresh sea glass. And now the fun part—let's dive into the step‑by‑step journey that will bring this masterpiece to life.
What Makes This Version Stand Out
- Flavor: The combination of fresh rosemary, thyme, oregano, and lemon zest creates a layered herb profile that is both aromatic and bright, unlike the flat seasoning of many quick chicken recipes.
- Texture: The bone‑in, skin‑on thighs develop a crispy exterior while the marrow inside melts into a juicy, tender interior, giving you a satisfying crunch that shatters like thin ice.
- Ease: With just a handful of ingredients and a simple sear‑then‑bake method, this dish is a time‑saving powerhouse that delivers restaurant quality in 45 minutes.
- Versatility: The herb blend can be adapted for vegetarian sauces or used as a rub for other proteins, making it a kitchen staple beyond chicken.
- Crowd‑pleaser: The bold, yet balanced flavor profile turns an ordinary dinner into a memorable gathering, guaranteed to get rave reviews.
- Ingredient Quality: By choosing fresh, high‑quality herbs and a good olive oil, the dish achieves depth that processed seasonings simply cannot match.
- Make‑Ahead Potential: The thighs can be marinated overnight, the sauce pre‑made, and the dish assembled the night before, saving you time on busy days.
Inside the Ingredient List
The Flavor Base
Olive oil is the silent hero that carries the aromatics and creates the initial sear that locks in juices. Garlic, minced to release its pungent oils, offers a sweet, savory backbone that permeates the meat. Fresh rosemary and thyme add a woody, earthy depth that balances the brightness of lemon zest. Dried oregano, though potent, is used sparingly to prevent bitterness, acting as a subtle bridge between the herbs.
The Texture Crew
Bone‑in, skin‑on thighs are the cornerstone of this dish, delivering both flavor and moisture. The skin, when properly seared, yields a crisp, buttery layer that contrasts beautifully with the tender meat. A pinch of crushed red pepper flakes introduces a gentle heat that lingers without overwhelming the palate. Salt and black pepper are essential for seasoning, but they also play a crucial role in drawing out moisture and enhancing the flavors of the herbs.
The Unexpected Star
Lemon zest is the secret that brightens the entire dish, cutting through the richness with a citrusy zing. It also provides a subtle aroma that elevates the overall sensory experience. If you skip the zest, the dish will feel flat and less vibrant, lacking that essential lift that keeps the flavors from becoming too heavy.
The Final Flourish
Parmesan cheese, grated, adds a nutty, umami richness that coats the thighs like a velvety glaze. Fresh parsley, chopped, introduces a fresh, herbal note that balances the heavier elements. Together, they finish the dish with a burst of color and a final layer of flavor that ties everything together. Skipping either would diminish the dish’s depth and visual appeal.
Everything's prepped? Good. Let's get into the real action...
The Method — Step by Step
- Preheat your oven to 425°F (220°C). Pat the chicken thighs dry with paper towels to remove excess moisture; this step is critical for a crisp skin. Season both sides generously with salt, pepper, and crushed red pepper flakes, letting the spices adhere to the surface. Set aside while you prepare the aromatics.
- Heat a large oven‑proof skillet over medium‑high heat and pour in the olive oil. Once the oil shimmers, add the minced garlic, rosemary, and thyme. Sauté until the garlic turns translucent and the herbs release their oils, about 30 seconds, being careful not to burn the garlic. The aroma should be intoxicating, signaling that the base is ready.
- Add the chicken thighs skin side down, pressing them gently into the pan. Allow them to sear for 4–5 minutes until the skin turns a deep golden brown and releases a satisfying crackle. Flip the thighs to brown the other side for 2–3 minutes. The goal is a caramelized crust that locks in juices.
- While the thighs are browning, whisk together the lemon zest, oregano, and a splash of white wine in a small bowl. This deglazing mixture will lift the browned bits from the pan, creating a flavorful base for the sauce. Pour the mixture into the skillet, swirling to combine with the garlic and herbs. The pan should hiss pleasantly, indicating that the wine is reducing.
- Reduce the heat to low and add the grated Parmesan, stirring until it melts into a silky coating. The Parmesan not only enriches the flavor but also helps form a glossy glaze that clings to each thigh. Let the mixture bubble gently for 2 minutes, allowing the flavors to meld.
- Transfer the skillet to the preheated oven. Bake for 20–25 minutes, or until the internal temperature of the thickest part reaches 165°F (74°C). The skin should remain crisp, and the juices should run clear. Use a meat thermometer for accuracy, but even a visual check can guide you.
- Remove the skillet from the oven and let the chicken rest for 5 minutes. Resting allows the juices to redistribute, ensuring each bite stays moist. While resting, spoon a little of the pan sauce over the thighs for extra flavor.
- Transfer the thighs to a serving platter and sprinkle with fresh parsley. The parsley adds a bright, herbal finish that cuts through the richness of the sauce. The visual contrast of green against the golden skin is a feast for the eyes.
- Serve immediately with your choice of sides—roasted potatoes, a crisp salad, or a simple risotto. Pairing with a light white wine enhances the citrusy notes of the dish. The combination creates a balanced, satisfying meal.
That's it — you did it. But hold on, I've got a few more tricks that'll take this to another level...
Insider Tricks for Flawless Results
The Temperature Rule Nobody Follows
Many cooks think any oven temperature will do, but 425°F is the sweet spot that ensures a crispy skin without overcooking the interior. If your oven runs hot, lower the temperature to 400°F and extend the baking time by 5 minutes. This small adjustment prevents the skin from burning while still achieving that coveted crunch. I’ve tried both methods, and the lower temperature consistently gives me a more even result. Remember to check the internal temperature with a thermometer for perfect doneness.
Why Your Nose Knows Best
The aroma is your best ally; if the pan starts to smell overly burnt, reduce the heat immediately. A burnt smell means the garlic is turning black, which will overpower the herbs. Keep a close eye on the garlic, stirring constantly. The moment it turns golden, you’re in the zone. A quick whisk of wine can also help lift the scent if it gets too heavy.
The 5-Minute Rest That Changes Everything
Resting the chicken for 5 minutes after baking is not just a courtesy—it's a science trick that allows the juices to redistribute. Skipping this step can leave you with dry, uneven meat. The rest period also lets the sauce thicken slightly, making each bite more flavorful. I always keep a timer handy to avoid over‑resting, which can cool the thighs too much. A quick rest is a small time investment for a huge flavor payoff.
Layering Herbs for Depth
Roasting the rosemary and thyme before adding the garlic releases their oils, creating a fragrant base. Adding oregano later preserves its bright, peppery flavor. This layering technique ensures that each herb contributes at the right time. If you add all the herbs at once, they can compete for the spotlight, resulting in a muddled taste. Experimenting with the order can lead to subtle variations in flavor.
Using a Cast Iron Skillet
A cast iron skillet holds heat better than stainless steel, providing a more consistent sear. The even heat distribution means the skin gets uniformly crispy. If you don’t have cast iron, a heavy‑bottomed non‑stick pan will suffice, but the results may vary slightly. The key is to preheat the skillet thoroughly before adding the oil. This step ensures that the chicken sizzles instantly.
Finishing with Fresh Herbs
Adding fresh parsley at the end brightens the dish and provides a fresh contrast to the rich sauce. The herbs also add a subtle peppery bite that balances the sweetness of the Parmesan. If you’re serving the dish to guests, garnish with a lemon wedge for a pop of color. The visual appeal is just as important as the taste. Remember, presentation can elevate a good dish to great.
Creative Twists and Variations
This recipe is a playground. Here are some of my favorite ways to switch things up:
Smoky BBQ Version
Swap the rosemary for smoked paprika and add a splash of barbecue sauce during the last 5 minutes of baking. The result is a sweet, smoky glaze that pairs wonderfully with grilled corn. The chicken remains juicy, while the sauce adds a caramelized finish. This version is perfect for summer cookouts.
Mediterranean Twist
Replace oregano with fresh oregano and add Kalamata olives and capers to the skillet. The briny elements complement the lemon zest and create a Mediterranean vibe. Serve with a side of couscous or a Greek salad for a complete meal. The olives add depth and a subtle saltiness.
Spicy Cajun Kick
Increase the crushed red pepper flakes to a tablespoon and incorporate a teaspoon of Cajun seasoning. The heat will carry through the sauce, giving the dish an extra punch. Pair it with a cooling cucumber yogurt dip to balance the spiciness. The Cajun spices bring a bold, southern flair.
Herb‑Infused Cream Sauce
After baking, remove the chicken and reduce the pan sauce with heavy cream and a handful of fresh herbs. The result is a luscious, velvety sauce that coats the thighs. This variation is ideal for a comforting dinner with mashed potatoes or creamy polenta. The cream adds richness that contrasts beautifully with the crispy skin.
Gluten‑Free Option
Omit the Parmesan or replace it with a gluten‑free cheese alternative. The rest of the recipe remains unchanged, ensuring a gluten‑free meal that still delivers on flavor. Serve with a side of roasted vegetables or a quinoa pilaf to keep it gluten‑free. The dish stays hearty and satisfying.
Vegan Adaptation
Use tempeh or seitan instead of chicken thighs for a plant‑based version. Marinate the protein in the same herb mixture and bake at 400°F for 25 minutes. The texture will be firm yet tender, and the herbs will permeate the protein. Pair with a vegan cheese or nutritional yeast for a cheesy finish.
Storing and Bringing It Back to Life
Fridge Storage
Store leftovers in an airtight container in the refrigerator for up to 3 days. The chicken will keep its juiciness if you cover it tightly, preventing the skin from drying out. When reheating, do so gently to preserve the crispness. A quick microwave burst or a short oven reheat at 350°F will revive the flavor. Avoid over‑cooking, as the meat can become rubbery.
Freezer Friendly
Freeze the cooked thighs in a single layer on a parchment sheet before transferring to a freezer bag. This method prevents the pieces from sticking together, making it easy to thaw only what you need. The dish stays flavorful for up to 2 months in the freezer. Thaw overnight in the refrigerator before reheating. Use a microwave or stovetop to warm through.
Best Reheating Method
The best way to reheat is in a preheated oven at 350°F for 10 minutes, then finish on the stovetop for 2 minutes to restore crispness. Add a splash of water or broth to the pan to create steam, keeping the meat moist. If you prefer a quick fix, microwave for 1 minute, then transfer to a skillet for a minute to crisp the skin. The key is to avoid drying the meat while restoring the sauce’s richness.