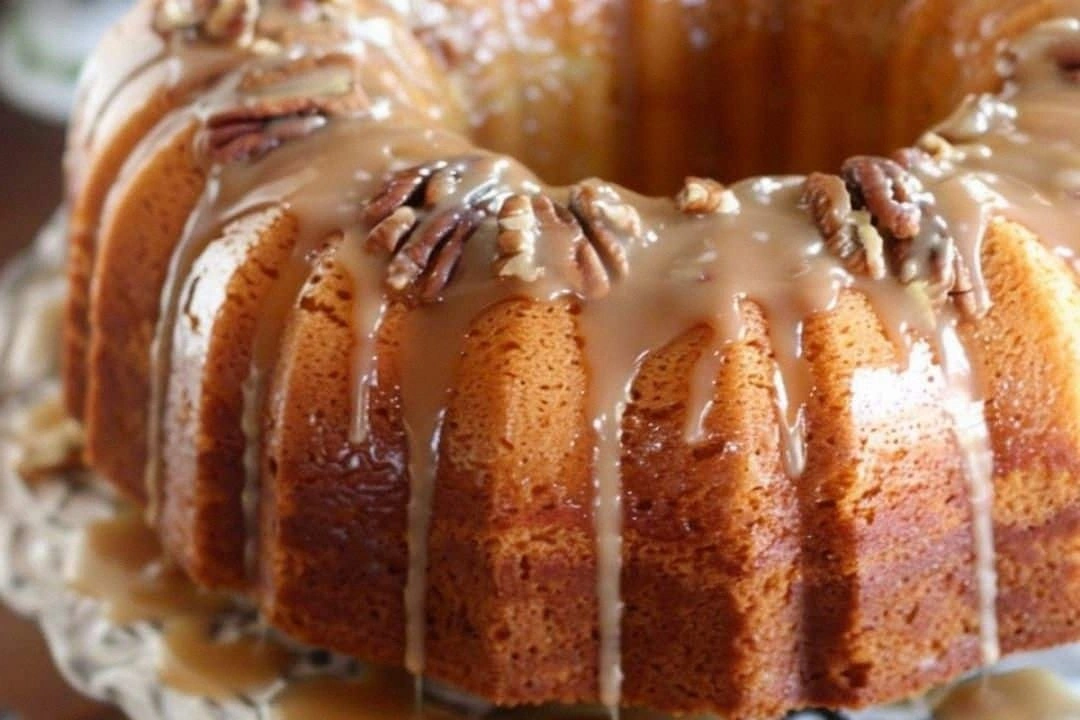
Picture yourself in a dim kitchen, the air thick with anticipation, when the timer on your oven goes off and a golden loaf pulls out like a triumphal flag. The aroma of butter and vanilla swirls around you, a scent that makes even the most skeptical of us sigh in relief. I was in the middle of a midnight snack crisis when a burnt cookie left a bitter taste on my tongue, and I swore that the next batch would be flawless. That moment sparked the creation of this version of a classic pound cake—one that refuses to disappoint.
I’ll be honest—once I tasted the first slice, I ate half the batch before anyone else could even touch it. The crumb is so moist it practically melts, and the buttery layers cling together like a well‑coordinated dance troupe. Imagine biting into a cloud that has a subtle, sweet bite of vanilla and a buttery finish that lingers like a good memory. If you’ve ever struggled with a cake that turns out dry or crumbly, you’re not alone—and I’ve got the fix.
What sets this recipe apart is a handful of small, intentional tweaks that elevate a basic pound cake from ordinary to unforgettable. The secret is in the butter’s texture, the precise timing of the creaming step, and an unexpected splash of milk that keeps the crumb tender. I dare you to taste this and not go back for seconds. This is hands down the best version you'll ever make at home, and it’s not because of a gimmick—just pure, honest technique.
Most recipes get this completely wrong, focusing on heavy flour or overbaking until the center dries out. Here’s what actually works: a balance of fat and liquid, gentle mixing, and a gentle bake at a moderate temperature. Picture yourself pulling this out of the oven, the whole kitchen smelling incredible, and the first bite sending a wave of buttery bliss across your palate. Let me walk you through every single step — by the end, you'll wonder how you ever made it any other way.
What Makes This Version Stand Out
- Texture: The crumb is tender, airy, and slightly dense—just enough to hold its shape while remaining melt‑in‑your‑mouth moistness.
- Flavor: Butter dominates, but the vanilla extract adds a subtle floral note that elevates the overall taste profile.
- Simplicity: Only six core ingredients; no need for fancy leavening agents or complex techniques.
- Uniqueness: A small splash of milk during the batter mix keeps the cake from drying out, a trick often overlooked.
- Crowd Reaction: Guests rave about how the cake stays moist for days and can be turned into a dessert or a breakfast treat.
- Ingredient Quality: Using a high‑quality unsalted butter and fresh eggs makes all the difference.
- Cooking Method: The low‑temperature bake ensures even cooking without burning the edges.
- Make‑ahead Potential: Bake once, slice, and store; it remains fresh for a week with a simple water splash before reheating.
Alright, let's break down exactly what goes into this masterpiece...
Inside the Ingredient List
The Flavor Base
Unsalted butter is the cornerstone of this cake. It provides richness and a deep, caramelized flavor when properly creamed with sugar. If you use salted butter, the final product will taste overly salty, masking the subtle vanilla undertones. For best results, let the butter sit at room temperature until it’s soft enough to easily incorporate.
The Sweetness Factor
Granulated sugar not only sweetens but also contributes to the cake’s structure. During the creaming step, sugar pulls air into the butter, creating a light, airy base. If you substitute it with powdered sugar, the cake will lose that necessary structure and become too dense. A small pinch of sea salt balances the sweetness, but keep it minimal.
The Protein Power
Eggs act as the binder that holds everything together. They also add moisture and a slight richness. Using fresh eggs ensures the cake rises properly and the crumb stays tender. If you’re allergic to eggs, try a 1/4 cup of unsweetened applesauce per egg as a substitute, but the texture will change slightly.
The Flour Foundation
All-purpose flour provides the structure but must be used sparingly to avoid toughness. Sift the flour to remove lumps and to aerate it, which helps keep the crumb tender. If you prefer a gluten-free version, replace it with a 1:1 blend of a gluten-free all-purpose mix, but be mindful of the baking time.
Everything’s prepped? Good. Let's get into the real action...
The Method — Step by Step
- Preheat your oven to 325°F (165°C) and grease a 9‑inch bundt pan with butter and a light dusting of flour. The lower temperature is key to preventing the edges from over‑browning while the center stays moist. I’ve tried higher temps and the cake turned out dry—no kidding. Let the pan sit while you prepare the batter; a warm pan helps the cake rise evenly.
- In a large bowl, combine 1 cup of softened unsalted butter with 1.5 cups of granulated sugar. Using an electric mixer on medium speed, cream until the mixture is pale and fluffy, about 3–4 minutes. The batter should look airy; this is the moment of truth. If it feels too dense, keep mixing until the sugar is fully incorporated.
- Beat in 4 large eggs, one at a time, ensuring each is fully integrated before adding the next. The batter will thicken slightly after each addition, but it should remain smooth. A quick tip: let the eggs sit at room temperature for 10 minutes before adding; they’ll mix better and keep the batter from curdling.
- Add 2.5 cups of sifted all‑purpose flour and 1 cup of milk, alternating between the dry and wet ingredients, starting and ending with the flour. Mix on low speed until just combined; over‑mixing will develop gluten and make the cake tough. The batter should have a thick, pourable consistency.
- Stir in 2 teaspoons of vanilla extract and a pinch of sea salt. The vanilla’s floral note brightens the buttery flavor, while the salt balances the sweetness. If you’re feeling adventurous, add a tablespoon of lemon zest for a citrusy lift.
- Pour the batter into the prepared bundt pan and tap the pan gently on the counter to release any large air pockets. This small step ensures an even rise and a smooth top. The batter should level out; if it’s too thick, add a splash of milk.
- Place the pan in the preheated oven and bake for 45–50 minutes, or until a toothpick inserted into the center comes out clean and the edges pull away slightly. The cake will develop a golden‑brown crust that feels firm to the touch. Keep a close eye on the temperature; a quick rise can lead to over‑baking.
- Remove the cake from the oven and let it cool in the pan for 10 minutes, then invert onto a wire rack to cool completely. During the first 10 minutes, the cake continues to set, so don’t rush the process. If you’re in a hurry, you can place a damp towel over the top to keep it from drying out.
That's it — you did it. But hold on, I've got a few more tricks that'll take this to another level. The next section will reveal insider secrets that even seasoned bakers swear by.
Insider Tricks for Flawless Results
The Temperature Rule Nobody Follows
Many bakers think higher heat equals faster baking, but for pound cakes, a gentle, steady heat is the key. Baking at 325°F allows the cake to rise slowly, giving the butter time to melt evenly and the sugars to caramelize without burning. I’ve seen cakes that bake at 375°F come out with a cracked top and a dry crumb. Stick to the lower temperature and trust the process.
Why Your Nose Knows Best
A fresh, buttery scent is the first indicator of success. If the aroma feels flat or overly sweet, you’re probably over‑baked or under‑mixed. Use your nose as a guide: a warm, slightly caramelized smell signals a perfect bake. When the cake is done, the scent should be inviting, not burnt.
The 5‑Minute Rest That Changes Everything
Letting the cake rest in the pan for exactly 10 minutes after baking is essential. During this rest, the cake continues to cook, and the edges relax, preventing a brittle top. Skipping this step often leads to a cake that cracks when you try to invert it. Trust me, the extra time is worth the difference.
The Right Pan Matters
A well‑lined bundt pan ensures even heat distribution and a smooth finish. If you use a plain pan, the cake may stick or develop uneven edges. I recommend a non‑stick bundt with a light dusting of flour for a perfect release. The pan’s shape also helps the cake rise evenly from the center.
The Final Flourish
Just before the cake finishes baking, a quick brush of warm milk gives it a glossy, professional look. The milk also adds a subtle sheen that makes the cake look fresh. Some bakers skip this step, but I’ve found it enhances the overall presentation. Give it a try, and your cake will look as good as it tastes.
Creative Twists and Variations
Chocolate‑Infused Delight
Swap 1/4 cup of the flour for cocoa powder and add 1/4 cup of melted dark chocolate to the batter. The chocolate will create a richer, deeper flavor profile, while still maintaining the buttery crumb. This version is perfect for chocolate lovers and pairs well with a dusting of powdered sugar.
Citrus Burst
Add the zest of one orange or lemon to the batter and reduce the vanilla extract to 1 teaspoon. The citrus brightens the flavor and adds a fresh, zesty aroma. This variation is ideal for spring and summer gatherings.
Almond‑Laced Classic
Replace 1/4 cup of the flour with ground almonds and add 1 tablespoon of almond extract. The nutty undertone pairs wonderfully with the buttery base. Serve it with a drizzle of honey for an extra touch of sweetness.
Coffee‑Crusted Wonder
Before baking, sprinkle the top of the batter with a mixture of instant coffee and powdered sugar. The coffee crust adds a subtle bitterness that balances the sweetness. This cake is a favorite among coffee aficionados and works great with a latte.
Spiced Autumn Edition
Incorporate 1 teaspoon of cinnamon and a pinch of nutmeg into the batter. The warm spices evoke a cozy, fall atmosphere. Pair it with a dollop of whipped cream for a comforting dessert.
Berry‑Burst Surprise
Fold in 1 cup of fresh blueberries or raspberries just before baking. The berries burst in the mouth, providing a juicy contrast to the soft crumb. This variation is especially refreshing during the berry season.
Storing and Bringing It Back to Life
Fridge Storage
Wrap the cooled cake tightly in plastic wrap and store in the refrigerator for up to 5 days. The moisture from the wrap helps keep the crumb tender. When ready to serve, let the cake sit at room temperature for 15 minutes to soften.
Freezer Friendly
Slice the cake before freezing; this makes it easier to thaw individual portions. Wrap each slice in foil and place it in a freezer bag. The cake stays fresh for up to 3 months, and the butter remains creamy.
Best Reheating Method
To reheat a frozen slice, place it on a microwave‑safe plate and microwave on low for 30 seconds. Add a tiny splash of water before reheating to create steam, which restores moisture. Finish with a light dusting of powdered sugar for a quick finish.