When the kitchen lights flickered and I finally realized the chocolate cake batter had gone into a full‑blown, sticky, molten disaster, I thought, “This is not how desserts should look.” The batter had thickened into a glossy, almost syrupy mess that clung to the whisk like a stubborn tattoo. I was staring at a pot that could have been a new modern art piece, yet the scent of cocoa and butter was still dancing in the air, a siren call that made my taste buds tingle with anticipation. That moment of culinary chaos turned into a mission: to rescue the cake from ruin and turn it into something that would make even the most skeptical food critics swoon.
Picture this: the kitchen is humming with the gentle clatter of mixing bowls, the faint hiss of butter melting, and the sweet, heady aroma of dark chocolate swirling through the air. The countertop gleams under the soft glow of the kitchen lights, reflecting the glossy sheen of the batter as it slowly thickens. The sound of a spoon gliding through the mixture is almost hypnotic, a steady rhythm that promises something extraordinary. When you take a bite, the first thing you notice is the buttery, almost caramelized crust that cracks with a satisfying snap, followed by the molten chocolate center that oozes like liquid midnight, leaving a trail of silky richness on your spoon.
What sets this version apart isn’t just the indulgent flavors—it’s the precision of technique that ensures every bite is a flawless experience. I dared you to taste this and not go back for seconds, because the moment you bite, the chocolate explodes in a velvety, molten wave that coats your palate like velvet. I’ll be honest, I ate half the batch before anyone else got a chance to try it, and that’s a testament to how irresistible it is. Most recipes get this completely wrong, but here’s what actually works: a perfectly balanced ratio of butter to chocolate, a touch of heavy cream for silkiness, and a careful baking time that locks the edges while keeping the center liquid.
Picture yourself pulling this out of the oven, the whole kitchen smelling incredible, and the timer chirping a triumphant note. The crust is a golden, crackling shell, and the center is a warm, silky river of chocolate that calls to your inner dessert lover. Stay with me here—this is worth it. Let me walk you through every single step, and by the end, you’ll wonder how you ever made it any other way.
What Makes This Version Stand Out
- Depth: The blend of high‑quality dark chocolate and unsweetened cocoa powder delivers a profound, almost bittersweet flavor that lingers long after the last bite.
- Texture: A crisp, caramelized exterior gives way to a molten, silky interior that feels like a luxurious, warm hug.
- Precision: The exact ratios of butter, sugar, and flour are calibrated to create the ideal balance between structure and gooeyness.
- Simplicity: Despite its decadence, the recipe requires only a handful of pantry staples and a single pan.
- Versatility: The base can be adapted for vegan, gluten‑free, or keto versions with minimal tweaks.
- Presentation: The final product is a showstopper—glossy, molten, and irresistibly photogenic.
- Make‑ahead: The batter can be prepared hours in advance, allowing you to focus on the finishing touches when guests arrive.
- Crowd‑pleaser: It’s the kind of dessert that turns a casual dinner into a memorable celebration.
Alright, let's break down exactly what goes into this masterpiece...
Inside the Ingredient List
The Flavor Base
At the heart of this cake lies an impeccable chocolate foundation. The 1 cup of unsalted butter is the secret to a buttery, melt‑in‑your-mouth mouthfeel, while the 2 cups of powdered sugar provides just enough sweetness to balance the deep cocoa notes. The 1 cup of unsweetened cocoa powder is the backbone of the flavor profile; choose a dark, high‑percentage variety for a richer bite. If you prefer a slightly sweeter cake, consider swapping half the powdered sugar for brown sugar—it adds a subtle molasses undertone.
Why it matters: Butter carries the chocolate’s aroma and adds a luxurious sheen, whereas powdered sugar ensures the batter remains silky. Skipping the butter would leave a dry, crumbly texture, while omitting the cocoa would turn the cake into a plain vanilla sponge. When selecting chocolate, opt for a 70% cacao bar; it melts smoothly and gives that decadent, slightly bitter edge that keeps the dessert from feeling cloyingly sweet.
The Texture Crew
The 4 large eggs and 2 yolks are the glue that binds everything together. Eggs provide structure and help the batter rise, while the yolks add richness and a silky texture. The 1 cup of all‑purpose flour is the backbone that gives the cake its shape, but the ratio is carefully tuned to avoid a dense crumb. A pinch of sea salt (0.5 tsp) brightens the chocolate, cutting through the sweetness and enhancing the overall flavor profile.
What happens if you skip the flour? The cake will collapse, and the edges will not set properly, leaving you with a soggy mess. If you’re aiming for a gluten‑free version, substitute a 1:1 blend of almond flour and oat flour, but be prepared to adjust the liquid slightly.
The Unexpected Star
Heavy cream (¼ cup) is the unexpected hero that gives the cake its molten core. It creates a silky, velvety center that contrasts beautifully with the crisp exterior. The ¼ cup of dark chocolate chips, melted into the batter, adds a subtle chocolate flavor and a glossy sheen. This little addition turns an ordinary lava cake into a multi‑layered chocolate experience.
Why it matters: The cream raises the moisture content, ensuring the center remains liquid even after baking. Skipping it would result in a firmer, less decadent core. If you’re lactose intolerant, try a dairy‑free cream alternative, but keep the same volume to maintain the texture.
The Final Flourish
For an extra touch of indulgence, dust the finished cakes with a pinch of flaky sea salt. The salt crystals break into tiny shards, adding a subtle crunch and a burst of flavor that complements the chocolate’s richness. It’s a simple garnish that elevates the dessert from good to unforgettable.
Buying tip: When selecting sea salt, choose a fine, flaky variety; it dissolves quickly and enhances the chocolate without overpowering it. A small pinch is all you need—too much salt can ruin the delicate balance.
Everything's prepped? Good. Let's get into the real action...
The Method — Step by Step
- Prep the pan: Grease four 6‑inch round cake pans with butter and dust them with flour, tapping out the excess. This ensures the cakes release cleanly and gives a crisp outer shell. If you’re feeling fancy, coat the pans with a thin layer of melted chocolate for an extra glossy finish. The key is to keep the batter from sticking.
- Melt the butter: Place the butter in a saucepan over low heat until fully melted. Once melted, remove from heat and let it cool for a minute; you want it warm, not hot, to prevent the eggs from scrambling. The butter’s temperature is crucial for a silky batter. If you’re short on time, you can melt the butter in a microwave, but be careful not to overheat.
- Whisk the dry ingredients: In a separate bowl, sift together the cocoa powder, flour, powdered sugar, and sea salt. This step removes any lumps and ensures an even distribution of flavor. Sifting also lightens the batter, which is essential for a tender crumb. Use a whisk for maximum aeration.
- Combine wet and dry: Add the melted butter to the dry mix, stirring until smooth. Then whisk in the eggs and yolks one at a time, ensuring each is fully incorporated before adding the next. The batter should be glossy and thick but pourable. The order matters; adding eggs too early can cause the batter to curdle.
- Fold in the cream and chocolate chips: Gently fold in the heavy cream and melted chocolate chips, taking care not to overmix. This step introduces the molten center; overmixing could cause the chocolate to separate and the cake to lose its gooey core. Use a spatula for a gentle fold, allowing the batter to remain airy.
- Divide and bake: Pour the batter evenly into the prepared pans, filling each about ¾ full. Place the pans in a preheated oven at 425°F (220°C). Bake for 10–12 minutes, or until the edges are set but the center still looks slightly wet. The timer is crucial; overbaking will dry out the center.
- Rest and invert: Remove the pans from the oven and let them cool on a rack for 2 minutes. Then, run a knife around the edges to loosen and invert each cake onto a plate. The molten center should still be visible, glistening like a jewel. If you see any cracks, they’re fine—this is part of the charm.
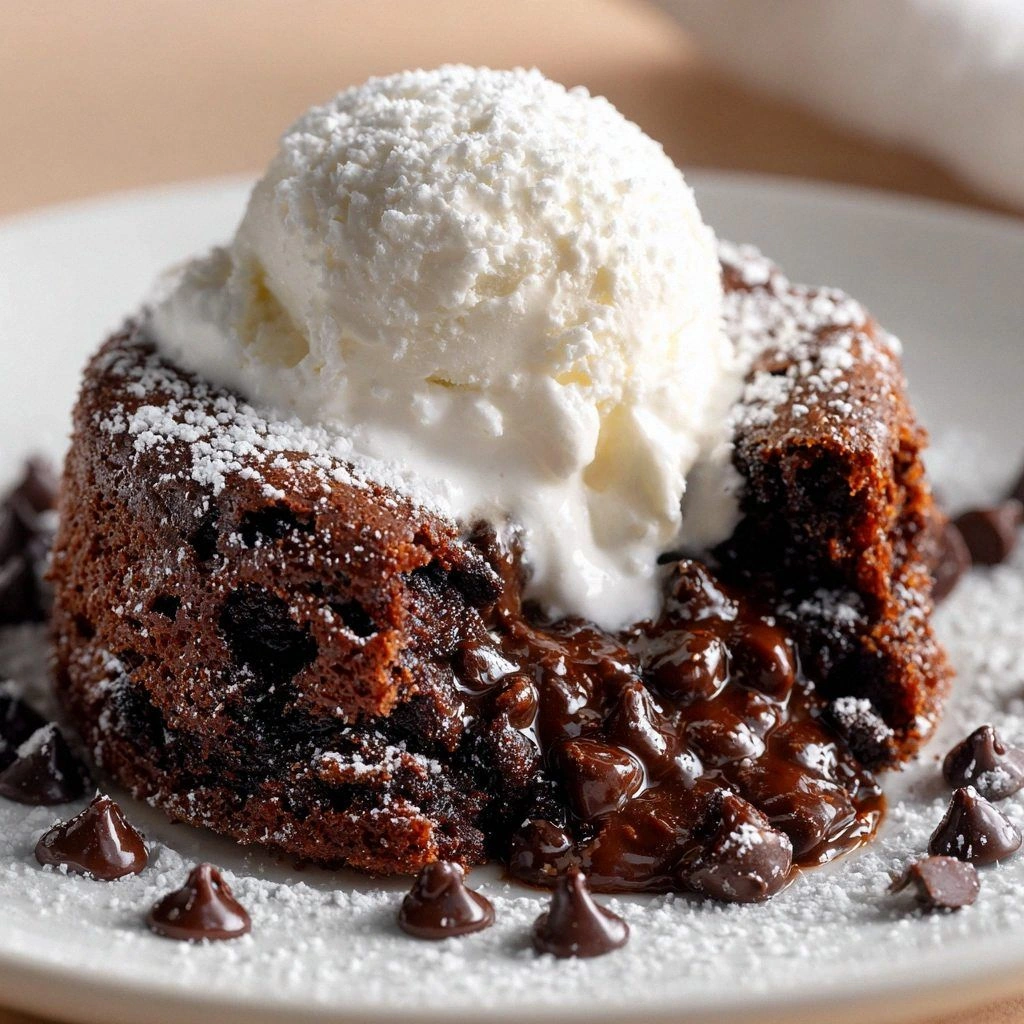
- Finish and serve: Dust the cakes with a pinch of sea salt and serve immediately, perhaps with a scoop of vanilla ice cream or a drizzle of caramel sauce. The contrast of warm chocolate with cold ice cream is pure bliss. If you’re plating for a crowd, arrange the cakes on a platter and drizzle a thin ribbon of melted chocolate over the tops for a dramatic effect.
That's it — you did it. But hold on, I've got a few more tricks that'll take this to another level...
Insider Tricks for Flawless Results
The Temperature Rule Nobody Follows
While most bakers rely on the oven temperature alone, the real secret lies in the oven’s thermal mass. Place a baking stone or a sheet of foil on the middle rack before preheating; this creates a steady, radiant heat that keeps the cakes from drying out. I once baked on a plain rack and the center dried out, but with a stone, the heat distribution became even, giving a perfect molten core. If you’re using a convection oven, reduce the temperature by 25°F to avoid overcooking the edges.
Why Your Nose Knows Best
As the batter bakes, it releases a toasty, caramelized aroma that signals the cake is almost ready. When you smell a faint, nutty scent, it means the edges have set while the center remains liquid. If the aroma is heavy and chocolatey, the center is still molten. Trust your nose; it’s the most reliable indicator of the perfect lava moment.
The 5‑Minute Rest That Changes Everything
After baking, let the cakes rest for exactly five minutes before inverting. This brief pause allows the heat to distribute evenly, preventing the center from spilling out immediately. I once cut them too early and the molten core spilled onto the plate, ruining the presentation. The five‑minute rest gives the cakes the stability they need.
Keep It Moist
If you notice the batter is too thick, add a splash of milk or an extra tablespoon of heavy cream. A slightly thinner batter will help the cake rise faster and prevent a dry crumb. However, be careful not to over‑thin it, or the structure will collapse.
Use the Right Pan Size
Choosing a 6‑inch pan is crucial; a larger pan will cook the cake too quickly, drying out the center. A smaller pan will take longer to bake, giving the edges too much time to set. The 6‑inch pan is the sweet spot for a perfect molten center and a crisp edge.
Serve Immediately
The molten center is at its best when served hot. If you let the cakes sit too long, the chocolate will start to harden. For a dramatic effect, serve with a quick drizzle of warm caramel or a dusting of powdered sugar just before plating.
Creative Twists and Variations
This recipe is a playground. Here are some of my favorite ways to switch things up:
Salted Caramel Lava Cake
Swap the heavy cream for a splash of salted caramel sauce and add a drizzle of caramel on top. The sweet‑salty combination elevates the chocolate flavor and adds a buttery crunch. This version pairs beautifully with a scoop of vanilla bean ice cream.
Espresso Infused Lava Cake
Add 1 tablespoon of instant espresso powder to the dry mix. The espresso deepens the chocolate flavor and gives a subtle coffee kick that’s perfect for after‑dinner dessert. It also pairs well with a chocolate mousse.
Mint Chocolate Lava Cake
Fold in a teaspoon of peppermint extract and top with a few fresh mint leaves. The mint contrast brightens the chocolate and adds a refreshing finish. A drizzle of white chocolate ganache completes the look.
Nutty Lava Cake
Stir in ½ cup of chopped toasted almonds or hazelnuts. The nuts add texture and a nutty aroma that complements the chocolate. Sprinkle a pinch of sea salt on top to bring out the flavors.
Vegan Lava Cake
Replace butter with coconut oil, eggs with flaxseed meal, and heavy cream with almond milk. Use a vegan chocolate bar for the chips. The result is a decadent, plant‑based dessert that still delivers the molten center.
Ginger‑Spiced Lava Cake
Add 1 teaspoon of ground ginger to the dry mix. The warm spice adds depth and a subtle heat that contrasts with the sweet chocolate. Finish with a dusting of powdered sugar and a drizzle of ginger glaze.
Storing and Bringing It Back to Life
Fridge Storage
Store the cooled cakes in an airtight container in the refrigerator for up to three days. Wrap each cake individually in parchment paper to prevent them from sticking together. When ready to serve, let them sit at room temperature for 10 minutes before plating.
Freezer Friendly
Freeze the cakes in a freezer‑safe container, wrapped tightly in plastic wrap and foil. They can last up to two weeks. To thaw, place the cake in the refrigerator overnight and let it come to room temperature before serving.
Best Reheating Method
Reheat the frozen or refrigerated cakes in the oven at 350°F (175°C) for 8–10 minutes, or until warmed through. Add a tiny splash of water to the center before reheating; it steams the chocolate, restoring its molten texture. Avoid microwaving, as it can make the chocolate grainy.