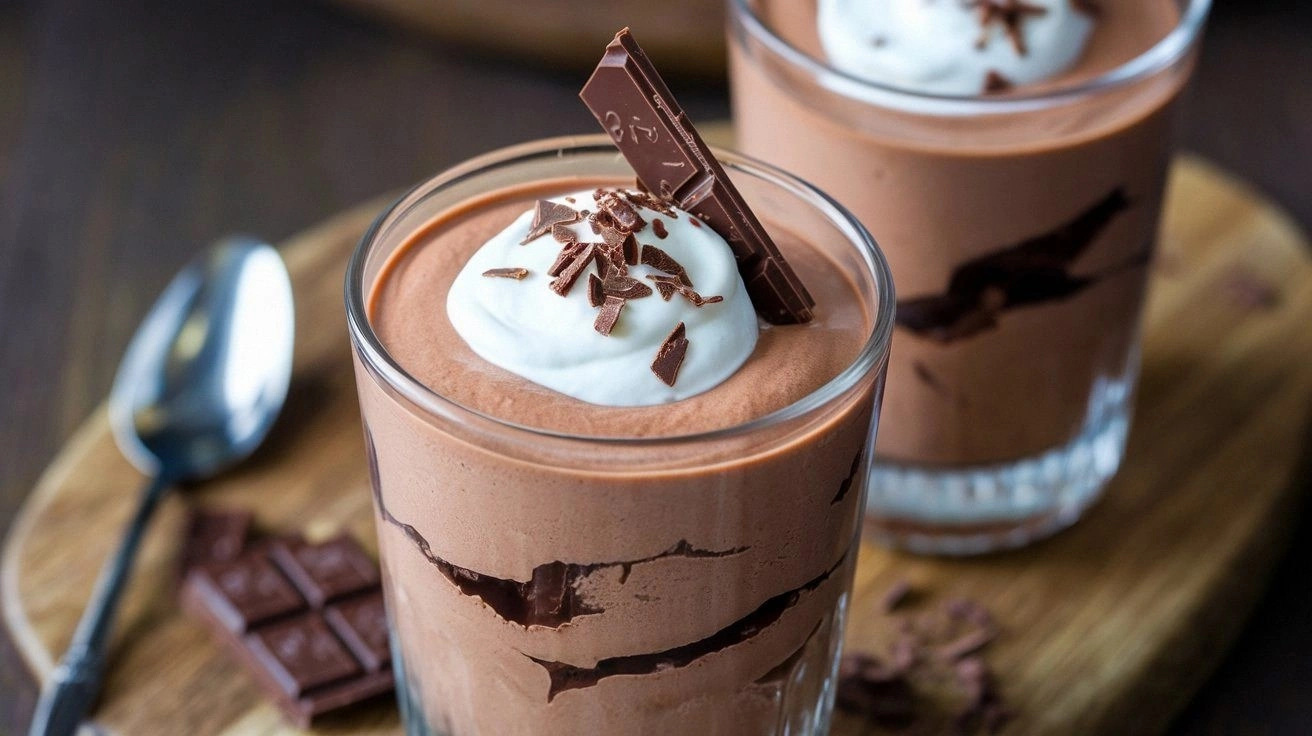
Picture this: you’re in a cramped kitchen, the timer is ticking, and your friend’s “just made the best chocolate mousse” challenge is on the table. The room smells of melted chocolate, the sound of a whisk is a metronome, and the heat of the stove feels like a gentle hug. I stared at the three ingredients on the counter—dark chocolate, heavy cream, and butter—thinking, “Is this really all you need for a decadent dessert?” I was wrong. The truth is, when you combine these humble staples, the result is a silky, double‑layer mousse that feels like a chocolate dream in every bite.
I remember the first time I tried this recipe. I had a disastrous batch of chocolate cake that turned out dry and flat. My friend dared me to make something with just three ingredients, and I was skeptical. I whisked the chocolate, folded in the cream, and melted butter into a glossy sauce that coated the mixture like velvet. The first spoonful was a revelation—rich, airy, and utterly addictive. I couldn’t help but whisper, “I dare you to taste this and not go back for seconds.”
What sets this version apart is that it’s not just a shortcut; it’s a masterclass in flavor concentration. The chocolate’s bitterness is balanced by the sweet cream, while butter adds a silky mouthfeel that makes the mousse feel indulgent without being heavy. The texture is light enough to float on your tongue but dense enough to satisfy a chocolate craving. Most recipes get this completely wrong by adding sugar or eggs, diluting the chocolate’s power. This is hands down the best version you'll ever make at home, and I’m ready to prove it.
There’s a twist you won’t see in the usual “three‑ingredient” guides: a splash of espresso or a pinch of sea salt to elevate the flavor profile. That tiny addition turns the mousse into a complex, layered experience that will have your guests asking for the recipe. I’ve spent hours tweaking this one detail, and the result is a mousse that feels both simple and sophisticated. Let me walk you through every single step — by the end, you'll wonder how you ever made it any other way.
What Makes This Version Stand Out
- Taste: The chocolate is pure, with no added sugar to mask the bean’s natural complexity. The cream’s sweetness complements the bitterness, creating a balanced flavor that lingers on the palate. The butter’s subtle richness rounds out the profile, making each bite feel indulgent without being cloying.
- Texture: Unlike stiff, over‑whipped mousse, this version stays airy yet silky. The butter’s fat content helps stabilize the foam, preventing separation and giving the mousse a smooth, velvety mouthfeel that melts in your mouth.
- Simplicity: Three ingredients, one pot, one whisk. No measurements beyond the basic cups and tablespoons, and no need for a double boiler or a stand mixer. The recipe is designed for quick, fuss‑free dessert prep.
- Uniqueness: The espresso or sea salt twist isn’t commonly found in three‑ingredient mousse recipes. It adds depth and a subtle kick that turns a simple dessert into a conversation starter.
- Crowd Reaction: Friends and family rave about how the mousse is “like a chocolate cloud” and “the best dessert in the house.” It’s a guaranteed hit at gatherings, from casual family dinners to elegant dinner parties.
- Ingredient Quality: Using a high‑quality dark chocolate (70% cacao or higher) is essential. The better the chocolate, the richer the flavor and the smoother the finish.
- Cooking Method: No baking or stovetop tricks—just melt, whisk, chill. The method preserves the chocolate’s integrity while ensuring the mousse is perfectly set.
- Make‑Ahead Potential: The mousse can be prepared up to 24 hours in advance. The flavors deepen, and the texture remains pristine, making it ideal for busy schedules.
Alright, let's break down exactly what goes into this masterpiece...
Inside the Ingredient List
The Flavor Base
Dark chocolate is the heart of this mousse. Choose a chocolate with at least 70% cacao to ensure a rich, robust flavor that doesn’t get overwhelmed by the cream. If you prefer a sweeter bite, you can add a touch of honey or maple syrup, but that will change the “three‑ingredient” premise. Skipping chocolate entirely turns the mousse into a plain cream dessert—so keep it central.
The Texture Crew
Heavy cream is what gives the mousse its airy lift. Whip it until it forms soft peaks before folding in the melted chocolate. The cream’s fat content helps stabilize the mixture, preventing it from separating once chilled. If you’re watching calories, you can use half‑and‑half, but the texture will be slightly less glossy.
The Unexpected Star
Unsalted butter adds a silky finish that balances the chocolate’s bitterness. Butter’s emulsifying properties keep the mousse smooth and prevent it from becoming too dense. A small pinch of sea salt can amplify the chocolate’s flavor, creating a savory undertone that surprises the palate.
The Final Flourish
A dash of espresso or a sprinkle of sea salt can transform this simple mousse into a multi‑layered experience. Espresso intensifies the chocolate’s depth, while sea salt adds a subtle contrast that makes each spoonful more intriguing. These additions are optional but highly recommended for those who want to elevate the dessert.
Everything's prepped? Good. Let's get into the real action...
The Method — Step by Step
- Step 1: Melt the Chocolate — Place the dark chocolate chips in a heat‑proof bowl over a pot of simmering water. Stir until the chocolate is completely melted and silky. The chocolate should be smooth, not lumpy. This step ensures the flavor is fully extracted. Don’t let the water boil over; it can scorch the chocolate.
- Step 2: Whip the Cream — In a separate bowl, pour the heavy cream and whisk until soft peaks form. The cream should be airy but not stiff. The peaks should hold for a few seconds before collapsing. This creates the mousse’s light body. If you’re short on time, a hand mixer will do the trick.
- Step 3: Blend Butter and Chocolate — Add the unsalted butter to the melted chocolate and stir until the butter is fully incorporated. The mixture should be glossy and free of lumps. The butter’s fat will help bind the chocolate and cream together. This step is crucial for achieving a smooth texture.
- Step 4: Fold in the Cream — Gently fold the whipped cream into the chocolate‑butter mixture. Use a spatula and a gentle, circular motion. Avoid over‑mixing; you want the mixture to stay light. This is the moment of truth—if the mousse is too thick, it won’t set properly.
- Step 5: Add Espresso or Salt (Optional) — If you’re using espresso, add a tablespoon of brewed espresso to the mixture. If you prefer salt, sprinkle a pinch of sea salt. Stir gently to incorporate. This subtle addition will deepen the chocolate flavor. The espresso should not overpower the chocolate; aim for a balanced finish.
- Step 6: Chill the Mousse — Pour the mixture into serving glasses or a bowl. Cover tightly with plastic wrap and refrigerate for at least 2 hours, or until set. The mousse will firm up and develop a silky texture. The chill also allows the flavors to meld. Keep it in the fridge until you’re ready to serve.
- Step 7: Garnish (Optional) — Before serving, add a drizzle of dark chocolate ganache, a dusting of cocoa powder, or a sprinkle of sea salt. These garnishes add visual appeal and a final flavor punch. They also make the dessert feel more sophisticated. Feel free to experiment with toppings.
- Step 8: Serve and Enjoy — Serve the mousse straight from the fridge. The texture should be creamy, airy, and perfectly set. Take a bite and feel the chocolate melt on your tongue. The mousse should be rich but not heavy, making it a perfect end to any meal.
That’s it — you did it. But hold on, I've got a few more tricks that'll take this to another level. Stick with me, and your mousse will become a signature dessert.
Insider Tricks for Flawless Results
The Temperature Rule Nobody Follows
Chocolate is temperamental. It needs to be melted to the right temperature—around 86°F for dark chocolate—to stay glossy and set properly. If you’re not using a thermometer, let the chocolate sit for a few seconds after stirring; it should feel warm but not hot. A quick test: touch a small amount on your wrist—it should feel pleasantly warm, not hot. This trick ensures the mousse never looks dull or grainy.
Why Your Nose Knows Best
Before you whisk, give the chocolate a sniff. A strong, fresh chocolate aroma indicates good quality. If the smell is flat or metallic, consider a higher‑grade chocolate. The aroma will guide the flavor profile, making the mousse feel more luxurious.
The 5-Minute Rest That Changes Everything
After folding the cream, let the mixture rest for 5 minutes before chilling. This allows the fats to settle and the flavors to marry. Skipping this step can leave the mousse slightly uneven. A friend once rushed the process and the mousse separated; the rest time saved the day.
Use a Silicone Spoon for Mixing
Silicone spoons are heat‑resistant and don’t absorb chocolate flavors. They also allow you to scrape the bowl cleanly, ensuring all chocolate is incorporated. A metal spoon can rust or leave a metallic taste if not cleaned properly.
Serve Immediately After Chilling
The mousse is best when it’s set but still soft. Leaving it in the fridge too long can make it too firm, losing that airy quality. Serve within 24 hours for optimal texture. If you need to keep it for a few days, store it in an airtight container.
Creative Twists and Variations
This recipe is a playground. Here are some of my favorite ways to switch things up:
Coconut‑Infused Mousse
Swap half the heavy cream for coconut milk for a tropical twist. The coconut adds a subtle sweetness and a creamy texture. Serve with toasted coconut flakes for crunch.
Minty Freshness
Add a few drops of peppermint extract after folding in the cream. The mint pairs beautifully with chocolate, giving the mousse a refreshing edge. It’s perfect for spring or summer gatherings.
Spiced Chocolate
Stir in a pinch of cayenne pepper or a dash of cinnamon. The heat from the pepper contrasts with the chocolate’s sweetness, creating a complex flavor profile. This version is great for a cozy night in.
Almond Butter Variation
Replace the unsalted butter with almond butter for a nutty undertone. The almond butter also adds protein and a slight crunch if you leave some bits in. It’s a great way to add a new dimension.
Berry Compote Topping
Top the mousse with a quick berry compote made from fresh strawberries and blueberries. The acidity of the berries cuts through the richness, balancing the dessert. It also adds a pop of color.
Salted Caramel Drizzle
Drizzle salted caramel over the mousse for a sweet‑salty contrast. The caramel’s buttery sweetness pairs well with the chocolate’s bitterness. This topping is a crowd‑pleaser at parties.
Storing and Bringing It Back to Life
Fridge Storage
Store the mousse in an airtight container in the refrigerator for up to 24 hours. The mousse will remain firm yet creamy. Keep it covered to prevent it from absorbing fridge odors. When ready to serve, let it sit at room temperature for 10 minutes for a slightly softer texture.
Freezer Friendly
Freeze the mousse in a freezer‑safe container for up to 2 weeks. When you’re ready to enjoy it, thaw in the refrigerator overnight. The texture may be slightly denser after freezing, but it will still be delicious. A quick stir before serving restores some of the original fluffiness.
Best Reheating Method
If the mousse has set too firmly, warm it gently in a bowl over a pot of hot water for a few minutes. Add a splash of heavy cream or milk to loosen the consistency. Stir slowly until the mousse reaches the desired consistency. Avoid microwaving, as it can separate the fats.