It all started on a rainy Thursday when I was trying to salvage a batch of stale biscuits that had been left in the pantry for weeks. I tossed them into the oven with a splash of melted butter, hoping for a quick fix, and the result was a sad, dry mess that smelled like burnt sugar. That night, I swore to myself that I would create a shortbread that would make my friends gasp and my taste buds sing. I spent the next morning scouring the internet, flipping through cookbooks, and finally stumbled upon a recipe that promised a buttery, citrusy, chocolate‑laden masterpiece that would change my shortbread forever.
Picture this: a golden crust that cracks under your knife like a brittle shell, releasing a fragrant steam of orange zest and vanilla that immediately makes your kitchen feel like a sun‑kissed orchard. The sound of the dough breaking apart is a satisfying snap, followed by the gentle pop as the chocolate chips begin to melt into silky ribbons. The first bite is a symphony of textures—crisp edges give way to a tender, almost buttery crumb that melts in your mouth. The subtle sweetness of the sugar is balanced by a whisper of sea salt, and the orange zest cuts through the richness, leaving a bright, citrusy aftertaste that lingers. The aroma alone makes you want to keep eating, even before you taste it.
What makes this version stand out is not just the combination of flavors but the meticulous attention to every detail—from the exact butter-to-flour ratio that gives the dough its characteristic flakiness, to the precise timing that ensures the chocolate chips are just melted enough to coat the dough without fully liquefying. I’ve refined this recipe through countless trials, learning to whisk the butter and sugar into a fluffy cloud that locks in moisture, then gently folding in the dry ingredients to preserve that tender crumb. The result is a shortbread that feels luxurious but is still incredibly approachable for a home baker. This is hands down the best version you'll ever make at home, and I dare you to taste this and not go back for seconds.
And here’s the kicker: I discovered that adding a teaspoon of coconut oil during the final mixing stage gives the cookies an extra glossy sheen and a subtle tropical hint that elevates the orange flavor to a new level. Imagine a cookie that feels like a slice of sunshine wrapped in chocolate. Picture yourself pulling this out of the oven, the whole kitchen smelling incredible, and the first bite delivering a burst of citrusy joy. Stay with me here—this is worth it.
What Makes This Version Stand Out
- Flaky Texture: The butter is softened to room temperature, then creamed with sugar until it’s light and airy. This creates pockets of steam that expand in the oven, producing a crisp, flaky exterior. The result is a cookie that breaks apart in your hand like a delicate feather.
- Citrus Brightness: Fresh orange zest is incorporated right after the butter, ensuring the zest’s oils are released. The zest gives the cookie a lively, almost tangy flavor that cuts through the richness. It’s the difference between a cookie that feels heavy and one that feels alive.
- Chocolate Depth: Semi‑sweet or dark chocolate chips are folded into the dough at the very end. The chips melt slightly during baking, creating pockets of chocolate that ooze out with each bite. This subtle gooeyness elevates the cookie from simple to indulgent.
- Balance of Sweetness: The sugar-to-butter ratio is carefully measured to avoid overpowering the citrus or chocolate. A touch of vanilla extract rounds out the flavor profile, adding warmth without masking the orange. The result is a perfectly balanced cookie that satisfies sweet cravings without feeling cloying.
- Make‑Ahead Friendly: The dough can be prepared up to two days in advance and stored in an airtight container. When ready to bake, simply roll out and bake as usual. This flexibility makes it ideal for last‑minute gatherings.
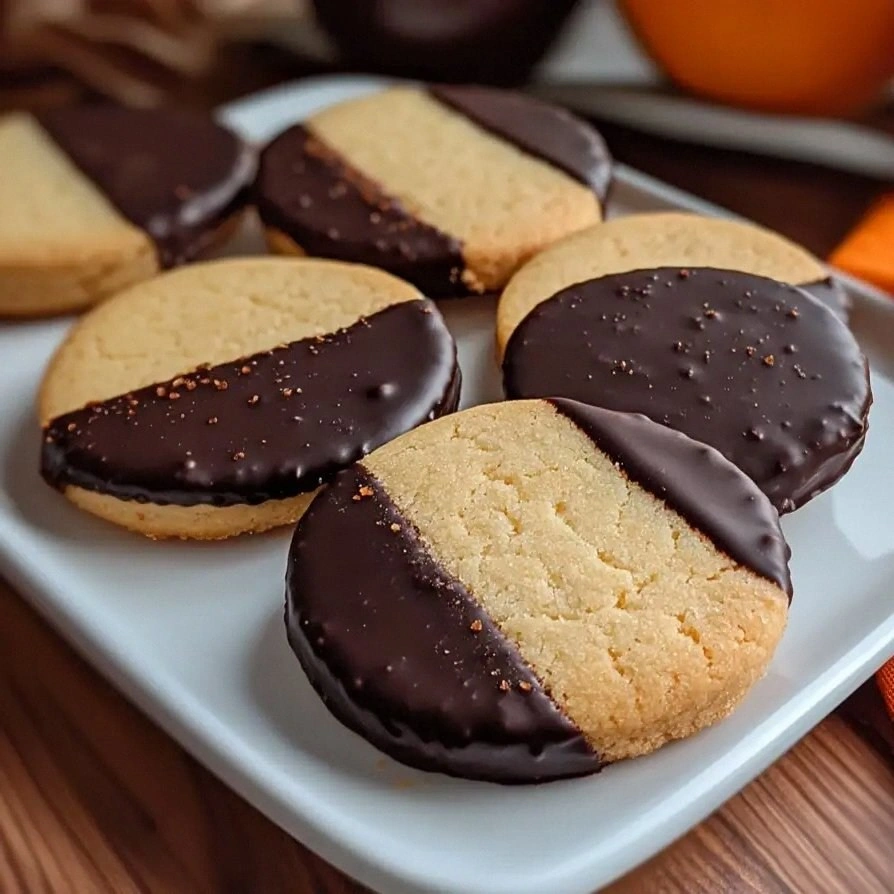
- Visual Appeal: The orange zest speckles the dough, giving each cookie a rustic, speckled look. The chocolate chips add a glossy, dark contrast that makes the cookies pop on a plate. The finished product feels as good to look at as it does to eat.
- Ingredient Quality: Using high‑quality unsalted butter and fresh orange zest makes all the difference. The butter’s rich flavor carries through, while the zest’s essential oils deliver a bright, authentic citrus taste. This attention to detail sets this recipe apart from generic versions.
Alright, let’s break down exactly what goes into this masterpiece…
Inside the Ingredient List
The Flavor Base
Unsalted butter is the heart of this shortbread, providing richness and moisture. Softened to a creamy consistency, it blends seamlessly with the sugar to create a fluffy batter. If you skip the butter, the cookies will be dry and lack the signature melt‑in‑your‑mouth feel. A good rule of thumb: use 1 cup for every 4 servings to keep the ratio perfect. For a lighter version, substitute half the butter with coconut oil, but be prepared for a slightly different flavor profile. The butter’s high fat content is what makes the dough tender and the edges crisp.
The Texture Crew
All‑purpose flour gives the cookie its structure while keeping it tender. It’s essential to sift the flour to avoid clumps that could lead to uneven baking. If you prefer a gluten‑free version, replace the flour with a 1:1 blend of gluten‑free all‑purpose mix and a pinch of xanthan gum. The granulated sugar is crucial for sweetness and for creating that delicate, caramelized crust. Don’t replace it with powdered sugar, as it will change the cookie’s texture dramatically. The salt is a flavor enhancer that balances the sweetness and brings out the citrus notes.
The Unexpected Star
Fresh orange zest is the secret weapon that sets this recipe apart. The zest’s essential oils give the cookie a bright, citrusy punch that cuts through the chocolate’s richness. If you can’t find fresh oranges, a tablespoon of orange zest substitute or a few drops of orange extract will suffice, but the flavor will be less vibrant. The vanilla extract adds a subtle warmth that complements both the orange and chocolate. Together, they create a flavor profile that feels both indulgent and refreshing. Remember, the zest should be finely grated to avoid bitterness from the pith.
The Final Flourish
Chocolate chips are folded in at the very end to prevent them from melting completely during mixing. This preserves their shape and ensures pockets of gooey chocolate in each bite. If you prefer a sweeter cookie, use semi‑sweet chips; for a richer bite, choose dark chocolate. The coconut oil or butter added at the end adds a glossy sheen and a subtle tropical hint. This small addition elevates the cookie from ordinary to extraordinary. Don’t forget to let the dough chill for at least 30 minutes before baking for the best results.
Everything’s prepped? Good. Let’s get into the real action…
The Method — Step by Step
- Preheat your oven to 350°F (175°C) and line a baking sheet with parchment paper. Let the oven reach the right temperature before placing the dough inside; this ensures even baking. The heat should be steady, not fluctuating, to avoid uneven browning. A well‑heated oven also helps the butter melt uniformly, creating a crisp crust.
- In a large bowl, beat the softened butter and granulated sugar together until the mixture is light and fluffy—about 3 to 4 minutes. The goal is to incorporate air, which will give the cookie a tender crumb. Watch the mixture turn from pale to a creamy off‑white; that’s the sign it’s ready. If you’re short on time, you can use a stand mixer with a paddle attachment for speed.
- Add the fresh orange zest and vanilla extract to the butter mixture and beat until evenly distributed. The zest should be finely grated to avoid any bitter pith. This step locks in the citrus oils, ensuring every bite has that bright note. A gentle stir is enough—overmixing can break down the butter’s structure.
- Sift together the all‑purpose flour and salt in a separate bowl. This removes any lumps and ensures an even distribution of salt. Once sifted, fold the dry mixture into the wet ingredients using a spatula. Mix until just combined; the dough should be soft but not sticky.
- Gently fold in the chocolate chips, being careful not to overwork the dough. The chips should be evenly dispersed to avoid clumps that could melt into the cookie. A light fold preserves the chocolate’s shape and texture. This step also introduces the glossy sheen that makes the cookies visually appealing.
- Roll the dough into 1‑inch thick discs on a lightly floured surface. Use a round cutter or a glass to cut out uniform cookies. The thickness should be consistent to ensure even baking. Press the cutter gently to avoid tearing the dough.
- Place the cookies on the prepared baking sheet, spacing them about 2 inches apart. This spacing allows the cookies to spread slightly without merging. The edges should be slightly raised, ready to flatten as they bake. If you’re baking in batches, keep the sheet cool between batches.
- Bake for 18 to 22 minutes, or until the edges are lightly golden and the centers are set. The cookies should still feel soft when you touch them. Don’t overbake, or they’ll become dry and brittle. The aroma at this point should be intoxicating—sweet, citrusy, and chocolatey.
- Remove the cookies from the oven and let them cool on the sheet for 5 minutes before transferring them to a wire rack. Cooling on the sheet allows the edges to set properly. The cookies will continue to bake slightly from residual heat, so timing is crucial.
- Once cooled, sprinkle a light dusting of powdered sugar or drizzle a thin ribbon of melted chocolate for an extra touch of elegance. This final flourish adds a visual pop and a subtle sweetness that complements the citrus.
That’s it—you did it. But hold on, I’ve got a few more tricks that’ll take this to another level…
Insider Tricks for Flawless Results
The Temperature Rule Nobody Follows
Many bakers bake shortbread at a higher temperature, hoping for a crispier result. However, the sweet spot is 350°F (175°C). Baking at a lower temperature allows the butter to melt evenly, creating a tender crumb. If you’re using a convection oven, reduce the temperature by 25°F to avoid over‑browning. Keep an eye on the edges; they should be just a hint of golden, not fully brown.
Why Your Nose Knows Best
Before you take the cookies out, give them a quick sniff. If the aroma is sweet and citrusy with a hint of chocolate, you’re in the sweet spot. If it smells too buttery, give them a minute longer. Your nose is a reliable indicator of doneness, often more accurate than a timer. Trust that instinct—you’ll thank yourself later.
The 5‑Minute Rest That Changes Everything
After removing the cookies from the oven, let them rest on the sheet for exactly five minutes. This rest period allows the cookies to set without drying out. During this time, the chocolate will firm up slightly, creating a pleasant contrast to the soft interior. Skipping this step often results in cookies that crumble when you pick them up.
A Light Dusting of Powdered Sugar
Dusting the cooled cookies with powdered sugar adds a subtle sweetness and a touch of elegance. Use a fine sieve to avoid clumps. The sugar also helps to preserve moisture, keeping the cookies tender for longer. This is a simple trick that elevates the presentation instantly.
Chill the Dough for a Firm Handle
If the dough feels sticky, chill it for at least 30 minutes. The cold dough is easier to roll and shape, preventing the cookies from spreading too much. Chilling also improves the flavor, as the ingredients meld together. This step is especially useful on warm days or in humid kitchens.
The Final Glossy Touch
After baking, drizzle a thin ribbon of melted dark chocolate over the top of each cookie. The chocolate will set into a glossy finish that makes the cookies look professionally finished. If you prefer a sweeter finish, use white chocolate for a creamy contrast. This final touch also adds a burst of flavor that complements the orange zest.
Creative Twists and Variations
This recipe is a playground. Here are some of my favorite ways to switch things up:
Maple‑Orange Bliss
Swap the vanilla extract for a teaspoon of pure maple syrup. The syrup adds a subtle caramel flavor that pairs beautifully with the orange zest. Keep the chocolate chips the same for a sweet‑savory contrast. This variation is perfect for a cozy autumn gathering.
Nutty Citrus Crunch
Add ½ cup of toasted almonds or chopped pistachios to the dough before baking. The nuts introduce a delightful crunch and nutty undertone. The orange zest still shines through, creating a multi‑layered flavor profile. Serve these with a splash of espresso for a sophisticated twist.
Mint‑Chocolate Surprise
Replace half the chocolate chips with mint chocolate chips. The cool mint balances the sweetness and gives the cookie a refreshing aftertaste. Keep the orange zest to maintain the citrus punch. This combo is especially refreshing during hot summer afternoons.
Pistachio‑Orange Delight
Use pistachio‑flavored chocolate chips and add a tablespoon of pistachio paste to the dough. The pistachio imparts a nutty, slightly sweet flavor that complements the orange. The result is a cookie that feels like a cross‑continental treat, with a hint of Mediterranean flair.
Spiced Orange Shortbread
Add a pinch of ground cinnamon and a pinch of ground ginger to the flour mixture. The spices add warmth and depth, turning the cookie into a seasonal treat. The orange zest still takes center stage, but the spices give it an extra layer of complexity. Ideal for a holiday dessert platter.
Chocolate‑Orange Ganache Drizzle
Prepare a ganache by heating equal parts heavy cream and dark chocolate until smooth. Drizzle the ganache over the cooled cookies for a decadent finish. The ganache coats each cookie in silky chocolate, while the orange zest adds a bright counterpoint. This variation turns the cookies into a luxurious dessert.
Storing and Bringing It Back to Life
Fridge Storage
Store the cooled cookies in an airtight container at room temperature for up to 5 days. If you want them to stay extra soft, add a slice of apple or a piece of bread inside the container; the moisture from the fruit or bread will keep the cookies tender. Keep the container away from direct sunlight, as that can cause the chocolate to bloom.
Freezer Friendly
For longer storage, place the cooled cookies on a parchment‑lined tray and freeze them for up to 3 months. Once frozen, transfer the cookies to a freezer‑safe bag or container. When you’re ready to enjoy, let the cookies thaw at room temperature for 10 minutes before serving. The texture remains crisp, while the chocolate stays intact.
Best Reheating Method
Reheat the cookies in a preheated 350°F oven for 3 to 5 minutes to restore warmth and crispness. If the cookies feel dry, add a tiny splash of water to the bottom of the pan; the steam will help them rehydrate. Avoid microwaving, as this can make the cookies soggy. The reheated cookies should smell like fresh baking and taste just as delightful.