I still remember the day I ruined a perfectly good batch of chocolate cookies. There I was, standing in my kitchen at 11 PM, flour in my hair, cocoa powder on my forehead, holding a tray of sad, dry hockey pucks that were supposed to be my contribution to a neighborhood potluck. My roommate walked in, took one bite, and without missing a beat said, "These taste like disappointment with a hint of charcoal." She wasn't wrong. But here's where the story gets interesting — instead of admitting defeat, I became obsessed with creating the opposite. I wanted something so rich, so decadent, so ridiculously over-the-top that it would make up for every baking failure I'd ever had. After three weeks, twelve pounds of cream cheese, and what my neighbors now refer to as "The Great Butter Shortage of 2023," I finally cracked the code. What emerged from my oven wasn't just a cookie — it was a revelation. A black velvet cheesecake cookie that combines the fudgy intensity of devil's food cake with the creamy tang of New York cheesecake, wrapped in a cookie that stays soft for days. The first time I pulled these from the oven, the entire apartment building smelled like Willy Wonka had opened a bakery. My neighbor from two floors down knocked on my door at midnight, begging to know what I was making. I'll be honest — I ate half the batch before anyone else got to try it, standing over the sink in my pajamas, barely waiting for them to cool. If you've ever struggled with cookies that spread too thin, cheesecake that cracks like the Sahara, or desserts that look better than they taste, you're not alone — and I've got the fix that'll change everything.
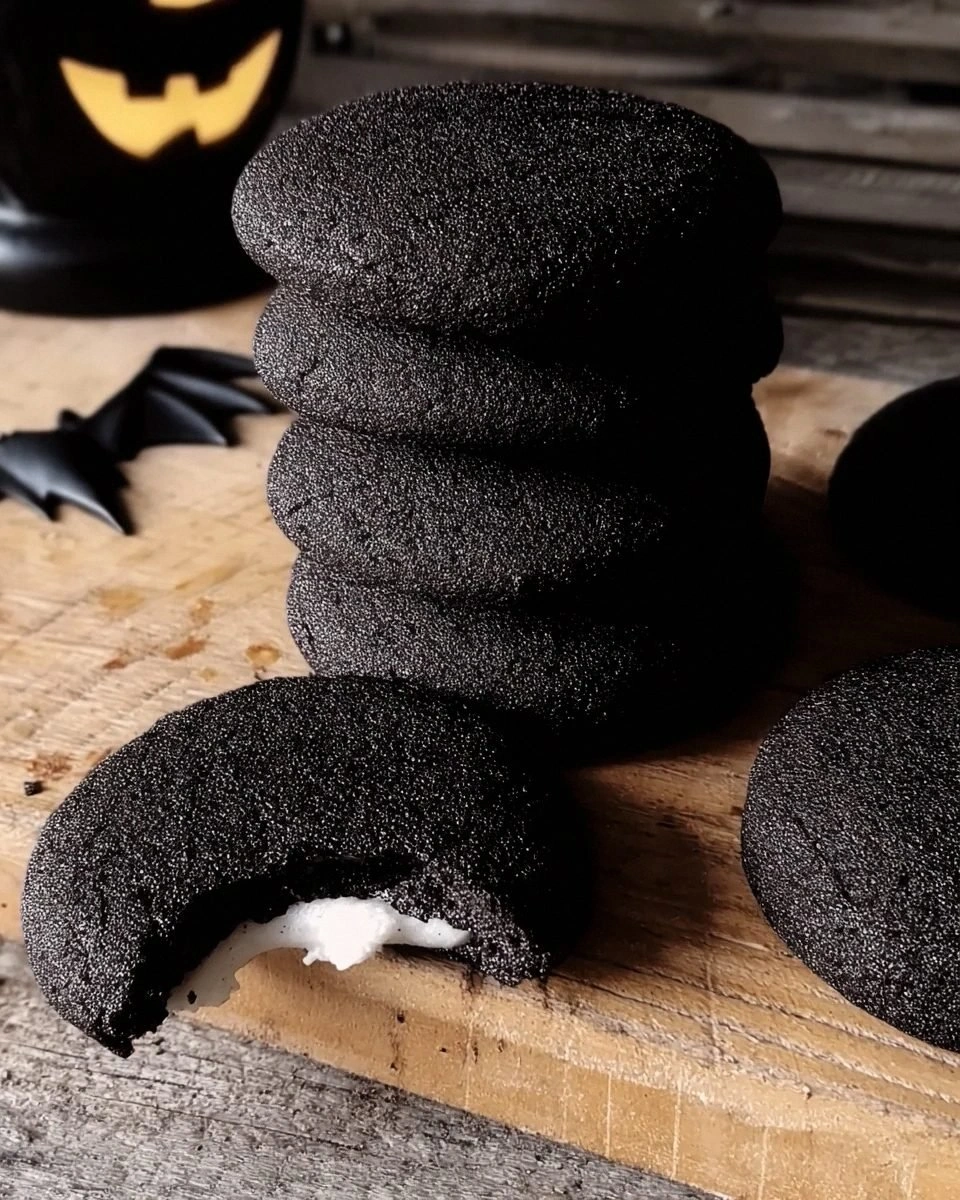
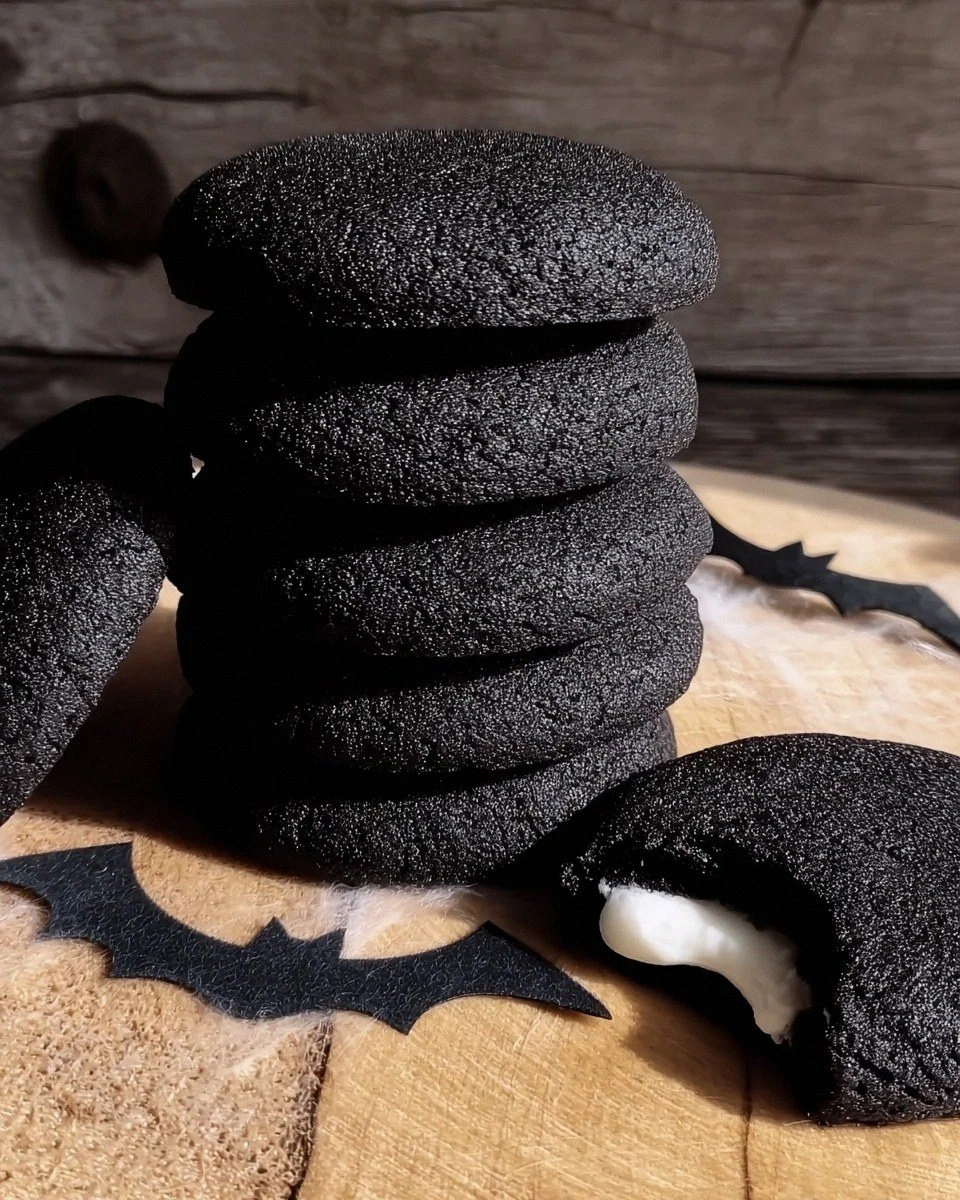
Picture yourself pulling these cookies from the oven, the whole kitchen smelling like a chocolate factory had a baby with a cheesecake shop. The tops are crinkled and glossy like a brownie's crown, with cracks revealing the pale cheesecake swirl underneath. As you break one open, the chocolate cookie yields like velvet, revealing a creamy white ribbon that practically glows against the midnight-dark dough. The first bite hits you with deep cocoa notes, then the tangy cream cheese cuts through like a spotlight, balancing the richness with its signature zing. The edges have that perfect cookie snap, but give way to a center so soft it feels like you're eating chocolate clouds. That sizzle when the cold cream cheese hits the warm chocolate dough? Absolute perfection. Most recipes get this completely wrong — they either make a chocolate cookie that's too cakey or a cheesecake swirl that bakes away into nothingness. But here's what actually works: creating two distinct batters that dance together but never fully combine, so every bite gives you both experiences in perfect harmony.
What started as my late-night revenge against those terrible hockey-puck cookies has become my signature move at every gathering. People don't just ask for the recipe — they text me photos of their attempts, send me thank-you cards, and one friend even named her cat after these cookies (Cookie Monster was already taken, apparently). The magic lies in the contrast: the black velvet cookie base gets its obsidian color from Dutch-processed cocoa and a touch of espresso powder that deepens the chocolate without making it taste like coffee, while the cheesecake swirl stays bright white thanks to a technique that keeps it from browning. I dare you to taste this and not go back for seconds — actually, I dare you to stop at three. Stay with me here — this is worth it. Let me walk you through every single step — by the end, you'll wonder how you ever made it any other way.
What Makes This Version Stand Out
Intense Chocolate Hit: Most chocolate cookies taste like someone waved a cocoa packet over them from across the room. These bad boys use a triple threat: Dutch-processed cocoa for smoothness, melted dark chocolate for depth, and espresso powder to amplify everything without tasting like a mocha. The result is chocolate flavor so intense it could make a chocoholic weep with joy.
Cheesecake That Stays White: Here's where most recipes fail spectacularly — their cheesecake swirl turns an unappetizing beige color. My version uses a specific ratio of cream cheese to powdered sugar and a lower baking temperature that keeps the swirl pristine white, creating stunning visual contrast that looks like edible art against the black cookie.
No Chilling Required: While everyone else is telling you to chill dough for six hours (who has that kind of patience?), this recipe works straight away. The fat ratios are perfectly balanced so the cookies hold their shape but stay soft, meaning you can go from zero to cookie monster in under 45 minutes flat.
Texture That Defies Physics: Somehow these manage to be crispy on the edges, chewy in the middle, and creamy in the swirl all at once. It's like someone took the best parts of a cookie, brownie, and cheesecake and forced them to become best friends in one perfect package.
Make-Ahead Champion: The dough keeps for three days in the fridge and freezes like a dream for three months. I always keep a log in my freezer for emergencies — breakups, bad days, surprise guests, or Tuesday nights when Netflix asks if I'm still watching. Future you will thank present you for being so prepared.
Crowd Reaction Guarantee: I've never brought these anywhere without someone requesting the recipe within ten minutes. They're conversation starters, mood lifters, and friendship makers all rolled into one. One bite and people forget they're supposed to be adults — suddenly everyone's fighting over the last cookie like it's the last lifeboat on the Titanic.
Ingredient Quality Flexibility: While premium chocolate makes them transcendent, this recipe is incredibly forgiving. I've made them with everything from Valrhona to generic store brands, and they still taste like they came from a boutique bakery. Your wallet and your taste buds can both be happy.
Alright, let's break down exactly what goes into this masterpiece...
Inside the Ingredient List
The Flavor Foundation
Unsalted butter forms the backbone of these cookies, and I refuse to compromise on this. European-style butter with its higher fat content creates cookies that taste like they came from a Parisian bakery, but regular American butter works if that's what you've got. The key is keeping it cool enough to cream properly but soft enough to incorporate air — think playdough texture, not greasy melted sadness. When you beat it with the sugars, you're creating tiny air pockets that'll give your cookies lift and structure. Skip the butter-flavored shortening trend — these aren't your grandmother's cookies, and we want real dairy flavor here. If you only have salted butter, reduce the added salt by half and prepare for slightly less control over the final seasoning.
Dutch-processed cocoa powder is non-negotiable for that true black velvet color and smooth chocolate flavor. Natural cocoa tastes sharp and will give you reddish-brown cookies that look like every other chocolate cookie on Pinterest. Dutch-processed has been alkalized, removing the harsh acids and leaving behind pure chocolate bliss that plays beautifully with the tangy cheesecake swirl. I keep a massive container of Valrhona or Droste in my pantry because once you taste the difference, there's no going back to the cheap stuff. In a pinch, you can use black cocoa for ultra-dark cookies, but cut it 50/50 with regular Dutch cocoa or they'll taste like charcoal.
The Texture Crew
Cream cheese is obviously the star of the swirl, but it also sneaks into the cookie dough for extra tenderness. Full-fat Philadelphia is my ride-or-die — the low-fat versions have stabilizers that make them grainy and sad. The cream cheese needs to be genuinely room temperature, not "I left it out for ten minutes while I preheated the oven" cold. When it's properly softened, it should bend like yoga instructor, not crack like old paint. This ensures it whips up light and airy for the swirl, creating those beautiful white ribbons that stay distinct during baking. Don't even think about using whipped cream cheese from a tub — it's got air beaten in already and will throw off all your ratios.
Brown sugar and granulated sugar play different roles here, and understanding why makes you a better baker. The brown sugar adds moisture and chewiness thanks to its molasses content, while the white sugar creates crispy edges through caramelization. I use a 60/40 ratio favoring brown sugar for cookies that stay soft for days but still have those crave-worthy crispy edges. Dark brown sugar gives deeper flavor than light brown, but either works — just don't try to substitute all white sugar unless you want cookies that could chip a tooth. The molasses in brown sugar also helps keep the chocolate flavor from becoming one-dimensional.
The Unexpected Star
Espresso powder is my secret weapon for chocolate desserts that make people close their eyes and sigh. You won't taste coffee — it just amplifies the chocolate flavor like turning up the contrast on a photo. I use King Arthur's espresso powder because it's specifically made for baking, but you can dissolve instant espresso in a teaspoon of hot water if that's what you have. Skip the espresso at your peril — your cookies will still taste good, but they won't have that mysterious depth that keeps people guessing. One teaspoon is enough for a whole batch; more than that and you're making mocha cookies. If you're caffeine-sensitive, you can use decaf espresso powder, but honestly, the amount per cookie is so small it's negligible.
The Final Flourish
Cornstarch is my insurance policy against tough cookies. Just a tablespoon tenderizes the dough by interfering with gluten development, giving you that melt-in-your-mouth texture that makes people wonder if you slipped in illegal substances. This is especially important here because we're adding cream cheese to the dough, which can make cookies dense if you don't balance it properly. Don't substitute arrowroot or tapioca — cornstarch has the right neutral flavor and thickening power for this specific application. If you skip it, expect cookies that taste fine but don't have that pillowy softness that makes grown adults fight over the last one.
Pure vanilla extract deserves better than the imitation stuff that's been sitting in your pantry since the Clinton administration. Real vanilla adds floral notes that complement both chocolate and cream cheese, creating complexity that makes people ask what your secret ingredient is. I use Madagascar bourbon vanilla for its rich, creamy flavor, but Tahitian vanilla works if you want something more floral. The alcohol bakes off, leaving behind pure flavor that artificial vanilla simply cannot replicate. Yes, real vanilla costs more, but these are special occasion cookies — treat yourself and your taste buds accordingly.
Everything's prepped? Good. Let's get into the real action...
The Method — Step by Step
Start by creaming your butter and sugars together for a full three minutes — set a timer because we're all liars about how long we actually mix things. You're looking for the mixture to turn pale and fluffy, like chocolate mousse but lighter in color. This step incorporates air that'll give your cookies lift, so don't rush it. Scrape down the bowl twice during mixing to ensure everything gets evenly incorporated. The mixture should look like pale brown clouds and feel slightly gritty from the sugar crystals — that's perfect.
Beat in the eggs one at a time, letting each fully incorporate before adding the next. Add the vanilla with the second egg — this prevents the batter from curdling and ensures even distribution. The mixture might look slightly curdled anyway, but don't panic — once you add the dry ingredients, everything comes together like magic. Room temperature eggs mix in more easily, so if yours are fridge-cold, float them in warm water for five minutes. This is the moment of truth where your batter starts smelling like actual cookie dough instead of just butter and sugar.
In a separate bowl, whisk together your flour, cocoa powder, cornstarch, espresso powder, baking soda, and salt. Don't just dump everything in — whisking distributes the leavening agents evenly so you don't get one cookie that rises like a balloon and another that stays flat as a pancake. The cocoa powder likes to form lumps, so press any clumps against the side of the bowl with your whisk. This dry mixture should smell like a chocolate factory and look like midnight in powder form. Okay, ready for the game-changer?
Add the dry ingredients to the wet in three additions, mixing just until the flour disappears. Overmixing develops gluten and gives you tough cookies that could double as hockey pucks — we're making cookies, not bread. The dough will be thick and slightly sticky, like brownie batter that decided to become a cookie. If you're using a stand mixer, switch to the paddle attachment and keep it on low speed. By hand works too — think of it as your daily arm workout and justification for eating more cookies later.
Now for the cheesecake swirl: beat the cream cheese until it's completely smooth and fluffy, about two minutes. Add the powdered sugar and vanilla, beating until it looks like thick whipped cream. The mixture should hold peaks but still be spoonable — if it's too stiff, add milk a teaspoon at a time. This is where most recipes go wrong and you end up with white streaks that disappear during baking. The secret is getting the right consistency so it stays distinct but marbleable.
Here's where the magic happens: scoop your chocolate dough into 2-tablespoon portions (a medium cookie scoop works perfectly), then use your thumb to make a deep indentation in each. Spoon about a teaspoon of cheesecake mixture into each indentation, then gently fold the chocolate dough over, creating a marbled effect. Don't fully enclose the cheesecake — you want those beautiful white streaks visible on top. This next part? Pure magic.
Arrange cookies on a parchment-lined baking sheet, leaving 2 inches between each because they spread more than you'd expect. Bake at 325°F (not 350°F — lower temperature keeps the cheesecake white) for 12-14 minutes. The edges should look set but the centers will still appear slightly underbaked — that's perfect, as they'll continue cooking on the hot sheet. Don't walk away from the oven here; one minute too long and your cheesecake turns golden instead of staying pristine white. The cookies are done when they smell like chocolate heaven and the edges look dry but the centers still jiggle slightly.
Let cookies cool on the baking sheet for 10 minutes — this is crucial for setting the structure. They're too soft to move when hot and will fall apart like chocolate lava if you rush this step. After 10 minutes, transfer to a wire rack to cool completely, though honestly, who waits that long? The first warm cookie is a religious experience: the chocolate dough soft and almost brownie-like, the cheesecake swirl creamy and slightly tangy against your tongue. Store completely cooled cookies in an airtight container, though they've never lasted more than two days in my house.
That's it — you did it. But hold on, I've got a few more tricks that'll take this to another level...
Insider Tricks for Flawless Results
The Temperature Rule Nobody Follows
Room temperature ingredients aren't just baking snobbery — they're the difference between cookies that look like the photos and cookies that look like chocolate pancakes. Cold eggs don't incorporate properly, leading to broken batters that separate during baking. Cold butter won't cream correctly, giving you dense, greasy cookies that spread like they've given up on life. But here's what most recipes don't tell you: "room temperature" in baking means 65-70°F, not whatever temperature your kitchen happens to be. In summer, this might mean slightly cooler than your kitchen; in winter, warmer. I keep a cheap instant-read thermometer in my drawer and check my ingredients like a baking nerd — because it works every single time.
Why Your Nose Knows Best
Professional bakers don't use timers — they use their senses, and you should too. These cookies are done when your kitchen smells like someone opened a chocolate shop next door to a cheesecake factory. The aroma should be rich and intoxicating, not sharp or burnt-smelling. Visual cues matter, but smell is your most reliable indicator of doneness. If you're unsure, err on the side of underbaking — cookies continue cooking from residual heat for several minutes after leaving the oven. A friend tried skipping this step once — let's just say it didn't end well, and her smoke alarm now has trust issues.
The 5-Minute Rest That Changes Everything
After mixing your cheesecake swirl, let it sit for exactly five minutes before using it. This brief rest allows the powdered sugar to fully hydrate, creating a smoother texture that pipes and swirls like a dream. During this time, the mixture will thicken slightly as the cornstarch in the powdered sugar activates. Don't skip this step or you'll end up with a runny mess that disappears into the chocolate dough during baking. Use these five minutes to portion your chocolate dough or clean up your mixing bowls — multitasking makes you feel like a kitchen superhero.
The Freezer Trick for Perfect Portions
If you're making these for an event and want perfectly uniform cookies, here's my catering secret: portion all your dough onto a parchment-lined sheet pan, then freeze for 15 minutes. The cold dough holds its shape better during baking, giving you bakery-perfect rounds that look professionally made. This is especially helpful if you're planning to gift these or serve them at a fancy dinner party. Frozen dough also means you can make these weeks ahead and bake fresh cookies on demand — future pacing at its finest. Picture yourself pulling fresh cookies from the oven whenever the mood strikes, your kitchen smelling like chocolate heaven in minutes.
Storage Secrets for Maximum Freshness
These cookies stay soft for up to five days if you store them with a slice of sandwich bread in the container. The bread releases moisture slowly, keeping your cookies from drying out without making them soggy. Replace the bread slice every other day for maximum effectiveness. Don't use fancy artisanal bread — plain white sandwich bread works best because it has the perfect moisture content. This trick works for most soft cookies, but it's especially effective here because the cream cheese swirl needs that extra humidity to stay creamy. Just don't eat the storage bread by accident — it's basically chocolate-scented by day three and surprisingly addictive.
Creative Twists and Variations
This recipe is a playground. Here are some of my favorite ways to switch things up:
Mint Chocolate Madness
Replace the vanilla in the cheesecake swirl with 1/4 teaspoon peppermint extract and add 1/2 cup mini chocolate chips to the chocolate dough. The result tastes like an Andes mint and a cheesecake had a beautiful baby. Top with crushed candy canes for holiday cookies that disappear faster than you can say "peppermint bark." These are dangerous around mint-chocolate lovers — I've seen grown adults hide these from their own children.
Salted Caramel Swirl
Drizzle homemade or store-bought caramel over the cheesecake swirl before baking, then sprinkle with flaky sea salt. The sweet-salty combination elevates these from amazing to life-changing. The caramel bakes into the cheesecake swirl, creating pockets of gooey sweetness that contrast beautifully with the tangy cream cheese. Pro tip: warm the caramel slightly so it drizzles easily but isn't hot enough to melt the cheesecake mixture.
Orange Chocolate Elegance
Add the zest of one orange to the chocolate dough and replace the vanilla in the cheesecake swirl with orange extract. These taste like those chocolate orange candies that appear during the holidays, but elevated and sophisticated. The citrus brightens the chocolate and cuts through the richness, making these surprisingly refreshing despite their decadence. Perfect for dinner parties where you want to impress without looking like you're trying too hard.
Peanut Butter Cup Dreams
Swirl 1/4 cup peanut butter into the cheesecake mixture and press a mini peanut butter cup into the center of each cookie before baking. The peanut butter adds nuttiness that plays beautifully with the chocolate, while the peanut butter cup creates a molten center that flows like lava when warm. These are basically healthy because peanut butter has protein, right? That's what I tell myself while eating four.
Raspberry Cheesecake Delight
Add 2 tablespoons raspberry jam to the cheesecake swirl and dot the tops with freeze-dried raspberries before baking. The tart raspberries cut through the richness like a knife through butter, creating balance that makes these dangerously easy to eat. The jam creates beautiful pink streaks in the white cheesecake swirl, making these Instagram-worthy without any filters.
Espresso Cheesecake Mocha
Dissolve 1 teaspoon instant espresso in 1 tablespoon hot cream, cool completely, then add to the cheesecake swirl. These taste like your favorite coffee shop drink but in cookie form, with the espresso in the swirl creating actual coffee flavor rather than just enhancing the chocolate. Perfect for brunch gatherings or as a sophisticated dessert after Italian dinners.
Storing and Bringing It Back to Life
Fridge Storage
Store completely cooled cookies in an airtight container in the refrigerator for up to one week. The cream cheese swirl means these need to stay cold for food safety, but don't worry — they taste amazing cold, room temperature, or even slightly warm. Layer them between sheets of parchment paper to prevent sticking, and always let them come to room temperature for 15 minutes before serving for maximum flavor. The chocolate actually tastes more intense when it's not ice-cold, and the cheesecake swirl regains its creamy texture as it warms.
Freezer Friendly
These freeze beautifully for up to three months — I always make a double batch and freeze half for emergencies. Freeze cookies in a single layer on a baking sheet first, then transfer to freezer bags once solid. This prevents them from freezing into one giant cookie clump that requires a chisel to separate. Thaw overnight in the refrigerator, then bring to room temperature for 20 minutes before serving. The texture stays remarkably close to fresh, making these perfect for make-ahead entertaining.
Best Reheating Method
To revive day-old cookies, warm them in a 300°F oven for 5-7 minutes or microwave for 8-10 seconds. The gentle heat refreshes the chocolate and brings back that fresh-baked aroma without drying them out. Add a tiny splash of water to the container before reheating — it steams back to perfection, recreating that just-baked softness. Don't overdo it though — you're warming, not cooking. A warm cookie with a cold glass of milk is basically therapy you can eat.