I was standing in my kitchen, eyes glued to a burnt pancake, when the idea hit me like a sudden gust of fresh lemon zest. The kitchen smelled of burnt sugar and disappointment, and I could taste the bitter aftertaste of failure on my tongue. But then a memory surfaced: a friend’s mother’s pavlova, light as a cloud and crisp as a sunrise, had danced on our family table. That memory was the spark that ignited my quest for the ultimate pavlova, a dessert that would turn a kitchen disaster into a triumph. I’m about to walk you through every single step, and by the end, you’ll wonder how you ever made it any other way.
Picture this: a bowl of egg whites, the foam rising like a storm, the kitchen filling with the sweet scent of sugar as it caramelizes in the oven. The silence of anticipation is broken only by the soft hum of the oven fan, and the gentle crackle of the pavlova’s edges as they brown. I dare you to taste this and not go back for seconds—once you’ve had that first bite, the world will taste like sugar and vanilla. If you’ve ever struggled with pavlova, you’re not alone—my first attempt was a sad, soggy mess that could have been a dessert for a funeral. But I learned the secrets of the perfect pavlova, and now I’m handing them to you, the friend who loves to experiment in the kitchen.
Most recipes get this completely wrong by overbaking or underbaking, but my version balances the crisp exterior and the airy interior with surgical precision. The technique I’ll share involves a trick with vinegar and cornstarch that locks in the structure, giving the pavlova a flawless finish that feels like a cloud in your mouth. I’ll also reveal the best oven temperature that ensures a golden crust without burning the inside. And the final flourish—whipped cream and fresh fruit—adds a burst of flavor that makes this dessert unforgettable. So grab your whisk, preheat your oven, and let’s dive into the world of pavlova, where every step feels like a dance.
Let’s get into the heart of the matter: the ingredients, the process, and the science behind why this pavlova is hands down the best version you’ll ever make at home. I’ll walk you through the exact quantities, the timing, the temperature, and the little tricks that separate a good pavlova from a showstopper. And if you’re wondering whether you need a fancy mixer, I’ll let you in on the secret that makes whisking a breeze. All set? Let’s break down exactly what goes into this masterpiece.
What Makes This Version Stand Out
- Texture: The combination of egg whites, sugar, vinegar, and cornstarch creates a pavlova that is simultaneously crunchy on the outside and marshmallow‑like on the inside, a texture that melts in your mouth.
- Flavor: The subtle hint of vinegar balances the sweetness, while the vanilla essence lifts the overall taste profile, giving the dessert a sophisticated finish.
- Simplicity: With only six core ingredients and a single oven, the recipe is a breeze for beginners and a joy for seasoned bakers alike.
- Make‑ahead: The pavlova can be baked and stored for up to 24 hours, making it the perfect pre‑planned dessert for gatherings.
- Visual Appeal: The glossy, caramelized crust and the airy interior create a dessert that looks as impressive as it tastes.
- Versatility: Swap the fruit or add a splash of citrus zest to match the season, and you’ll have a new flavor every time you bake.
- Health‑Friendly: By using superfine sugar and minimal butter, the dessert keeps calories in check while still satisfying the sweet tooth.
- Crowd Reaction: Friends and family always ask for a second plate; the pavlova is a conversation starter that keeps the table lively.
Alright, let’s break down exactly what goes into this masterpiece…
Inside the Ingredient List
The Flavor Base
Superfine sugar is the backbone of any pavlova, providing the essential sweetness and the caramelized crust that gives the dessert its signature crunch. The finer the sugar crystals, the quicker they dissolve, allowing the sugar to bind with the egg whites without forming a gritty texture. If you’re using regular granulated sugar, consider pulsing it in a food processor until it reaches a powdery consistency to mimic superfine sugar’s performance.
The Texture Crew
Egg whites are the star of the show, responsible for the pavlova’s lift and structure. When beaten to stiff peaks, they trap air that expands during baking, creating that cloud‑like interior. Avoid using room‑temperature eggs; cold eggs whip more efficiently and hold their shape better. A small pinch of salt can help stabilize the whites, but don’t add it after the sugar to prevent crystallization.
The Unexpected Star
White vinegar may seem like an odd choice, but it’s the secret weapon that prevents the pavlova from turning into a rubbery mess. The acidity reacts with the egg whites, strengthening the protein network and giving the dessert a crisp exterior while maintaining a soft core. A teaspoon is all you need; too much will give a sharp aftertaste that masks the vanilla.
The Final Flourish
Cornstarch is the unsung hero that locks the structure in place, ensuring the pavlova keeps its shape even after cooling. It works by absorbing moisture and preventing the egg whites from collapsing. One tablespoon is enough to make a difference, and you can skip it only if you’re comfortable with a slightly softer texture.
Everything's prepped? Good. Let's get into the real action…
The Method — Step by Step
- Preheat the oven: Set your oven to 120°C (250°F). Line a baking sheet with parchment paper and place an empty metal tray on the middle rack to catch any drips. The low temperature is key to drying out the pavlova slowly without browning too quickly.
- Separate the eggs: Use a clean bowl and a whisk. Carefully separate the whites from the yolks, ensuring no yolk contaminates the whites—otherwise the whites won’t whip properly. I keep the yolks in a separate bowl for a future dessert.
- Beat the whites to soft peaks: Start with a small pinch of salt. Beat until the whites form soft peaks that gently fall over the back of the spoon. This step is where the pavlova’s foundation is laid.
- Gradually add sugar: With the whisk on a low speed, pour the sugar in a thin stream, then increase speed to medium-high. The sugar dissolves completely, creating a glossy mixture. If you see any sugar crystals, continue whisking until they disappear.
- Incorporate vinegar and vanilla: Add the teaspoon of white vinegar and a teaspoon of vanilla extract. Fold gently with a spatula to keep the mixture light. This infusion of flavor and acidity is what gives the pavlova its distinctive taste.
- Fold in cornstarch: Sprinkle the cornstarch over the mixture and fold with a spatula until fully incorporated. This step stabilizes the structure and ensures the pavlova holds its shape during baking.
- Shape the batter: Spoon the batter onto the prepared baking sheet, forming a round disk about 10 cm in diameter. Use the back of a spoon to smooth the top, creating an even surface for crisp edges.
- Bake slowly: Place the tray in the oven and bake for 30 minutes. After 20 minutes, check the edges—they should be golden brown but not too dark. The center should still feel slightly springy to the touch.
- Cool in the oven: Turn off the oven and leave the pavlova inside with the door ajar for 45 minutes to an hour. This gradual cooling prevents cracks and preserves the airy interior.
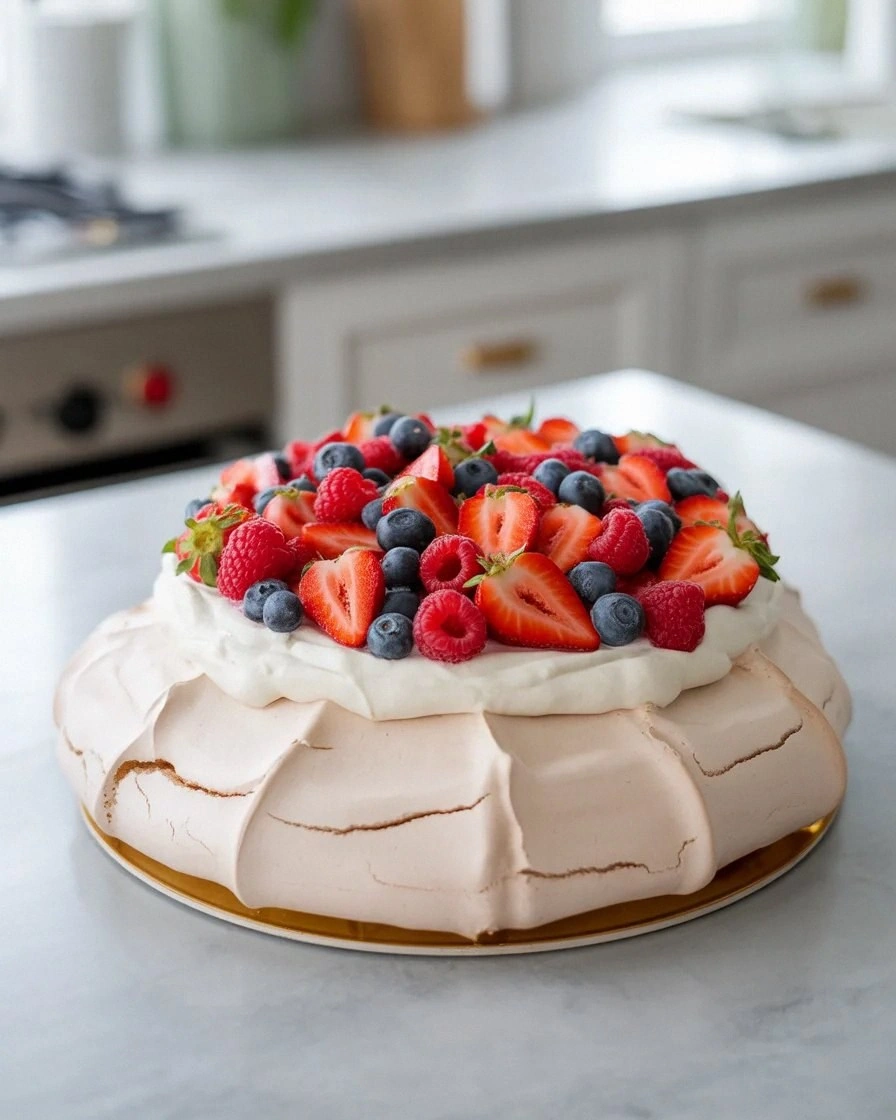
- Assemble the dessert: Once cooled, top the pavlova with a generous swirl of whipped cream. Layer fresh fruit—strawberries, kiwi, mango—on top. The contrast of the sweet cream and tart fruit creates a harmonious flavor profile.
That's it—you did it. But hold on, I've got a few more tricks that'll take this to another level. From the way you fold in the cornstarch to the final topping arrangement, each detail is designed to elevate this dessert from simple to spectacular.
Insider Tricks for Flawless Results
The Temperature Rule Nobody Follows
Many bakers set the oven to 180°C (350°F), but that temperature is too high for a pavlova. A low, steady heat of 120°C ensures the outer shell dries and browns evenly while the center stays soft. I’ve tried 150°C once, and the result was a pavlova that was too dry and cracked—definitely not worth the effort.
Why Your Nose Knows Best
The aroma of the baking pavlova is a reliable indicator of doneness. When the scent turns nutty and slightly caramelized, you’re close to perfection. If it still smells like raw sugar, give it a few more minutes. Trust your nose; it’s a seasoned judge.
The 5-Minute Rest That Changes Everything
After turning off the oven, leave the pavlova inside with the door slightly open for 45 minutes. This slow cooling process prevents the outer shell from cracking and helps the interior maintain its airy texture. Skipping this step often leads to a soggy center.
Whisking Without a Stand Mixer
If you don’t have a stand mixer, a large whisk and a bowl will do the trick. Beat the whites in a circular motion, then switch to a back‑and‑forth motion to incorporate air more efficiently. I’ve used a hand mixer for a few minutes to speed up the process, but a good whisk will still yield great results.
Choosing the Right Fruit
Seasonal fruit adds a burst of freshness that contrasts beautifully with the sweet pavlova. In summer, strawberries, kiwi, and mango are ideal. If you’re in the off‑season, frozen berries work well, but let them thaw slightly to avoid excess moisture.
Creative Twists and Variations
This recipe is a playground. Here are some of my favorite ways to switch things up:
Berry Burst Pavlova
Swap the standard fruit for a medley of blueberries, raspberries, and blackberries. The tartness of the berries cuts through the sweetness, creating a balanced flavor profile that feels like a summer picnic.
Citrus Zest Pavlova
Add a tablespoon of lemon or orange zest to the batter. The citrus oils give the pavlova a bright, zesty note that pairs wonderfully with the creamy topping.
Chocolate Pavlova
Fold in a handful of dark chocolate chips into the batter before baking. The chocolate melts into the airy interior, offering a rich, indulgent twist that chocolate lovers will adore.
Almond Pavlova
Replace half of the superfine sugar with ground almonds. The nutty flavor complements the vanilla, and the almond flour adds a subtle texture that’s both crunchy and tender.
Matcha Pavlova
Stir in a teaspoon of matcha powder into the batter for a green tea twist. The earthy flavor pairs beautifully with the sweet cream and fruit, creating an unexpected but delightful combination.
Caramelized Banana Pavlova
Top the pavlova with sliced bananas caramelized in a pan with butter and brown sugar. The caramelized banana adds a deep, buttery sweetness that contrasts with the airy base.
Storing and Bringing It Back to Life
Fridge Storage
Store the finished pavlova in an airtight container in the refrigerator for up to 24 hours. The crisp edges will soften slightly, but the interior remains airy. Let it sit at room temperature for 10 minutes before serving to restore its texture.
Freezer Friendly
Wrap the pavlova tightly in plastic wrap and then place it in a freezer bag. It can be frozen for up to one week. Thaw in the refrigerator overnight and then bring to room temperature before topping with fresh fruit.
Best Reheating Method
To revive a frozen or refrigerated pavlova, gently warm it in a 120°C oven for 10 minutes. Add a tiny splash of water to the bottom of the pan to create steam, which helps the pavlova rehydrate and regain its crispness.