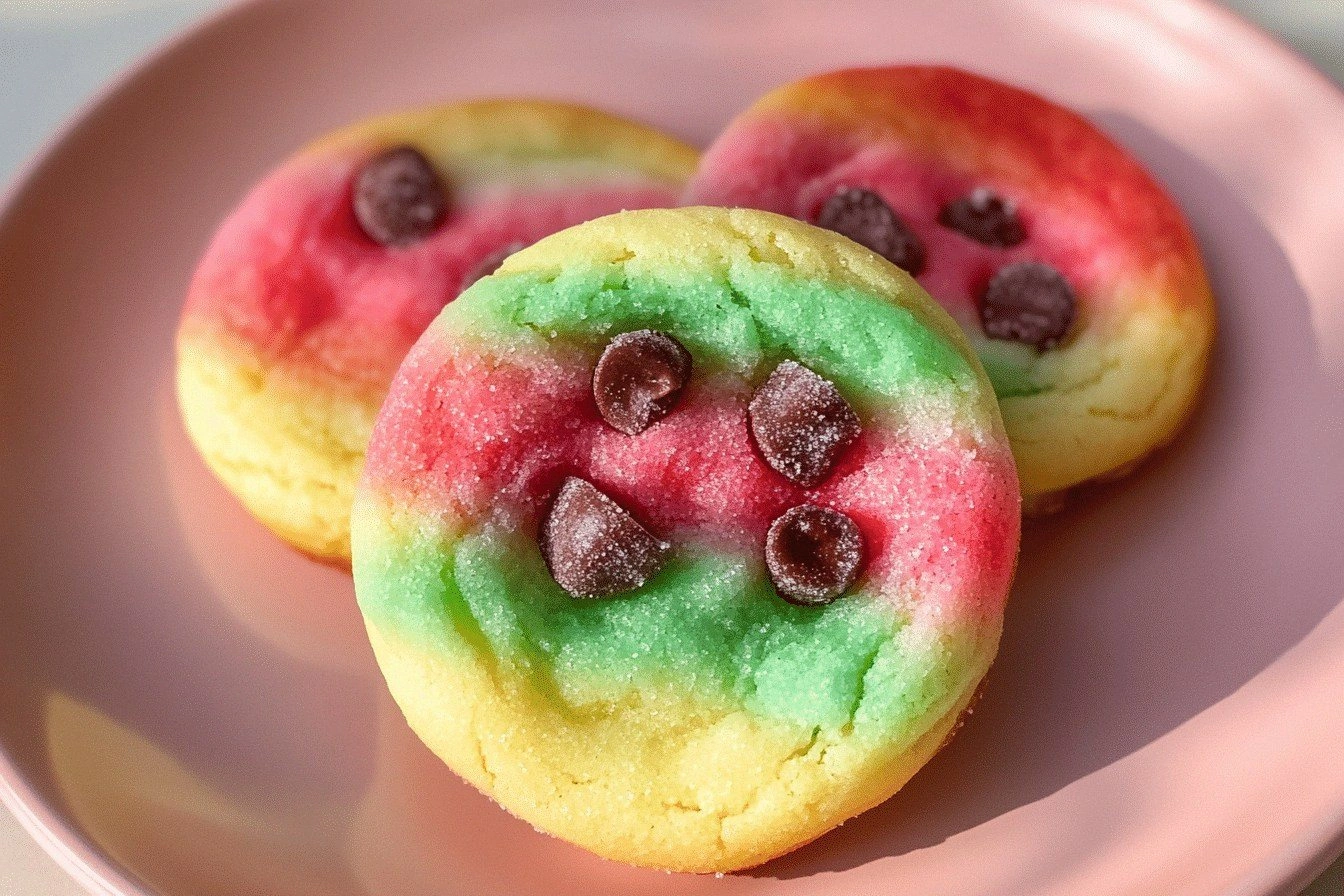
Picture a Saturday night, a kitchen full of laughter, the scent of melted butter, and a half‑finished batch of cookies that looked more like paper than pastry. I was halfway through a classic sugar cookie recipe, the dough still clinging to the spoon, when my roommate shouted, “I want something that looks as good as it tastes!” That was the spark that turned a routine cookie into the rainbow sensation I’m about to unveil. We’re talking about a cookie that’s not only a feast for the eyes but a symphony of textures—crisp edges, a chewy center, and a sugary glaze that melts like a sunrise.
The moment the dough hits the oven, a sweet, buttery aroma fills the room, and the sound of the timer ticking becomes a metronome for anticipation. The first bite is a burst of caramelized sugar, followed by a gentle, buttery crunch that gives way to a soft, pillowy interior. The rainbow hues—each color distinct yet harmoniously blended—create a visual crescendo that turns every cookie into a piece of edible art. I dare you to taste this and not go back for seconds; the flavor profile is so vivid it feels like a flavor explosion.
What sets this version apart is that it’s not just about the colors. The recipe balances the classic sweetness with a subtle vanilla warmth, a hint of salt that elevates every bite, and a light, airy texture achieved through the precise use of baking powder. The result? A cookie that’s hands down the best version you’ll ever make at home, with a finish that’s both crisp and tender. And here’s the twist: I’ll show you how to add a splash of gel food coloring that keeps the dough vibrant without compromising structure.
So, if you’ve ever struggled with cookies that look pretty but taste flat, or if you’re just looking to impress at your next gathering, stay with me. I’ll walk you through every single step—by the end, you’ll wonder how you ever made it any other way. Let’s get started on this sweet, colorful adventure.
What Makes This Version Stand Out
- Taste: The blend of butter, sugar, and vanilla creates a rich, buttery sweetness that is balanced by a subtle salt kick, turning each bite into a flavor revelation.
- Texture: The cookies achieve a perfect harmony of crisp edges and a chewy center, thanks to the precise ratio of butter to sugar and the gentle lift from baking powder.
- Color: Gel food coloring preserves the vibrancy of each hue, giving you a rainbow that stays true even after baking.
- Simplicity: With only eight core ingredients, this recipe is straightforward, yet the results are anything but ordinary.
- Make‑ahead: The dough can be prepared a day ahead, chilled, and baked later, making it ideal for last‑minute parties.
- Audience Appeal: Kids love the colors, adults appreciate the taste, and the recipe scales easily for large gatherings.
- Ingredient Quality: Using unsalted butter and pure vanilla extract ensures no off‑flavors, allowing the natural sweetness to shine.
- Versatility: Sprinkle on top, drizzle with icing, or add a touch of sea salt—each variation offers a new dimension.
Alright, let’s break down exactly what goes into this masterpiece…
Inside the Ingredient List
The Flavor Base
Unsalted butter is the cornerstone of this cookie. When softened, it blends seamlessly with sugar, creating a creamy foundation that locks in moisture. If you skip the butter, the cookies lose that buttery depth and become dry. For the best flavor, choose a high‑quality butter with a rich, creamy profile—ideally one that’s been stored at room temperature for at least 30 minutes before use.
The Sweetness Factor
Granulated sugar is not just a sweetener; it’s the binder that gives the dough its structure. It caramelizes during baking, forming a golden crust that adds a delightful crunch. Too much sugar and the cookies become overly sweet; too little and they taste flat. If you’re looking for a healthier twist, you can replace half the sugar with a natural sweetener like honey, but the texture may shift slightly.
The Unexpected Star
Gel food coloring is the secret weapon that turns ordinary cookies into a rainbow spectacle. Unlike liquid dyes, gel doesn’t alter the dough’s moisture level, ensuring the cookies bake evenly. Use one teaspoon per color for five distinct shades—red, orange, yellow, green, and blue. If you’re color‑blind, mix them in a separate bowl to avoid accidental clashing.
The Texture Crew
All‑purpose flour provides structure, while baking powder gives a gentle lift that keeps the cookies fluffy. The pinch of salt is essential; it balances the sweetness and enhances every flavor note. If you’re allergic to gluten, you can swap the flour for a gluten‑free blend, but adjust the baking powder slightly to maintain lift.
The Final Flourish
Pure vanilla extract adds a warm, aromatic layer that ties all flavors together. Sprinkles or sanding sugar are optional but add a delightful crunch and visual sparkle. If you prefer a dusting of sugar, a light coating of powdered sugar after baking gives a classic finish.
Everything’s prepped? Good. Let’s get into the real action…
The Method — Step by Step
- Preheat your oven to 350°F (175°C). Line two baking sheets with parchment paper; this prevents sticking and ensures even baking. The scent of butter will already be starting to mingle with the room as you prep.
- In a large bowl, cream together 1 cup of softened unsalted butter and 1 cup of granulated sugar until pale and fluffy. Use a hand mixer on medium speed for about 2 minutes; the mixture should look like whipped cream. This step is crucial for a light crumb.
- Beat in 1 large egg and 1 teaspoon of pure vanilla extract. The egg binds the dough, while the vanilla gives it that warm aroma. Mix until fully incorporated—don’t overmix, or the dough will become tough.
- Whisk together 2 ¼ cups of all‑purpose flour, 1 teaspoon baking powder, and ½ teaspoon salt. Sifting the dry ingredients ensures no lumps and a smoother dough. This dry mix will give the cookies structure and that subtle lift.
- Gradually add the dry mix to the wet mixture, stirring until just combined. Overmixing here can develop gluten, making the cookies chewy instead of tender. The dough should be thick but pliable.
- Divide the dough into five equal portions. Using a small cookie scoop or tablespoon, roll each portion into a ball. Place the balls on the prepared baking sheets, spacing them about 2 inches apart.
- Using a small bowl of gel food coloring, add 1 teaspoon of each color to separate portions of dough. Knead gently until the color is evenly distributed. The dough will turn a vibrant hue—this is the moment where the cookie truly becomes a rainbow.
- Press each ball lightly with the back of a spoon to flatten slightly; the cookies will spread during baking. If you like a crispier edge, sprinkle a pinch of sanding sugar over each cookie before baking.
- Bake for 12–14 minutes, or until the edges are golden but the centers still look slightly pale. The cookies should smell toasty and sweet. Watch out: if you leave them too long, they’ll dry out and lose that chewy center.
- Remove from the oven and let the cookies cool on the sheet for 5 minutes before transferring to a wire rack. This resting period allows the structure to set and the colors to firm up.
That’s it — you did it. But hold on, I've got a few more tricks that'll take this to another level…
Insider Tricks for Flawless Results
The Temperature Rule Nobody Follows
Many bakers bake at 375°F, but that’s too high for our rainbow cookies. The lower 350°F allows the colors to set without bleeding, and the cookies develop a golden crust while keeping the centers tender. If your oven runs hot, use an oven thermometer to verify the temperature.
Why Your Nose Knows Best
Before you open the oven door, pause and sniff the air. A sweet, buttery aroma signals that the cookies are nearing perfection. If you smell a faint metallic taste, it’s time to lower the heat or reduce the baking time.
The 5‑Minute Rest That Changes Everything
Letting the cookies sit on the baking sheet for five minutes after removal from the oven allows the structure to set. This step prevents them from crumbling when transferred to a wire rack and locks in the vibrant colors.
Avoiding Overmixing
Once you add the dry ingredients, mix just until combined. Overmixing develops gluten, resulting in chewy, dense cookies that don’t have that desired airy crumb. Trust the dough’s texture—it should feel smooth and slightly sticky.
Sprinkling Sugar for Extra Sparkle
If you want a bit of crunch and a glossy finish, dust the cookies with a light layer of sanding sugar before baking. The sugar caramelizes, giving each cookie a subtle, sweet crunch that contrasts with the chewy center.
Creative Twists and Variations
This recipe is a playground. Here are some of my favorite ways to switch things up:
Chocolate‑Rainbow Surprise
Add a tablespoon of cocoa powder to each color portion before kneading. The chocolate will deepen the color and give a subtle cocoa undertone, perfect for chocolate lovers.
Nutty Rainbow Crunch
Fold in ¼ cup of finely chopped walnuts or pecans into each color batch. The nuts add a delightful crunch and a nutty aroma that complements the buttery base.
Citrus‑Infused Delight
Replace the vanilla extract with a teaspoon of orange or lemon zest. The bright citrus notes elevate the sweetness and add a fresh, zesty finish.
Gluten‑Free Rainbow
Swap the all‑purpose flour for a gluten‑free blend, and reduce the baking powder by ¼ teaspoon to avoid over‑rise. The cookies will still be tender and colorful.
Holiday Spice Edition
Add a pinch of cinnamon, nutmeg, or ginger to the dry mix for a warm, spicy twist. This variation is perfect for fall gatherings or holiday parties.
Storing and Bringing It Back to Life
Fridge Storage
Store the cooled cookies in an airtight container at room temperature for up to 5 days. The airtight seal keeps the cookies from drying out and preserves their soft texture.
Freezer Friendly
For longer storage, place the cookies in a freezer‑safe zip‑lock bag and freeze for up to 3 months. Thaw at room temperature for 30 minutes before serving.
Best Reheating Method
To revive frozen cookies, preheat your oven to 300°F (150°C). Place the cookies on a parchment‑lined sheet and bake for 8–10 minutes. Add a tiny splash of water to the bottom of the baking sheet; it steams the cookies back to perfection, keeping them moist and chewy.