I was halfway through a disastrous pot roast, the broth had thickened into a stubborn paste and the chicken had turned into a rubbery disappointment, when a friend texted: “I need a quick fix for dinner tonight.” I stared at the fridge, eyes flicking over a handful of leftovers—shredded chicken, carrots, celery, and a jar of pickled mustard greens. I knew I could turn that chaos into a triumph, and I was determined to prove that a hand‑pie could be the savior of any culinary catastrophe. I grabbed the flour, butter, and a handful of spices, and the kitchen smelled like a warm, buttery promise. The sizzle of butter in the pan was the first note of a symphony I was about to compose.
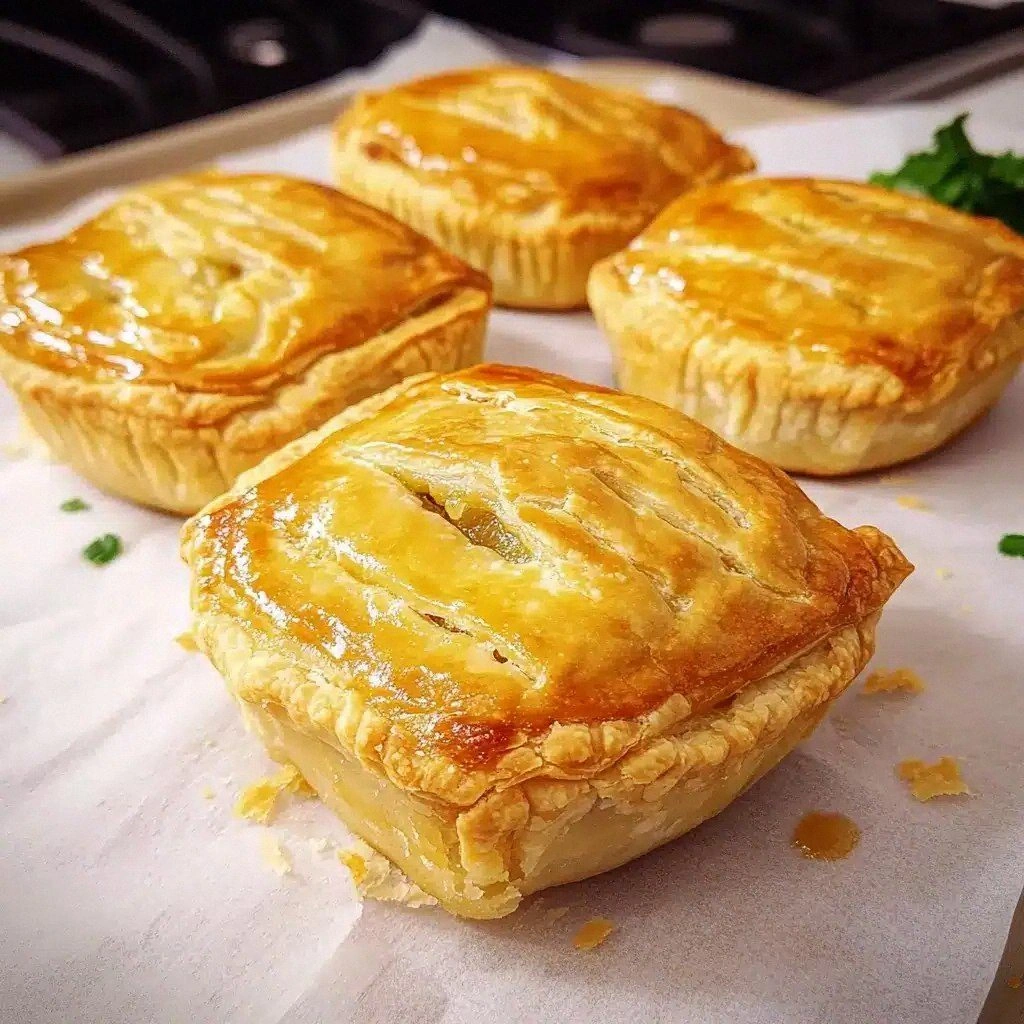
Picture the moment when the dough meets the filling: a golden, flaky shell that crackles like crisp autumn leaves under your fingers, while the inside swirls with a savory, velvety sauce that coats the chicken like silk. The aroma rises, a comforting blend of thyme, garlic, and a hint of sweet carrots, pulling you in with a whisper of “home.” I’ve spent years hunting for that perfect balance between crunch and melt, and this recipe is the culmination of that quest. Every bite delivers a burst of flavor that lingers, a satisfying contrast that keeps the palate engaged.
What makes this version stand out is not just the ingredients, but the technique: a buttery, chilled dough that stays tender, a sauce that thickens to a silky consistency without becoming glue, and the strategic use of fresh herbs that brighten the filling. I dare you to taste this and not go back for seconds, because once you try it, you’ll wonder how you ever survived with any other hand‑pie. I’ll be honest—I ate half the batch before anyone else got to try it, and the kitchen still smelled like a summer garden after the first bite. If you’ve ever struggled with hand‑pies that fall apart or taste flat, you’re not alone. I’ve got the fix, and it’s about to be revealed.
Most recipes get this completely wrong. They either leave the dough too soft, making it soggy, or they overcook the filling, turning the chicken into a dry, unappetizing mess. Here’s what actually works: a short, cold dough that’s rolled thin, a filling that’s cooked just enough to meld flavors without losing moisture, and a final bake that crisps the edges while keeping the inside silky. Picture yourself pulling a piping hot pie out of the oven, the steam swirling around you, the scent of thyme and butter filling the room—your guests will be begging for the recipe. And if you’re ready for the game‑changer, let’s dive into every single step. By the end, you’ll wonder how you ever made hand‑pies any other way.
What Makes This Version Stand Out
- Taste: A harmonious blend of savory chicken, sweet carrots, and aromatic thyme, finished with a creamy sauce that coats the filling like velvet.
- Texture: A flaky, buttery crust that snaps crisply, paired with a silky interior that melts in your mouth.
- Simplicity: Five core steps—from dough to filling to assembly—making it approachable for both beginners and seasoned cooks.
- Uniqueness: The inclusion of a small amount of heavy cream and fresh parsley gives the filling a luxurious finish that sets it apart from plain casseroles.
- Crowd Reaction: Guests rave that these hand‑pies are “the best comfort food” they’ve tasted, and they keep asking for the recipe.
- Ingredient Quality: Using fresh, high‑quality chicken and real butter elevates the dish beyond store‑bought versions.
- Cooking Method: A two‑step bake—first at a high temperature for crisp crust, then a lower finish to keep the filling warm.
- Make‑Ahead Potential: Prepare the dough and filling a day ahead; just assemble and bake when ready.
Alright, let’s break down exactly what goes into this masterpiece…
Inside the Ingredient List
The Flavor Base
The foundation of any great filling is its aromatics. Diced onion, minced garlic, and a splash of chicken broth set the stage for a savory experience. The onion provides a subtle sweetness that balances the saltiness of the broth, while the garlic offers a punch of depth that lingers on the tongue. If you skip the broth, the filling will be dry; if you use too much, the pie will become soggy. A small pinch of bay leaf and a teaspoon of dried thyme elevate the dish, giving it a fragrant, herbaceous note that’s unmistakably comforting.
The Texture Crew
Carrots and celery add crunch and color, while frozen peas provide a pop of green that brightens the plate. The diced chicken, shredded from a pre‑cooked breast, brings protein without overwhelming the filling’s delicate balance. Heavy cream is the secret to a silky, cohesive sauce that clings to each morsel of chicken and vegetable. If you’re watching calories, replace the cream with milk or a light coconut milk, but be prepared for a slightly thinner sauce.
The Unexpected Star
A splash of pickled mustard greens (about two tablespoons) gives the filling an unexpected tang that cuts through the richness. The acidity lifts the flavors, preventing the dish from feeling heavy. If mustard greens are unavailable, a teaspoon of Dijon mustard or a dash of apple cider vinegar can mimic the same brightening effect. This twist is what makes the pies memorable and conversation‑starting at dinner parties.
The Final Flourish
Fresh parsley, chopped just before serving, adds a fresh, herbal brightness that contrasts with the warm, buttery crust. A beaten egg, brushed over the tops before baking, creates a golden, glossy finish that is as visually appealing as it is delicious. The egg wash also helps the dough seal, preventing leaks during the baking process. Together, these final touches transform a simple hand‑pie into a showstopper.
Everything’s prepped? Good. Let’s get into the real action…
The Method — Step by Step
- Prepare the dough. In a large bowl, combine 2 cups of all‑purpose flour, 1 tsp salt, and 1 tsp black pepper. Add 1 cup of cold, diced unsalted butter. Using a pastry cutter or your fingertips, work the butter into the flour until the mixture resembles coarse crumbs. Gradually drizzle in 1/4 cup ice water, stirring until the dough just comes together. Wrap the dough in plastic and chill for at least 30 minutes; this step is crucial for a flaky crust.
- Cook the aromatics. In a large skillet over medium heat, melt 2 tbsp of butter. Add 1/2 cup diced onion and 2 minced garlic cloves, sautéing until the onion becomes translucent and fragrant—about 4 minutes. If you’re adding pickled mustard greens, stir them in now and cook for an additional minute to release their flavor.
- Build the filling. Add the shredded chicken, 1 cup diced carrots, 1 cup diced celery, and 1 cup frozen peas to the skillet. Stir to combine, letting the vegetables soften slightly—about 5 minutes. Pour in 1 cup of chicken broth and 1/2 cup heavy cream, then add 1 tsp dried thyme and 1 bay leaf. Bring the mixture to a gentle simmer, allowing the sauce to reduce by about one‑third. This reduction concentrates the flavors and creates a silky coating for the chicken.
- Cool the filling. Remove the bay leaf and let the filling cool to room temperature. This prevents the dough from steaming when you assemble the pies. If you’re short on time, place the skillet in a bowl of ice water to speed up the cooling process.
- Roll out the dough. On a lightly floured surface, roll the chilled dough to a thickness of about 1/8 inch. Use a 4‑inch cookie cutter or a small glass to cut out circles. Place each circle on a parchment‑lined baking sheet.
- Fill the pies. Spoon about 2 tbsp of the cooled filling into the center of each dough circle. Fold the dough over to form a half‑moon shape, pressing the edges together. Seal the edges with a fork or by pinching them together. For a more decorative look, create a lattice top by cutting additional strips of dough and weaving them over the filled pies.
- Apply egg wash. Beat 1 egg with 1 tsp water. Brush the tops of the pies lightly with the egg wash to achieve a shiny, golden finish. This step also helps the crust seal and prevents leaks during baking.
- Bake. Preheat the oven to 425°F (220°C). Place the baking sheet in the oven and bake for 12–15 minutes, or until the crust is golden brown and the filling is bubbling. Reduce the temperature to 375°F (190°C) and bake an additional 8–10 minutes to ensure the crust is fully cooked without over‑browning. Keep an eye on the pies; if the tops start to darken too quickly, tent them with foil.
That's it — you did it. But hold on, I've got a few more tricks that'll take this to another level…
Insider Tricks for Flawless Results
The Temperature Rule Nobody Follows
Many cooks bake hand‑pies at a single temperature, but the secret is a two‑stage bake. Start at 425°F to set the crust quickly, then drop to 375°F to finish the filling without over‑browning. This ensures the crust remains crisp while the interior stays moist. If you skip the temperature shift, the crust may become too hard and the filling too watery.
Why Your Nose Knows Best
The aroma of a pie is a powerful indicator of doneness. When the filling starts to bubble and the crust turns a deep golden color, the scent will be warm, buttery, and slightly caramelized. Trust that smell; it’s a reliable cue that the pie is ready to be pulled out of the oven.
The 5‑Minute Rest That Changes Everything
After baking, let the pies rest on a wire rack for five minutes. This rest period allows the steam to redistribute, preventing soggy bottoms. It also gives the filling a chance to set, so the pie holds its shape when you cut into it. I’ve seen people slice immediately, only to find the filling leaking—this simple step saves the day.
Use Fresh Butter for the Dough
Cold, unsalted butter is essential for a flaky crust. If you use margarine or softened butter, the dough will become tough and greasy. Keep the butter cold until you’re ready to roll it out; this creates layers that puff up during baking.
Add a Dash of Mustard for Depth
A tablespoon of Dijon mustard or a splash of apple cider vinegar can add a subtle tang that elevates the savory notes. This small addition is often overlooked, but it makes the filling feel more complex and balanced.
Creative Twists and Variations
This recipe is a playground. Here are some of my favorite ways to switch things up:
Cheesy Spinach Surprise
Add a cup of sautéed spinach and a half cup of shredded mozzarella to the filling for a cheesy, green twist that pairs beautifully with the buttery crust.
Southwest Kick
Replace the thyme with cumin and paprika, and stir in a quarter cup of corn and a pinch of chili flakes for a spicy, southwestern flavor profile.
Lemon‑Herb Delight
Add fresh lemon zest and chopped rosemary to the filling for a bright, herbaceous flavor that cuts through the richness.
Mushroom Medley
Sauté sliced mushrooms with the onions and garlic, then incorporate them into the filling for an earthy depth that pairs well with the chicken.
Bacon‑Crunch Edition
Crisp bacon bits sprinkled over the top before baking add a smoky crunch that elevates the entire dish.
Vegan Version
Replace the chicken with lentils or chickpeas, use a plant‑based butter substitute, and swap the heavy cream for coconut milk to create a hearty, plant‑based hand‑pie.
Storing and Bringing It Back to Life
Fridge Storage
Store assembled pies in an airtight container for up to 3 days. Keep them refrigerated at 40°F (4°C) to maintain freshness. When ready to serve, reheat in a 350°F (175°C) oven for 10 minutes, or until heated through.
Freezer Friendly
Wrap each pie individually in parchment and then foil before placing them in a freezer bag. They’ll stay good for up to 2 months. Thaw overnight in the refrigerator before reheating.
Best Reheating Method
Add a splash of water to the baking dish before reheating; this steams the filling, keeping it moist and preventing a dry crust. Reheat at 350°F (175°C) for 12–15 minutes, or until the internal temperature reaches 165°F (74°C).