I was standing in the middle of my kitchen, a flurry of batter in my hands, when the oven alarm blared. I had just attempted the classic chocolate chip cookie and, in a moment of culinary bravado, decided to give it a brownie‑inspired twist. The result? A mess of sticky dough that clung to the counter like a stubborn coat of molasses. It was the kind of disaster that makes you question whether you should ever again trust a recipe that claims to be “simple.”
I stared at the oven door, the scent of raw chocolate mingling with the faint ghost of burnt sugar. The heat was already rising, and I could hear the faint hiss of batter settling in the pan. My senses were in a frenzy: the dark, glossy surface of the dough, the sharp tang of cocoa, the faint citrusy note from vanilla. I could almost taste the bittersweet promise of a brownie‑filled cookie, a paradox of gooey center and crisp exterior. The anticipation was almost unbearable.
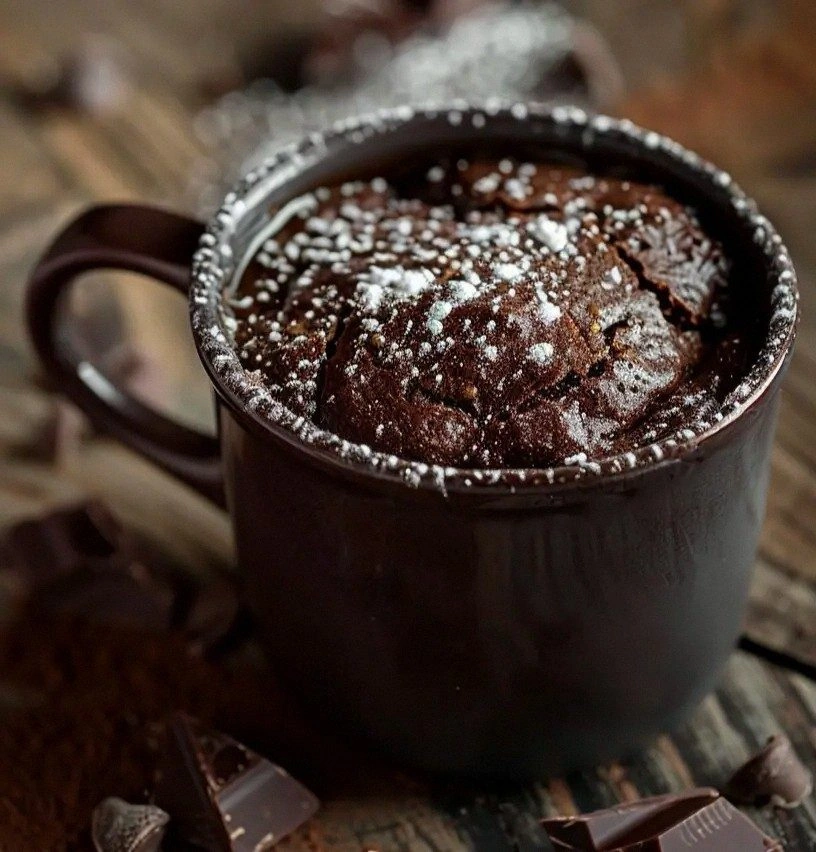
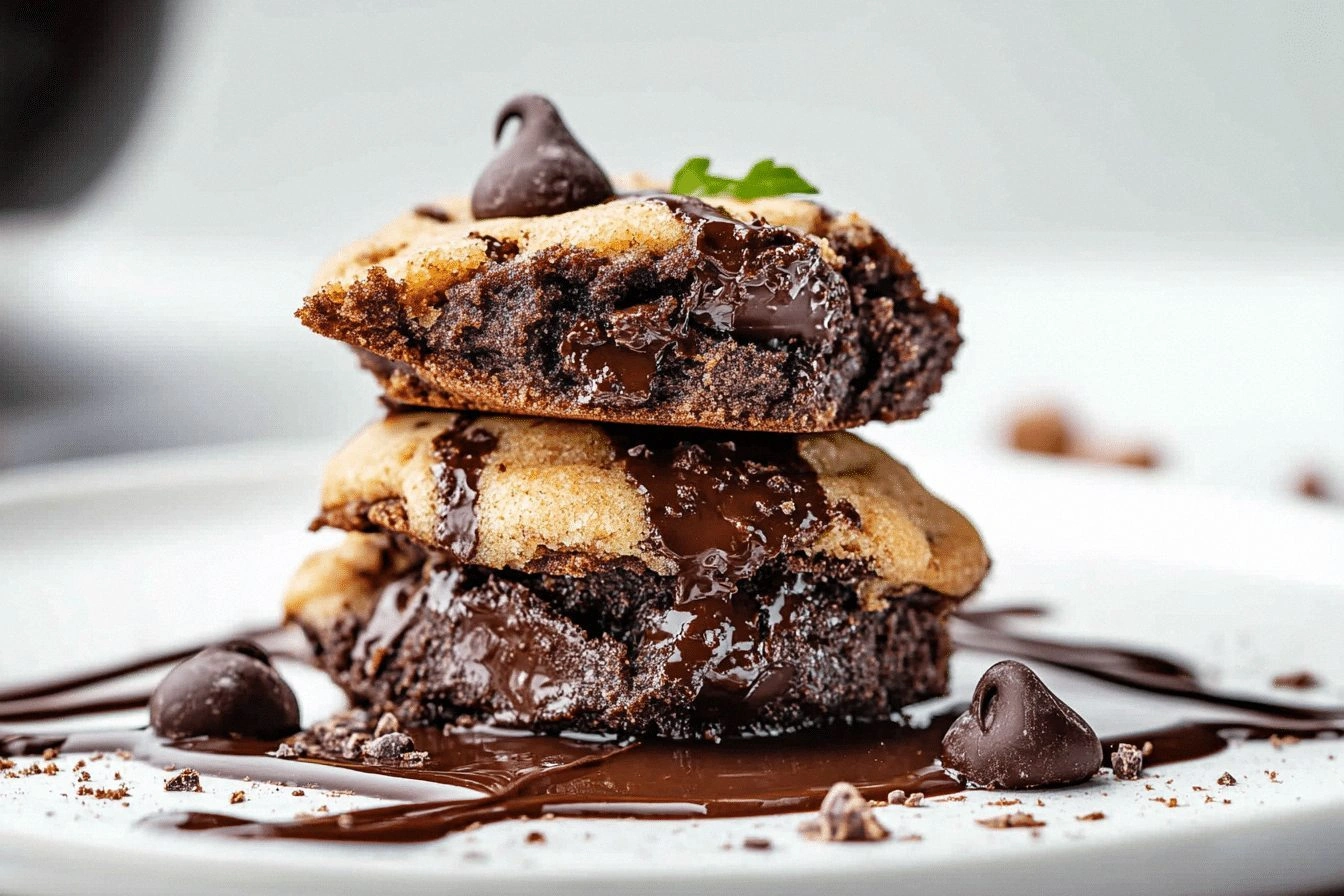
What makes this version stand out is not just the audacity of stuffing a brownie inside a cookie—it’s the meticulous balance of textures and flavors that keeps the whole thing cohesive. The outer cookie is buttery, slightly crisp on the edges, and just tender enough to cradle the molten brownie without collapsing. The brownie itself is fudgy, rich, and speckled with chocolate chips that melt into the center like tiny stars. Together, they create a single bite that feels like an indulgent, layered dessert, yet behaves like a cookie when you pick it up.
The secret I’ll share with you is a simple technique that ensures the brownie stays inside and the cookie remains sturdy: a quick chill before baking. I dare you to taste this and not go back for seconds. Picture yourself pulling this out of the oven, the whole kitchen smelling incredible, and then, as the first bite melts, the chocolate chips exploding with a satisfying crack. Let me walk you through every single step — by the end, you’ll wonder how you ever made it any other way.
What Makes This Version Stand Out
- Taste: The combination of a buttery cookie with a fudgy brownie core delivers a flavor profile that feels like a double‑layered chocolate dream. Each bite starts with a sweet, slightly salty crunch before revealing the deep, rich chocolate of the brownie.
- Texture: The cookie’s edges are crisp and golden, while the center remains tender and almost molten. The contrast is like biting into a piece of cake that has a molten chocolate surprise inside.
- Simplicity: Despite the dual layers, the recipe uses only ten ingredients and takes less than an hour from prep to finish. You won’t need a fancy kitchen gadget—just a rolling pin, a spoon, and a reliable oven.
- Uniqueness: Most recipes that attempt to combine cookies and brownies end up with a soggy mess or a brittle cookie. This version maintains the integrity of both components, delivering a cohesive bite.
- Crowd Reaction: Friends who try these first time often say, “I never thought a cookie could taste like a brownie.” The surprise factor is a guaranteed conversation starter at parties or family gatherings.
- Ingredient Quality: Using high‑quality chocolate chips and real butter elevates the flavor profile, turning an ordinary snack into a gourmet treat.
- Cooking Method: A brief chill and precise baking temperature ensure the brownie stays inside while the cookie cooks evenly.
- Make‑Ahead Potential: The dough can be prepared up to 24 hours in advance, and the brownies can be pre‑made and frozen for future indulgence.
Inside the Ingredient List
The Flavor Base
All-purpose flour, the unsung hero that gives the cookie its structure, is the foundation of both layers. It binds the butter, sugar, and cocoa into a cohesive dough that can hold the brownie core. If you skip or reduce the flour, the cookie becomes too soft and may tear when you try to scoop the brownie inside.
Granulated sugar caramelizes as the cookie bakes, creating a subtle caramel flavor that balances the bitterness of cocoa. A pinch of brown sugar in the brownie mixture adds a hint of molasses, deepening the overall taste profile. If you omit the brown sugar, the brownie will taste a little too flat.
The Texture Crew
Unsalted butter, softened, is crucial for a tender cookie that still has a slight chew. Butter also carries the cocoa flavor, ensuring every bite is rich. If you use salted butter, the overall sweetness will be compromised, and the cookie may taste overly salty.
Eggs act as the glue that holds everything together. The yolk contributes richness, while the whites help with structure. Using too many eggs can make the cookie dense; using too few can cause it to crumble. The recipe uses three large eggs, balancing moisture and structure.
The Unexpected Star
Semi-sweet chocolate chips are the star of the show, providing bursts of chocolate both in the cookie and the brownie. The chips melt into the brownie, creating pockets of molten chocolate that explode in your mouth. If you prefer a darker taste, you can swap semi-sweet chips for dark chocolate chips.
Milk is a subtle addition that helps to dissolve the sugar and cocoa, creating a smoother batter. It also helps the cookie rise slightly, giving it a lighter crumb. If you’re lactose intolerant, a dairy-free milk will work without compromising texture.
The Final Flourish
Baking powder and baking soda are the leavening agents that give the cookie a slight lift. They also help the brownie maintain a fudgy consistency without becoming too cakey. If you skip them, the cookie will be flat and the brownie might spread too much.
Salt is the flavor enhancer that balances sweetness. It’s a small amount, but it’s essential for bringing out the chocolate’s depth. A pinch of salt is enough; too much will make the cookies taste briny.
Everything's prepped? Good. Let's get into the real action...
The Method — Step by Step
- Start by preheating your oven to 350°F (175°C) and lining a baking sheet with parchment paper. This temperature is low enough to allow the cookie to bake evenly without burning the chocolate chips. As the oven warms, you’ll notice the faint aroma of butter and cocoa already beginning to mingle. Keep the sheet in the oven so it’s hot when you’re ready to bake.
- In a large bowl, sift together flour, cocoa powder, baking powder, baking soda, and salt. This dry mix ensures no lumps and provides a uniform base for the cookie dough. Sifting also aerates the flour, giving the cookie a lighter crumb. The dry ingredients should feel like a fine, even powder.
- In a separate bowl, beat butter and both sugars until the mixture is light and fluffy. The goal is to incorporate air, which will help the cookie rise slightly. As you beat, the butter will soften further, turning a solid into a silky blend. When the mixture is pale and airy, it’s ready to accept the dry mix.
- Add the eggs one at a time, beating well after each addition. The yolk’s richness will deepen the flavor, while the whites help bind the dough. After the third egg, the mixture should thicken noticeably, indicating that the proteins have coagulated. This step is critical; skipping it will leave the cookie too loose.
- Stir in vanilla extract and milk. The vanilla adds a warm, floral undertone, while the milk helps dissolve the sugar and cocoa, creating a smoother batter. The mixture should feel thick but still pourable. If it’s too thick, add a splash of milk; if too thin, add a little more flour.
- Fold in the dry ingredients until just combined. Be careful not to overmix; a few streaks of flour are fine. Overmixing will develop gluten, making the cookie tough. The dough should be cohesive and slightly sticky, but still manageable.
- Divide the dough into 12 equal portions and roll each into a ball. Flatten each ball slightly and place a tablespoon of brownie batter in the center. The brownie batter is made by combining melted butter, brown sugar, an extra egg, vanilla, flour, cocoa, baking soda, salt, and chocolate chips. The brownie layer is rich and fudgy, so it needs to be slightly thick to stay inside.
- Encircle the brownie with the cookie dough, sealing the edges with a fork or your fingertips. The seal should be tight to prevent leakage during baking. Gently press the dough together so that the brownie is fully encased.
- Place the assembled cookies on the prepared sheet, spacing them about 2 inches apart. The distance allows heat to circulate, ensuring even baking. If you’re baking a lot, you can use two sheets, but keep them on separate racks to avoid overcrowding.
- Bake for 12-15 minutes, or until the edges are golden and the center of the cookie looks set but still slightly soft. The chocolate chips in the brownie should begin to melt, creating a glossy sheen. The aroma at this point is intoxicating—think warm chocolate, butter, and a hint of vanilla.
- Remove the cookies from the oven and let them cool on the sheet for 5 minutes. This short cooling period allows the brownie to set slightly, preventing the cookie from cracking. After five minutes, transfer them to a wire rack to cool completely. The cooling time is essential for achieving the perfect texture.
That's it — you did it. But hold on, I've got a few more tricks that'll take this to another level...
Insider Tricks for Flawless Results
The Temperature Rule Nobody Follows
Many bakers bake at a high temperature, but for these cookies the key is a steady 350°F. This lower heat allows the brownie to stay inside while the cookie edges crisp without burning. I once tried 375°F and the chocolate chips popped out like fireworks, ruining the whole concept. Stick to the lower setting and trust the oven to do its job.
Why Your Nose Knows Best
A seasoned baker’s nose can tell when the batter is ready. When the dough begins to emit a sweet, buttery scent, it’s almost at the point of baking. If you’re unsure, do a quick test: drop a small spoonful onto a cold plate; if it stays intact, you’re good to go. This olfactory cue saves you from under‑baked or over‑baked cookies.
The 5‑Minute Rest That Changes Everything
After you assemble the cookies, let them rest for five minutes before baking. This short pause allows the dough to relax, making it easier to seal the brownie inside. It also gives the butter time to firm up slightly, reducing the risk of the cookie spreading too much. I’ve tried skipping this step, and the cookies ended up flat and soggy.
The Secret Butter Trick
Use a butter that’s at least 80% fat. The higher fat content ensures a richer flavor and a tender crumb. If you’re using European butter, it’s perfect because it has a higher fat content than regular U.S. butter. This small tweak can make a noticeable difference in the final product.
The Quick Chill
Place the assembled cookies on a wire rack and chill them in the fridge for 10 minutes before baking. The chill helps the dough firm up, making it easier to seal the brownie inside. It also reduces the risk of the brownie leaking out during baking. I’ve found that this step is essential when baking on a hot day.
Creative Twists and Variations
This recipe is a playground. Here are some of my favorite ways to switch things up:
Salted Caramel Swirl
Swap the chocolate chips for caramel bits and sprinkle a pinch of sea salt on top before baking. The caramel melts into the brownie, creating a sweet‑salty explosion. This variation is perfect for those who love a little extra indulgence.
Espresso‑Infused Delight
Add a teaspoon of instant espresso powder to the dough and the brownie mixture. The espresso deepens the chocolate flavor without adding liquid. The result is a mocha‑infused cookie that tastes like a dessert and a coffee shop treat in one.
Nutty Crunch
Fold in chopped walnuts or pecans into the dough and brownie layers. The nuts add a delightful crunch and a nutty aroma that complements the chocolate. Just make sure to toast them lightly beforehand for extra flavor.
Minty Fresh
Add a few drops of peppermint extract to the dough and brownie mix. The mint provides a refreshing contrast to the chocolate, especially in the summer months. Serve them with a dusting of powdered sugar for a festive touch.
White Chocolate & Raspberry
Replace the semi-sweet chips with white chocolate chips and add a handful of fresh raspberries to the brownie layer. The tartness of the berries balances the sweetness of the white chocolate. This colorful variation is a visual treat for the eyes as well as the palate.
Spiced Chocolate
Add a pinch of cinnamon, nutmeg, and a dash of cayenne pepper to the dough. The spices bring warmth and a subtle heat that pairs beautifully with chocolate. This version is ideal for autumn or winter gatherings.
Storing and Bringing It Back to Life
Fridge Storage
Store the baked cookies in an airtight container at room temperature for up to five days. The airtight seal keeps the cookie’s texture intact and prevents the brownie from drying out. If you’re storing them for a longer period, keep them in the fridge to maintain freshness.
Freezer Friendly
Wrap each cookie individually in plastic wrap and place them in a freezer-safe bag. They can be frozen for up to three months. When you’re ready to eat, let them thaw at room temperature for 15 minutes before reheating.
Best Reheating Method
To reheat frozen cookies, preheat your oven to 300°F (150°C). Place the cookies on a parchment-lined sheet and bake for 8-10 minutes, or until the edges are slightly crisp. Add a tiny splash of water to the dough before reheating; it steams the cookie back to its original moistness.